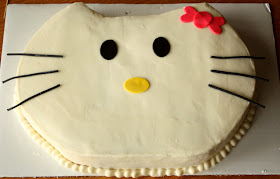
This particular cake was for a friends 6 year old daughter. My friend called and asked if I could make a Hello Kitty cake for her daughters birthday. She said that her daughter wanted the cake to be in the shape of Hello Kitty's head and the cake to be "pink velvet cake." She's a girl that knows what she likes!
This was my first Hello Kitty head cake. I hadn't really planned on sharing it here but as I was making it, I thought it was an easy fun cake that almost anyone could do and I decided to post it. It's great for a beginner cake decorator.
So here's a Hello Kitty cake tutorial, of sorts.
Materials
1 half sheet cake (you could also use a 9x13 inch cake)
3 cups of basic white buttercream frosting. (I used butter not shortening)
Fondant for bow, whiskers, eyes, and nose.
Make or buy cake. Wrap well and freeze the cake overnight. It's much easier to carve the cake while it's frozen. Freezing the cake also helps decrease the crumbs, which is very helpful when you go to frost the cake.
My cake was a basic vanilla cake dyed pink, aka pink velvet cake. If you want to go really simple, you could buy an plain, unfrosted half sheet cake from a bakery. I made my own frosting but you could use canned frosting as well.
Hello Kitty's head is pretty easy to cut out freehand. It's just an oval with ears. I didn't use a template but if you want one you can go here and download this one. You need Adobe Reader installed in your computer to download it. Or you could just Google Hello Kitty coloring pages and print the page. You may need to blow-up the picture to get the size you want for your cake.
If using a template, pin the template to the cake with toothpicks and carve around the template. I cut the corners off on the bottom of my cake. On the top of the cake I cut off a little less leaving room to cut out ears. Then I just carved off any edges that kept the cake from being oval shaped.
 | ||
| sorry this picture isn't very good, but I hope you get the general idea! |
Decorating:
I used fondant to make the bow, whiskers, eyes and nose, on my cake. If you don't want to buy fondant, you could use fruit roll-ups for the bow, jelly beans for the eyes and nose, and licorice for the whiskers.
For the bow: Pinch off a small piece of fondant. Add food gel coloring in desired color and knead until the color is incorporated into the fondant. Roll out fondant out to about 1/4 inch thickness. I used a small heart cookie cutter and a small oval cutter. I cut out 2 hearts and put the points of the heart together and put the oval over the points to form the center of the bow.
If you don't want to use fondant, you could cut a bow the same way out of fruit leather and get a similar effect.
 |
| I painted my bow with edible glitter! |
I cut the eyes and nose from small pieces of fondant but jelly beans would make a good substitution.
Place the bow, eyes, nose and whiskers on the cake. When I finished my cake I realized I should have put the eyes a lower but changing them at that point would have messed up the top of the cake.
I finished off the cake with a boarder of frosting around the bottom edge. This step is optional. Leave it off if you don't feel comfortable using a piping bag.
This Hello Kitty cake is a pretty easy, very fun project that would be great to do with the kids. The good news is, even if it isn't perfect at least you can eat your mistakes!


I have never heard of Pink Velvet Cake until now. I will have to give it a try!
ReplyDeleteI just love your hello kitty cake! She's adorable.
ReplyDeleteit's so doable, i'm shocked! that little bow might be the cutest thing i've seen all year. well done!
ReplyDeleteThis is so cute! I love Hello Kitty. :)
ReplyDeleteI love your post , a lot of graphic details.
ReplyDelete