Showing posts with label cupcakes. Show all posts

Monday, March 18, 2013

Lemon Curd Filled Bunny Ear Cakes


The recipe for the cake part of this recipe on Nigella Lawson's How to be a Domestic Goddess. She calls them  fairy cakes, which are sometimes also called butterfly cakes when the cakes have a filling and a buttercream frosting. Butterfly cakes are sort of an English version of a cupcake. I realize probably just offend all of my English readers by comparing the two! Before making this recipe and reading many heated comments from English bakers on the differences of fairy/butterfly cakes and cupcakes, I was unaware how deep the feelings ran in this debate! Yes there is a difference between an American cupcake and an English fairy cake, but you have to admit, they are kind of similar...cake baked in a muffin tin, topped with a frosting...please don't send me nasty emails! :)
Anyhoo as I was putting the "wings" on my lovely lemon curd filled cupcakes butterfly cakes, ensconced in their adorable Spring-y baking cups, it occurred to me that if I placed the pieces upright rather than on their sides, they would look like rabbit ears instead of wings. How perfect with Easter just around the corner. Ta da! Lemon curd filled bunny ear cakes! Which are nothing like cupcakes and kind of like  English butterfly cakes...either my bases are covered or I've just offended both sides of the fairy cake/cupcake debate!

Nigella's fairy cake recipe couldn't be easier to make. It only takes a few minutes to whip up the cakes and they bake in under 20 minutes. Then they're ready to be made into bunnies or butterflies, which ever suits your fancy!

Bunny Ear Cakes (Butterfly Cake)
Source: Nigella Lawson, How to be a Domestic Goddess
Yield 10-12 regular size cupcakes
Printable recipe

INGERDIENTS:
1/2 cup, (1 stick) unsalted butter, softened
1/2 cup sugar
2 eggs
3/4 cup self-rising flour
1/2 teaspoon vanilla extract
3 tablespoons milk

lemon curd, store bought or homemade

METHOD:
Preheat oven to 375 degrees.
Line a 12 cup muffin pan with paper liners.
I baked mine in these paper baking cups I had, but a muffin tin lined with cupcake liners works just as well.

Put all the ingredients except for the milk into a food processor filled with the blade and process until smooth, about a minute. Pulsing quickly, while adding the milk down the funnel till just blended. Spoon batter into muffin pan, filling about 2/3 full.
Bake for 15-18 minutes or until they are golden on top. Cool completely

With a sharp knife and cut a circle out of the top of each cake at an angle (kind of a cone shape) about 1/2 inch from the edge of the cakes.
Cut each circle in half and set aside.

Fill the cakes with about 2 teaspoons of lemon curd. Fill a piping bag fitted with a tip with the frosting. (Alternately  you can put the frosting into a zip lock bag with a hole cut into one corner, to pipe out the icing.) Pipe the frosting onto the tops of the lemon curd filled cakes. Top with the cut out pieces of the cakes. I stood them upright to look like a bunnies ears. Dust with powdered sugar. Serve immediately or keep refrigerated until served. The cakes can be stored in an airtight container in the fridge for 3 or 4 days but are best the day they are made.

Frosting

1 stick butter, room temp
2 1/2 cups confectioner's sugar
Enough heavy cream to get a cream consistency
1 teaspoon of either lemon or vanilla extract

Mix butter and sugar together in a medium bowl with an electric mixer. Gradually add in enough cream to produce the desired consistency for spreading or piping. Mix in flavoring of your choice.

Happy Easter!


Monday, September 24, 2012

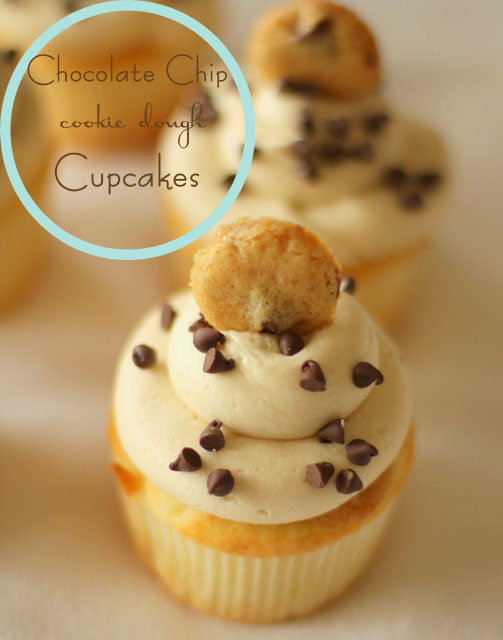
Chocolate Chip Cookie Dough Cupcakes

A couple of weeks ago I was asked to make a cupcake for someone that adores chocolate chip cookies. I did what I always do when I'm looking for inspiration and Googled it. I was shocked at how many recipes there were out there for cupcakes filled with chocolate chip cookie dough. Where have I been? Somehow I had missed this one! Anyway I made these for the birthday girl's party and have been getting requests to make these cupcakes ever since. 
They really are fantastic. The cupcake is very good and has a hidden surprise of cookie dough baked into the center. But the frosting...ooh my goodness the frosting!! It's what knocks this cupcake out of the park. It tastes just like chocolate chip cookie dough. I couldn't believe it when I first tasted it. I could just sit and eat it with a spoon, but I didn't do that. I used it frost the cupcakes. Well okay maybe, I might have snuck a couple of spoonfuls when no one was looking...maybe that happened...then possibly I licked the bowl...and the paddle attachment...
Anyway the combo of cupcake, cookie dough, and frosting make this a chocolate cookie dough lovers dream! 
  
Chocolate Chip Cookie Dough Cupcakes
source: Kevin and Amanda, slightly adapted
yield: about 2 doz

FOR THE COOKIE FILLING:
2 1/4 cups all-purpose flour
1 teaspoon baking soda
1 teaspoon salt
1 cup (2 sticks) butter, at room temp
3/4 cup sugar
3/4 cup light brown sugar
1 teaspoon pure vanilla extract
2 large eggs
1-12ounce bag chocolate chips (2 cups)
FOR THE CUPCAKES:
3 sticks softened butter
1 1/2 cups light brown sugar, packed
4 large eggs
2 2/3 cups all purpose flour
1 tsp. baking powder
1 tsp. baking soda
1/4 tsp. salt
1 cup milk
2 tsp. vanilla extract
FOR THE FROSTING:
3 sticks softened butter
3/4 cup light brown sugar, packed
3 1/2 cups powdered sugar
1/2 tsp. salt
2 tbsp. milk
1 tsp. vanilla extract
METHOD:

To make the cookie dough:
In a medium bowl, whisk the flour, baking soda, and salt. Set aside.
In the bowl of a stand mixer, at medium-low speed, mix the butter with the sugar and brown sugar. Raise the speed to medium-high and mix until creamy, light, and fluffy. Scrape down the bowl. Add the vanilla and eggs. Mix together until incorporated.
Add half of the four mixture. Mix until just combined, scrape down the bowl. Add the remaining flour mixture and mix until just combined. Stir in the chocolate chips.
Using a small ice cream/melon baller, scoop, shape the dough into balls. Freeze on a baking sheet lined with a silicon mat or parchment paper. 
To make the mini cookie topper:
Use the leftover cookie dough to make mini cookie toppers for the cupcakes. Spread all the leftover dough on a cookie sheet lined with parchment or a silicone baking mat. Try to spread it fairly evenly. Bake until the cookie is lightly browned, do not over cook. Let cool about a minute. While the cookie is still warm cut out mini cookies using a the end of a large piping tip or a mini round cutter. Do this before the cookie cools down too much or you may not be able to cut the mini cookies out.


To make the cupcakes:
Preheat the oven to 350° F. Line cupcake pan with paper liners.
In a medium bowl, combine the flour, baking powder, baking soda, and salt. Set aside. The bowl of a stand mixer, combine the butter and brown sugar. Beat together on medium-high speed until light and fluffy. Mix in the eggs one at a time, beating well after each addition and scraping down the sides of the bowl as needed.Mix in the vanilla.
Add the dry ingredients to the mixer bowl on low speed, alternating with the milk, beginning and ending with the dry ingredients, add it into the batter in thirds. Mix each addition just until incorporated.
Fill the prepared cupcake liners 2/3 full with the cupcake batter. Place a frozen cookie dough ball on the top center of each cupcake.
Bake at 350 for 16-20 mins.

To make the frosting:
Combine the butter and brown sugar in a mixing bowl and cream on medium-high speed until light and fluffy. Add in the powdered sugar, beating until smooth. Add in the salt, milk, and vanilla extract until combined.

When the cupcakes are cool, frost, sprinkle with mini chips and top with a mini chocolate chip cookie.
If you like eating cookie dough straight from the bowl, then this is your cupcake!

Thursday, November 17, 2011

Best Ever Carrot Cake Cupcakes


A few years ago I made some cupcakes for a friend and somehow that turned into a full time job! These days I make a lot of cupcakes. I'm always on the lookout for new ideas or improvements on old recipes. I had been using a carrot cake cupcake recipe from a well known cupcake cookbook, (that shall remain nameless) and it was good. Adequate...tasty enough but nothing to write home about. Earlier this week I was asked to make some carrot cake cupcakes so I started Googling recipes and came across this one. The name grabbed me right away, The Best Ever Carrot Cake Cupcakes. That was exactly what I wanted. Not just it's an okay, tastes pretty good, carrot cupcake but The Best EVER! With pineapple and applesauce in the batter, I knew these would be a super moist cupcake. I decided to top them with a cinnamon cream cheese frosting. Guess what?? These really are The Best Ever carrot cake cupcakes.
I may still look to perfect other cupcake recipes but my search for the perfect carrot cake cupcake is over.

Best Ever Carrot Cake Cupcakes

Ingredients:

4 eggs
3/4 cup vegetable oil
1/2 cup apple sauce
1 cup sugar
1 cup brown sugar
1 8-oz. can of crushed pineapple, well drained
2 teaspoons vanilla extract
2 cups all-purpose flour
2 teaspoons baking soda
2 teaspoons baking powder
1/2 teaspoon salt
2 teaspoons ground cinnamon
1/4 teaspoon ground nutmeg
Small pinch of ground cloves
3 cups grated carrots
1 cup chopped pecans

For Frosting:

1/2 cup butter, softened
8 oz. cream cheese, softened
4 cups confectioners' sugar
1/2 teaspoon vanilla extract
3/4 teaspoon ground cinnamon
Milk
Toasted pecans, chopped (optional for garnish)

Method:
Preheat oven to 350 degrees F. In a large bowl, beat together eggs, oil, apple sauce, sugars, pineapple and 2 teaspoons vanilla. Mix in flour, baking soda, baking powder, salt, cinnamon, nutmeg and small pinch of ground cloves. Stir in carrots. Fold in pecan. Line a muffin tin with cupcake wrappers. Fill each liner 3/4 full. Bake in the preheated oven for 18-20 min. Let cupcakes cool completely. While cooling, prepare frosting.

Frosting:
In a medium bowl, combine butter, cream cheese, confectioners' sugar, vanilla and cinnamon. Beat until the mixture is smooth and creamy. Add milk a tablespoon at a time, if needed to get a smooth consistency. Top with the toasted chopped pecans.

Source: Paula Deen for Smithfield


A perfect dessert for Thanksgiving!

Tuesday, May 17, 2011

Hydrangea Cupcake Bouquet Tutorial


I made this Hydrangea cupcake bouquet a couple of years ago to give as a gift to a friend for her birthday. I've been asked about how it's made many times and have finally gotten around to posting this tutorial. It's fairly simple to do but very impressive when finished. 
To make one small cupcake bouquet, you will need:

1 recipe (2-3 cups) buttercream frosting (you can use any type buttercream frosting you prefer. I used this recipe)
Violet or purple food coloring. The gel type icing coloring works best.
Pastry bag fitted with a large star tip. 
Container for your bouquet
Floral oasis or foam cut to fit the into your container
toothpicks
5-10 pieces of tissue paper cut into 4-5 inch squares


Add the violet food coloring to the buttercream but don't blend it in completely. Let some of the icing be darker and even leave some white bits. This will make your hydrangeas look variegated and more realistic. 

I used the Wilton 1M star tip. This is my go to decorating tip. I use it all the time!


Fill your pastry bag with the violet frosting and pipe stars all over the top of the cupcake. Pipe the stars very close together so that you cover the entire top of the cupcake.

I found these cute metal buckets for $1.00 at Target ! Small terracotta pots or any small flower pots work well too. Cut your floral foam to fit into your container. If you have a wide topped pot/container you may have to extra pieces to fit down into the sides. It doesn't have to fit perfectly, just make sure you have enough oasis to support your cupcakes.


Poke 2-3 toothpicks into the bottoms of you cupcakes. Two toothpicks usually does the job, but occasionally I need three to keep the cupcake in place.

Stick the tooth-picked cupcakes into the oasis in your container. Place the cupcakes as close together as possible. Fitting as many as possible around the top of the container. this will vary on the size of your cupcakes and the container you choose. I could fit 4 cupcakes on this bouquet. Don't worry that there are gaps where you can see the oasis. You will be hiding these with the tissue paper.

Grasp the tissue paper in the center of each square and twist. This will form your tissue paper "leaves". Going around the bouquet add the pieces of tissue paper anywhere you have a gap. I stick the pieces all around the edges and usually one on top. If you have a piece that won't stay in place you can secure it with a toothpick.

Voila, an edible bouquet, a great gift for almost anyone!

Tuesday, September 28, 2010

Retro 50's Housewife Shower


My youngest sister is getting married in a few weeks, so of course that means a shower must be thrown! Her wedding has a definite retro vibe and her own personal style has always been anything but traditional. With that in mind, we decided on a 50's housewife theme for her shower. The colors she's using in her wedding are aqua with touches of yellow and red. Perfect for our retro theme. Even the menu was retro. It included such classics as, pigs-in-a blanket, deviled eggs, and the piece de resistance, the sandwich loaf complete with cream cheese icing and stuffed olive decoration.


When I was trying to come up with ideas for the shower, I stumbled across the Wedding Chicks website. They have great DIY project ideas and lots of FREE customizable templates. I was able to customize the colors to match our shower.

This cute template was the inspiration for our dessert table

The "Candy Bar"
Ready to be the perfect housewife!
We asked our guests to wear their best 50's housewife dresses, aprons, and pearls. Desperate housewives??!!
Congratulations little sis!
.

Monday, August 17, 2009

Devil's food cupcakes


I recently had a birthday. At some point birthday's have gone from a highly anticipated to slightly dreaded events. I don't dread them so much because of getting older aspect but more for the fact that they mark how quickly time flies by. Every birthday I can't believe another year has slipped away and I'm another year older. Yikes when did that happen??!! The upside of course is, it's your birthday so cake and ice cream are required eating, and of course gifts are nice too. I usually get at least one cookbook for my birthday. This year I was given a copy of Martha Stewart's Cupcake cookbook. I've had a love/hate relationship with Ms. Stewart in the past. I love her ideas and she makes everything looks so easy. Remember the marshmallow peep bunnies anyone??? I was definitely not feeling the love for Martha when I was making those peeps.
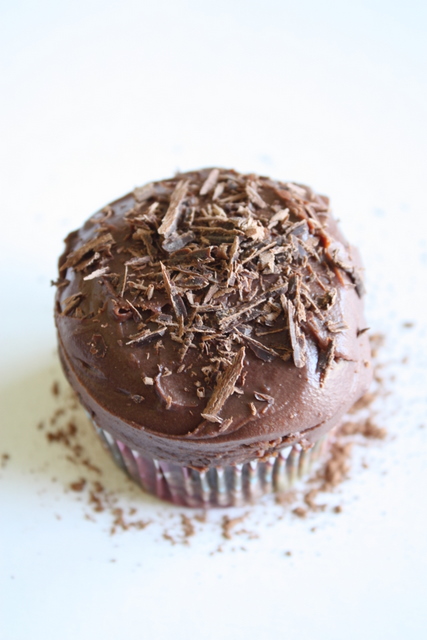
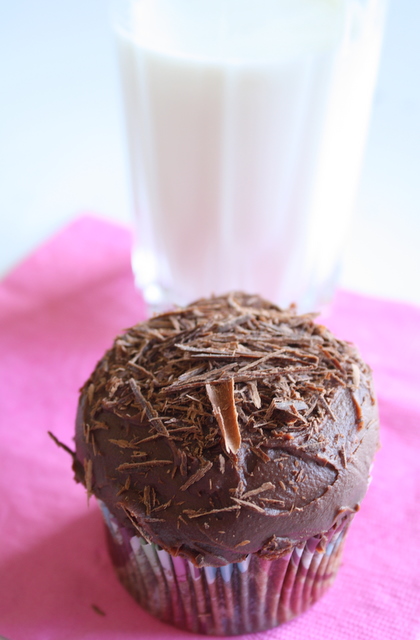
This cookbook is just cupcakes. It's a beautiful cookbook filled with great recipes and drool worthy photos. It was hard to decided which cupcakes to make first. I went with the devil's food because they were frosted with a ganache frosting and looked completely decadent. The cupcakes are very tasty but the topped with the ganache they're a chocolate lovers dream. I'm loving Martha again right now!

Devil's Food Cupcakes
Source; Cupcakes by Martha Stewart

Ingredients

3/4 cup unsweetened Dutch-process cocoa powder
3/4 cup hot water
3 cups all-purpose flour
1 teaspoon baking soda
1 teaspoon baking powder
1 1/4 teaspoons coarse salt
1 1/2 cups (3 sticks) unsalted butter
2 1/4 cups sugar
4 large eggs, room temperature
1 tablespoon plus 1 teaspoon pure vanilla extract
1 cup sour cream, room temperature

1. Preheat oven to 350 degrees. Line standard muffin tins with paper liners. Whisk together cocoa and hot water until smooth. In another bowl, whisk together flour, baking soda, baking powder, and salt.
2. Melt butter with sugar in a saucepan over medium-low heat, stirring to combine. Remove from heat, and pour into a mixing bowl. With an electric mixer on medium-low speed, beat until mixture is cooled, 4 to 5 minutes. Add eggs, one at a time, beating until each is incorporated, scraping down sides of bowl as needed. Add vanilla, then cocoa mixture, and beat until combined. Reduce speed to low. Add flour mixture in two batches, alternating with the sour cream, and beating until just combined after each.
3. Divide batter evenly among lined cups, filling each three- quarters full. Bake, rotating tins halfway through, until a cake tester inserted in centers comes out clean, about 20 minutes. Transfer tins to wire racks to cool 15 minutes; turn out cupcakes onto racks and let cool completely. Cupcakes can be stored overnight at room temperature, or frozen up to 2 months, in airtight containers.
4. To finish, use a small offset spatula to spread cupcakes with frosting. Refrigerate up to 3 days in airtight containers; bring to room temperature and garnish with chocolate curls just before serving.

Chocolate Ganache Frosting

1 pound good-quality bittersweet chocolate, finely chopped
2 1/3 cups heavy cream
1/4 cup corn syrup

Directions

1. Place chocolate in a large heatproof bowl. Bring cream and corn syrup just to a simmer over medium-high heat; pour mixture over chocolate. Let stand, without stirring, until chocolate begins to melt.
2. Beginning near the center and working outward, stir melted chocolate into cream until mixture is combined and smooth (do not overstir).
3. Refrigerate, stirring every 5 minutes, until frosting just barely begins to hold its shape and is slightly lighter in color. Use immediately (ganache will continue to thicken after you stop stirring).

Monday, December 1, 2008

Time to vote!!


The voting for this month's Iron Cupcake Earth: cranberry challenge is now open. Just click here and vote for my Ode to Fall Pumpkin Cranberry cupcakes!! Voting ends Friday Dec. 5th.


Also just a bit of news. My blog was added to Alltop! Woohoo! Alltop is an "online magazine rack" that aggregates RSS feeds about popular topics. Thanks for adding my little blog! Click here to check it out

Saturday, November 8, 2008

Ode to Fall Cupcakes


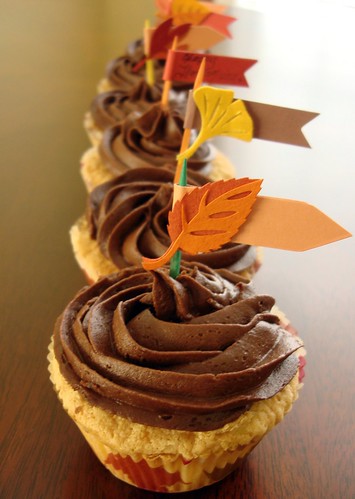
Fall here in the south has been really beautiful this year. Some years we don't get much in the way of fall color but this fall has been perfect. The early cold snap has lit the trees with glorious colors. I love walking in our neighborhood to the sound of acorns crunching underfoot and all the lawns covered in a patchwork of fallen leaves. It's so pretty. I wish that the color would hang around longer, but it's nearly gone.
So here's my ode to fall in the form of a cupcake! The cupcakes are pumpkin with pecans and dried cranberries. Then I frosted them with a rich chocolate frosting and topped with some sugared cranberries.

Pumpkin Pecan Cranberry Cupcakes

source : Shelly Kaldunski adapted

makes 12 cupcakes

1 cup all-purpose flour
1tsp baking powder
1/2 tsp baking soda
1/4 tsp salt
1 tsp ground cinnamon
1/2 tsp ground ginger
1/4 tsp ground allspice
Pinch of ground nutmeg
1 cup canned pumpkin puree
1 cup sugar
1/2 cup vegetable oil
2 lg eggs at room temp.
1/2 cup, pecans, toasted and coarsely chopped
1/2 cup dried cranberries coarsely chopped

Preheat oven to 350. Line standard 12 cup muffin pan with paper liners

In a bowl whisk together the flour, baking powder, baking soda, salt, and spices. In another bowl, whisk together the pumpkin puree, sugar, oil, and eggs. Add the flour mixture and whisk to combine completely. Stir in the pecans and cranberries.

Divide batter evenly between the prepared muffin cups, filling each about 3/4 full. Bake until a toothpick inserted into the center of a cupcake comes out clean, 22-24 minutes. Let the cupcakes cool about 5 minutes before removing from the pan. Cool completely before frosting.


CHOCOLATE FROSTING
1/2 cup (1 stick) butter softened
2/3 cup cocoa powder
3 cups powdered sugar
1/3 cup milk
1 teaspoon vanilla extract
In a mixing bowl, cream the butter. Sift the cocoa powder together with the powdered sugar. Alternately add powdered sugar and milk, beating to spreading consistency. Add small amount additional milk, if needed. Stir in vanilla. About 2 cups frosting.


This is my submission to this month's Iron Cupcake Earth Challenge: Cranberries. Click here to see all the great prizes up for grabs! There's some really cool stuff this month!

Saturday, August 2, 2008

I'm addicted to ya baby


So I guess I'm a bit addicted to food blogs. Okay more than just a bit. I mean who has over 50 Google bookmarks, all for recipes from other blogs?!? Actually all of you amazing food bloggers out there (you know who you are!!), are the cause this addiction. Tempting me with your beautiful photo's and your amazing sounding recipes. How dare you! It's like crack I tell you, as find myself adding yet another bookmark for yet another recipe I can't wait to make. And then all these recipes sit there, bookmarked and waiting, taunting me silently. MAKE ME, MAKE ME, MAKE ME! I want to make you all. Really I do! So many wonderful recipes and so little time...
Oh and not only do I want to make all these wonderful recipes, but now when I cook I spend time thinking about how to make my food so that it photographs well.
I admit it sounds a bit bizarre, possible a little crazy, but reading through other food blogs makes me pretty certain that I may not be alone in this obsession/addiction.
Anyway one of the recipes I'd bookmarked that's been hanging out waiting to be made was a recipe for Devil’s Food Cupcakes with Raspberry Jam Buttercream and Raspberry Truffle. It came from Peabody's blog Culinary Concoctions. I mean the name alone Devils Food Cupcakes... Mmm...Raspberry Jam Buttercream...OMG...AND Raspberry Truffle...Are you kidding me?!? Do those cupcakes sound amazing or what? Of course I immediately bookmarked that recipe. And there it sat, waiting patiently for me to find the time/occasion to actually make them.
Well wait no more! I had several people to make cupcakes for this week and couldn't wait to give this recipe a try.
I have just a word of warning; if you visit Peabody's blog, (and I encourage you to visit) beware, you'll be bookmarking recipes left and right. Don't say you weren't warned!

The chocolate raspberry mixture used for filling the raspberries is a basic ganache. I decided instead of filling the raspberries with the gancahe, that I would swirl the tops of the cupcakes in it and then frost them with the raspberry buttercream.

Devil's Food cake Cupcakes with Chocolate Raspberry Ganache and Raspberry Jam Buttercream


Deeply Dark Devil’s Food Cake

1 1/2 cups all-purpose flour
2 tsp baking powder
3/4 tsp baking soda
3/4 tsp salt
11 TBSP unsalted butter, softened
1 1/2 cups granulated sugar
2/3 cup Dutch-processed cocoa powder
2 large eggs
1 tsp vanilla
1 1/3 cups warm water

Preheat oven to 325F. Grease and flour mini cupcake pans.
Sift together the flour, baking soda, baking powder, and salt in a medium bowl. Mix to incorporate.
Beat the butter at medium speed until creamy. Gradually add the sugar and beat on high speed for about 3 minutes. Add the cocoa powder and beat for 1 minute. Scrape down the sides with a spatula. Beat in the eggs one at a time. Beat in the vanilla. On low speed, add the flour mixture in three additions alternating with the warm water in two additions. Scrape down the sides of the bowl and mix at low speed for 30 seconds. Pour batter into prepared pans.
Bake cupcakes for 13-15 minutes.
Let cool for 5 minutes in pan and remove cupcakes from pan. Let cool on wire rack. When cool, I swirled the tops of each cupcake in the still warm chocolate raspberry ganache. The only other change I made was to add some cream cheese to the buttercream. Just because I like cream cheese icing!

Cake Source: Adapted from The Cake Book by Tish Boyle

5 ounce semisweet chocolate
1/3 cup heavy cream
1/4cup seedless raspberry jam

Place chocolate and raspberry jam in a heat proof bowl.
Bring cream to a boil.
Pour cream over chocolate and jam and let sit for about 3 minutes.
Whisk together chocolate mixture. If it is still a little lumpy, put in microwave for a few seconds and whisk again. Dip the top of cupcakes in the chocolate. Be careful to just get the tops or ganache will run down the sides. Put cupcakes in the refrigerator for about 15 minutes or until ganache is set up. Then decorate with the Raspberry Buttercream.


Raspberry Jam Buttercream
1 cup unsalted butter, at room temperature
4oz cream cheese (optional)
6-8 cups powdered sugar
1/2 cup seedless raspberry jam

Place butter, cream cheese, and jam in a mixing bowl of an electric mixer fitted with a paddle attachment. Cream butter and jam until well incorporated, about 2 minutes. Add powdered sugar, one cup at a time until you reach desired consistency. If frosting gets too thick you can add a little milk to thin it out.

These cupcakes are sooo good. One bookmarked recipe down!

Thursday, February 14, 2008

Happy Valentine's Day


I've been up to my elbows in flour and frosting baking cupcakes for Valentine's Day and just wanted to wish you all a Happy Valentine's Day!

Sunday, January 27, 2008

Couture cupcake


I have never been the girl with just the right outfit for every occasion. You know the kind of girl the always wears the perfect shoes and has the perfect outfit for every occasion just hanging in her closet. Not me, I give it my best shot but usually just go with black. Black dress, good for most dressy occasions, nice black pants good for most semi dressy occasions and good ole jeans with a nice black sweater, top...well you get my drift. I do wear other colors but I find that my "go to" outfit is your basic black. Nothing wrong with that I suppose, but sometimes I just wish I be more like my friend N. She's got a closet full of just the right outfits for anything and the perfect shoe for every one of them.
Instead of reading the fashion magazines, and keeping up with the trends, I read cookbooks and food blogs for fun. I spend my time reading more about cupcakes than I do about couture. I was doing just that recently, reading one of my favorite cupcake blogs Cupcakes take the Cake. The blog features everything cupcake and they often interview or feature cupcake bakeries. I was going down their list of cupcake shops in the U.S. I love seeing what other people are making and how creatively they decorate their cupcakes. I came across the website for Dozen Cupcakes in Pittsburgh PA and was intrigued by their creative flavors and beautiful looking cupcakes. They have a cupcake called "Tiffany". It's aTiffany blue iced vanilla cupcake with white sprinkles. Perfect for my friend N, I thought. Living about 1000 miles from Dozen Cupcakes, I'd have to make my own. *This is the only drawback to surfing all these wonderful sites most times they're too far away to pop in and sample their goodies. So I made some vanilla cupcakes baked in silver cupcake liners and iced with a decadent cream cheese icing and gave them to her. She loved them so much that she asked me to make more for her to give as a gift. We decided to kick them up a notch and fill the cupcakes with a lemon filling. Just like a box from Tiffany's...blue and white on the outside with a surprise on the inside! I may never be the girl with perfect shoe for every occasion, but maybe I have the perfect cupcake for those girls:)
To make these cupcakes, use your favorite vanilla cupcake recipe. Martha Stewart's Vanilla Cupcakes is a nice basic vanilla cupcake. I'm aways trying out new recipes looking for the perfect one...kind of like the perfect shoe?!
For the cream cheese frosting, I used my favorite recipe. It's from "The Joy of Cooking" It so easy and it can be made in your food processor!
Cream Cheese Frosting
about 2 cups
Combine in food processor, and pulse until smooth and creamy:
8 oz cold cream cheese
6 Tablespoons unsalted butter, softened
2 teaspoons vanilla
3 cups confectioner's sugar, sifted
If frosting is too thick pulse a few seconds longer. Don't over process or it'll will be too soft and be difficult to decorate with.

Saturday, December 29, 2007

In search of red velvet perfection


Growing up in Pennsylvania in a Pennsylvania Dutch family I had never eaten or even seen, that I recall, Red Velvet cake. I'm sure it was out there, somewhere, but no where in my world. Then we moved to the South. Here in Lower Alabama Red Velvet cake is practically a staple food item. It shows up everywhere and is always greeted with delight. I remember the first time I tasted Red Velvet cake. I was about ten years old, and it was a discovery of pure delight! I loved everything about it. The cake was impressively tall, at least three layers, and moist with cream cheese icing full of pecans. And the color... vibrant Christmas red. I was instantly in love! My mother however, did not share these sentiments. We rarely, almost never, had any foods with food coloring in them, much less a cake made with a whole bottle of the stuff. Mom never made it for us, but I knew the cake would be a part of any gathering we went to, especially any church function. As an adult, I out grew of my love for the red confection and had never made the cake myself. I was recently asked to make cupcakes for a Christmas party. I wanted to make something festive and thought how cute red velvet cupcakes would be. Having never made the cake myself, I didn't have a tried and true recipe of my own. My back up plan is usually to call Mom. That was out in this case. So I searched my cookbooks and the internet. I first tried a recipe from the Joy of Cooking. It was pretty good, but not as moist as I would have liked. I thought this may be becuase I was using a cake recipe and need to use a recipe that stayed moister for cupcakes. On my second attempt, I almost made Paula Deen's recipe for but was a bit put off by the 1 1/2 cups of vegetable oil. I was hoping to find a recipe using butter. I came across this recipe on recipezaar. It used butter instead of oil, so I decided to give it a try. However, I gasped in horror at the 2 ounces of red food coloring. That's two whole bottle's of red dye...Yikes!!! So instead I used 2 TBL of food coloring. It seemed like plenty to me. The batter was very red. These cupcakes were pretty good as well but not as flavorful as I would have liked. Maybe all that food coloring is the key?!
The cream cheese frosting however, was great. I made it in the food processor. It's a super quick and really good recipe from The Joy of Cooking. It's great for decorating with although it does get a bit soft and needs to be put back in the fridge to set up again. I had fun decorating the cupcakes and used them for several parties I catered during the holidays.


But I'm still searching for that red velvet cake I remember from my youth. Next time I may give Paula Deen's recipe a try, after all she's the grande dame of Southern cooking.
Cream cheese frosting recipe
Food processor method:
8 ounces cold cream cheese
6 TBL unsalted butter, softened
2 teaspoons vanilla
3 cups confectioner's sugar
Combine in food processor and pulse just until smooth and creamy.