Monday, September 24, 2012

Chocolate Chip Cookie Dough Cupcakes

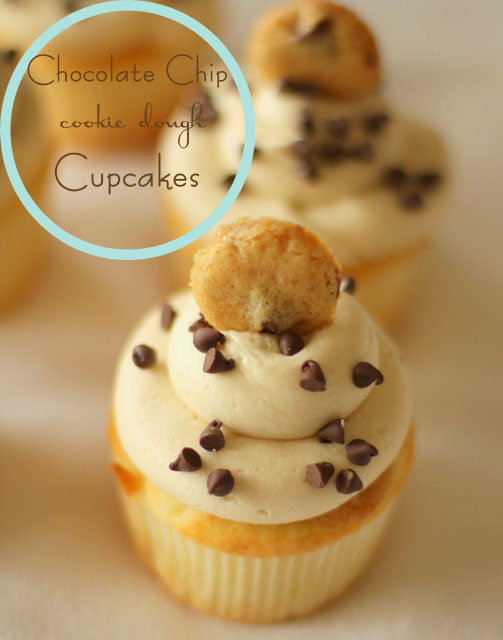
A couple of weeks ago I was asked to make a cupcake for someone that adores chocolate chip cookies. I did what I always do when I'm looking for inspiration and Googled it. I was shocked at how many recipes there were out there for cupcakes filled with chocolate chip cookie dough. Where have I been? Somehow I had missed this one! Anyway I made these for the birthday girl's party and have been getting requests to make these cupcakes ever since. 
They really are fantastic. The cupcake is very good and has a hidden surprise of cookie dough baked into the center. But the frosting...ooh my goodness the frosting!! It's what knocks this cupcake out of the park. It tastes just like chocolate chip cookie dough. I couldn't believe it when I first tasted it. I could just sit and eat it with a spoon, but I didn't do that. I used it frost the cupcakes. Well okay maybe, I might have snuck a couple of spoonfuls when no one was looking...maybe that happened...then possibly I licked the bowl...and the paddle attachment...
Anyway the combo of cupcake, cookie dough, and frosting make this a chocolate cookie dough lovers dream! 
  
Chocolate Chip Cookie Dough Cupcakes
source: Kevin and Amanda, slightly adapted
yield: about 2 doz

FOR THE COOKIE FILLING:
2 1/4 cups all-purpose flour
1 teaspoon baking soda
1 teaspoon salt
1 cup (2 sticks) butter, at room temp
3/4 cup sugar
3/4 cup light brown sugar
1 teaspoon pure vanilla extract
2 large eggs
1-12ounce bag chocolate chips (2 cups)
FOR THE CUPCAKES:
3 sticks softened butter
1 1/2 cups light brown sugar, packed
4 large eggs
2 2/3 cups all purpose flour
1 tsp. baking powder
1 tsp. baking soda
1/4 tsp. salt
1 cup milk
2 tsp. vanilla extract
FOR THE FROSTING:
3 sticks softened butter
3/4 cup light brown sugar, packed
3 1/2 cups powdered sugar
1/2 tsp. salt
2 tbsp. milk
1 tsp. vanilla extract
METHOD:

To make the cookie dough:
In a medium bowl, whisk the flour, baking soda, and salt. Set aside.
In the bowl of a stand mixer, at medium-low speed, mix the butter with the sugar and brown sugar. Raise the speed to medium-high and mix until creamy, light, and fluffy. Scrape down the bowl. Add the vanilla and eggs. Mix together until incorporated.
Add half of the four mixture. Mix until just combined, scrape down the bowl. Add the remaining flour mixture and mix until just combined. Stir in the chocolate chips.
Using a small ice cream/melon baller, scoop, shape the dough into balls. Freeze on a baking sheet lined with a silicon mat or parchment paper. 
To make the mini cookie topper:
Use the leftover cookie dough to make mini cookie toppers for the cupcakes. Spread all the leftover dough on a cookie sheet lined with parchment or a silicone baking mat. Try to spread it fairly evenly. Bake until the cookie is lightly browned, do not over cook. Let cool about a minute. While the cookie is still warm cut out mini cookies using a the end of a large piping tip or a mini round cutter. Do this before the cookie cools down too much or you may not be able to cut the mini cookies out.


To make the cupcakes:
Preheat the oven to 350° F. Line cupcake pan with paper liners.
In a medium bowl, combine the flour, baking powder, baking soda, and salt. Set aside. The bowl of a stand mixer, combine the butter and brown sugar. Beat together on medium-high speed until light and fluffy. Mix in the eggs one at a time, beating well after each addition and scraping down the sides of the bowl as needed.Mix in the vanilla.
Add the dry ingredients to the mixer bowl on low speed, alternating with the milk, beginning and ending with the dry ingredients, add it into the batter in thirds. Mix each addition just until incorporated.
Fill the prepared cupcake liners 2/3 full with the cupcake batter. Place a frozen cookie dough ball on the top center of each cupcake.
Bake at 350 for 16-20 mins.

To make the frosting:
Combine the butter and brown sugar in a mixing bowl and cream on medium-high speed until light and fluffy. Add in the powdered sugar, beating until smooth. Add in the salt, milk, and vanilla extract until combined.

When the cupcakes are cool, frost, sprinkle with mini chips and top with a mini chocolate chip cookie.
If you like eating cookie dough straight from the bowl, then this is your cupcake!

Wednesday, September 12, 2012

Apple Cinnamon Pull-Apart Bread


Lately I've come across several recipes for pull-apart breads. I've had several recipes bookmarked and have been meaning to make a loaf but always seem to put it off. There was a picture for this cinnamon apple pull-apart bread in the King Arthur Flour catalog that came in the mail yesterday. It was the first one I've seen that had apples in it and I had to have it. Now! 
I'm not sure what I really need to say about this pull apart bread. Just look at it! It speaks for itself...and it's saying "you know you want me!" There are several steps involved in making the bread but it's completely worth the extra effort. Seriously what's not to like about apples, cinnamon, and pecans, baked up into sweet dough? All that's missing is a cup of coffee.


Cinnamon Apple Pull Apart Bread
Yield: 1 loaf, about 12 to 15 servings. 
PRINTABLE RECIPE

For the filling:
2 tablespoons unsalted butter
1/2 cup packed brown sugar
1 tablespoon ground cinnamon
1/2 teaspoon vanilla extract
3 medium apples (about 2 cups), peeled, cored, and thinly sliced
1/2 cup pecans or walnuts, chopped (optional)

For the dough:
1/4 cup (4 tablespoons) unsalted butter, melted
1/3 cup lukewarm milk
1/4 cup lukewarm water
2 large eggs
1 teaspoon vanilla extract
3 cups King Arthur Unbleached All-Purpose Flour
1/4 cup sugar
1/2 teaspoon salt
2 1/4 teaspoons instant yeast

For the glaze:
1 cup powdered sugar
1 tablespoon milk
mix both ingredients together in a small bowl. Add more milk if necessary to get desired consistency. I like it to be the consistency of a thick syrup.

To make the dough:
Whisk together the butter, milk, water, eggs, and vanilla extract.
In the bowl mixer, mix together the flour, sugar, salt, and yeast, then add the wet ingredients. Using the dough hook attachment mix and knead, until the dough is smooth. The dough will be quite soft. If it seems too dry add a little water, if it seems too sticky add just a little flour, up to a 1/4 cup.
Place the dough in a lightly greased bowl, cover, and allow to rest until doubled in size, about 1 hour.
Grease a 9" x 5" loaf pan.
Gently deflate the dough and turn it out onto a lightly greased surface.*  Roll the dough into a 12" x 20" rectangle.
Stir the vanilla into the melted butter. Spread the butter mixture over the entire top on the dough, Use a pastry brush to get the butter even spread over the surface of the dough. Sprinkle the brown sugar over the top, using your hand to spread it evenly over the butter. Sprinkle the cinnamon evenly over the dough. Add the apples, on top of the cinnamon and sugar and sprinkle on the nuts, if using.
Cut the dough crosswise into six 3 1/2" x 12" strips. Stack the strips on top of one another. Cut the stack into six pieces, about 2" x 3 1/2" each. This part is a little messy but it doesn't have to be perfect.
Turn the pieces on edge, and place them in the loaf pan one in front of the other from one end of the pan to the other, squeezing them in tight. I sprinkled any nuts or apples that had fallen off over the top of the dough after I put it into the pan.
Cover the pan and allow the loaf to rise for 30 to 60 minutes, until it's almost doubled in size. While the loaf is rising, preheat the oven to 350°F.
Bake the loaf for 45 to 55 minutes in the center of the oven, tenting it with foil after 30 minutes. Remove the loaf from the oven, and transfer it to a rack to cool for 15 to 20 minutes before turning it out of the pan to cool completely.
While still slightly warm, spoon the glaze over the top of the bread.
Roll the dough into a 20"x 12" rectangle 
Add the filling
Slice crosswise into six even pieces
Stack the pieces on top of one another.
Slice the stack into six pieces.
Turn the pieces on their side and put them into the bread pan.
*Notes: I lightly sprayed a non-stick mat with cooking spray.
I kind of diced up my apples but after making the bread, I think sliced apples would be easier to keep on the pieces of dough as you stack them. (Which is what the recipe stated but I like to do things my aka the hard way!)
The long pieces are hard to move on top of one another. I kind of rolled the ends of each slice inward toward the center to make them easier to pick up to move. I had to spread the nuts and apples back into place but it made it easier for me to get the pieces stacked. Don't freak out if your apples and nuts fall off (they will!) just put them back on the dough after you've moved it onto the stack. (Hopefully these instructions will make sense when your actually making the bread!) I cooked mine the full 55 minutes. I probably could have taken it out at about 50 minutes.
There's no need for a knife with this bread. It really does just pull apart!

Friday, September 7, 2012

Butterscotch Pudding with Salted Buttered Pecans


I always feel at odds this time of the year. Labor Day is passed, schools back in session, and football season has started.Time for bonfires, bowls of chili, pumpkins, and all things Fall, right? Except that technically it's still summer for a couple more weeks, and here in Alabama it's still hot, like 90 degrees outside hot. It's that weird in-between seasons time. I can never decided what to wear. Too hot for jeans, not supposed to wear white anymore... mostly I stand staring at my closet hoping some perfect transitional outfit will suddenly appear.
Lately I've been feeling the same way about food. All the summery foods are still in season, but I'm ready for a change. I want the flavors of Fall, but it's still just plain too hot to even think about making much less eating, a big bowl of chili or hanging out by a bonfire. I tend to stand looking in the fridge the same way I look in the closet, just hoping to suddenly find the perfect in-between food. Of course this never happens in the closet or the fridge...
I think this butterscotch pudding is the perfect in-between dessert. It's cold which is what I want in this heat, but it's got a wonderful rich caramel flavor which satisfies my craving for Fall. Topped with a dollop of whipped cream and some salted buttered pecans, it's just what I was hoping for while staring into the fridge...now if I could just find the right outfit!

Butterscotch Pudding
source: David Lebovitz
serves 4-6
PRINTABLE RECIPE:

INGREDIENTS:
4 tablespoons butter
1 cup packed dark brown
3/4 teaspoon kosher salt
3 tablespoons cornstarch
2 1/2 cups whole milk
2 large eggs
2 teaspoons bourbon (optional)*
1 teaspoon vanilla extract

METHOD:
 Melt the butter in a medium heavy bottomed pan. when melted, stir in the dark brown sugar and salt, stir until the sugar is well-moistened. Remove from heat.
 In a small bowl, whisk together the cornstarch with  1/4 cup of the milk until very smooth, then whisk in the eggs.
Gradually pour the remaining milk into the melted brown sugar, whisking constantly. Whisk in the cornstarch mixture.
Return the pan to the heat and bring the mixture to a boil, whisking frequently. Once it begins to bubble, reduce the heat to a low simmer and continue to cook for one minute, whisking until the pudding thickens up. If the pudding seems to have a curdled look, don't freak out! Blend the pudding in batches in a blender or pass it through a medium mesh sieve and it'll be fine. I almost always put puddings and curds through a sieve just to get out any little egg-y pieces that may be in them.
Pour the pudding into 4-6 serving glasses or custard cups and chill thoroughly, at least four hours, before serving. Just before serving, top with sweetened whipped cream and some of the salted buttered pecans.*You don't have to add the bourbon, but if you do, you'll never want to butterscotch pudding without it again, trust me!

Salted Buttered Pecans
1 tablespoon butter
1/4 cup pecans, chopped
1/4 teaspoon course sea salt

Melt the butter in a small pan. Stir in the pecans cooking for about 2 minutes until the pecans are evenly coated with the butter. Remove from the heat and sprinkle the sea salt over the pecans.


I've linked this post to: I'm Lovin' It at TidyMom

Monday, August 27, 2012

Hurricane Survival Brownies


You may have heard there's a storm a-brewn' out in the Gulf of Mexico. I live in the Southeast corner of Alabama, just over an hour from the Florida coast. Hurricanes are pretty much a fact of life around here. We track them, keep a stash of batteries and bottled water on hand, and reminisce about Camille, Opal, and Katrina every time a hurricane starts making it's way toward us. The only good thing about a hurricane headed your way, (if there is such a thing) is that you get plenty of warning that it's coming. This gives us time to batten down the hatches and make plans to make due with possible power outages, road closings, etc for a period of time. I've shared with you here how my mother always whips up a batch of emergency cookies/brownies whenever a hurricane is headed our way. This morning I decided I needed to make some brownies, "just in case". In case of what, I'm not sure. Possible baked good deprivation, I guess! I called my mom to make sure they were prepared to ride out the weather and mentioned that I'd just made a batch of brownies. She informed me that she had just pulled a batch of brownies out of the oven as well and had them cooling on the counter. So yes, we're all prepared for Isaac.
This is probably my favorite brownie recipe. It's rich and fudge-like. Topped with the peanut butter frosting they are down right addictive! These brownies are fantastic whether or not a hurricane is headed your way. So don't wait for emergency weather to whip up a batch.

I've got my hurricane survival kit all ready to go!

Best Cocoa Brownies with Peanut Butter Frosting
Printable Recipe

Source: Epicurious  | November 2003
Alice Medrich (adapted)

Source:
10 tablespoons unsalted butter
1 1/4 cups sugar
3/4 cup plus 2 tablespoons unsweetened cocoa powder (natural or Dutch-process)
1/4 teaspoon salt
1 teaspoon espresso powder
1/2 teaspoon pure vanilla extract
2 cold large eggs
1/2 cup all-purpose flour
1/2 cup chocolate chips (optional)


Position a rack in the lower third of the oven and preheat the oven to 325°F. Line the bottom and sides of the baking pan with parchment paper or foil, leaving an overhang on two opposite sides.
Combine the butter, sugar, cocoa, espresso powder, and salt in a medium heatproof bowl and set the bowl in a wide skillet of barely simmering water. Stir from time to time until the butter is melted and the mixture is smooth and hot to the touch. Remove the bowl from the skillet and set aside briefly until the mixture is only warm, not hot.
Stir in the vanilla with a wooden spoon. Add the eggs one at a time, mixing well after each one. When the batter looks thick, shiny, and well blended, add the flour and stir until incorporated, then beat vigorously for 40 strokes with the wooden spoon or a rubber spatula. Stir in the chocolate chips, if using. Spread evenly in the lined pan.
Bake until a toothpick plunged into the center emerges slightly moist with batter, 20 to 25 minutes. Let cool completely on a rack.
Spread peanut butter icing over the top of the brownies.
Lift up the ends of the parchment or foil liner, and transfer the brownies to a cutting board. squares.

Peanut Butter Cream Cheese Frosting

Ingredients:
1/2 cup peanut butter
3 ounces cream cheese
3 tablespoons milk
1 tsp vanilla
1 1/2 tablespoons unsalted butter
2 1/3 cups confectioner's sugar

In a mixing bowl, mix peanut butter, cream cheese,a and butter together until smooth. Mix in confections sugar, milk, and vanilla. Mix until smooth adding more milk  if necessary.

If I have to evacuate, I'm taking the brownies!


Tuesday, August 21, 2012

Lemon-less Brazilian Lemonade


A few years ago hubs and I took a vacation to Barbados. During one particularly hot day of sightseeing, we came across a street vendor selling shaved ice type drinks. I ordered a lemon ice and was shocked when he pulled out a can of sweetened condensed milk and poured it all over the top of the ice along with the lemon syrup. This was not at all what I expected when I ordered the shaved ice. I was pretty sure that there was no way this shaved ice was going to be refreshing and probably not taste very good either. Happily, I was wrong and the shaved ice was both tasty and refreshing. I'd thought about trying to recreate it when we got home from Barbados, but since shaved ice isn't something that can really be done at home, I never did. Recently I found this recipe  for Brazilian lemonade. It was made up of the same basic components as the shaved iced so I knew it would be similar to what we'd had in Barbados and I couldn't wait to try it. I think it's even better than the shaved ice. Tart and creamy, kind of like a liquid key lime pie. The perfect party drink for a Labor Day cookout. 
As you can see from the recipe and may have gathered from the title of this post, there are no lemons in this lemonade. You may find that as shocking as the addition of the condensed milk. I guess in Portuguese lemons and limes have the same name? I'm not sure about the origins of the name but who cares what it's called when it tastes this good!

 
Brazilian Lemonade
Source: Allrecipes.com

INGREDIENTS:
2 limes
1/2 cup sugar
3 tablespoons sweetened condensed milk
3 cups water
ice
DIRECTIONS:
Be sure to buy limes that are very ripe and have thin skins. Limes with thick skins will make the drink very bitter. Wash limes thoroughly. Cut off the ends and slice into eight wedges. Place limes in a blender with the sugar, sweetened condensed milk, water, and ice. I used a couple of glasses full of ice.
Blend in an electric blender, pulsing several times. Strain through a fine mesh strainer to remove rinds. Serve over ice.
Call it lemonade or limeade...I call it delicious!

Tuesday, August 7, 2012

Molten Deep-Dish Chocolate Chip Cookies


I clearly remember my first experience with a molten chocolate cake. It was at a high-end restaurant in the 90's. I had to order it when I placed my dinner order if I wanted it for dessert. The waiter waxed poetic about it at length and of course I ordered one. When it came to the table I thought it looked nice but rather ordinary, then I cut into the center. Oh my, I think I heard angels sing! It was divine. The cake seemed somehow to be more than the sum of it's parts. There's something pretty wonderful about cutting into your dessert and having a warm chocolaty center ooze out.

Hot from the oven homemade chocolate chip cookies are one of my favorite things in the world. They are definitely near the top of my all-time favorite desserts. Possibly the only way to improve on a chocolate chip cookie is for a them to have a warm oozy chocolaty center.


These cookies are as easy to make as regular chocolate chip cookies. They are just baked in a ramekin instead of on a cookie sheet. The recipe for the cookies is the one I always use for my chocolate chip cookies. It's a pretty standard recipe, I got it from the back of the Ghirardelli semi-sweet chips bag. Just place a square of chocolate candy between two layers of cookie dough, bake, and I'll bet you'll be hearing angels sing too!


Molten Deep-Dish Chocolate Chip Cookies
Source: Kosher by Design - Teens and 20-Somethings, by Susie Fishbein

2  1/4 cups all-purpose flour
1 teaspoon baking soda
1 teaspoon salt
1 cup (2 sticks) butter, at room temp
3/4 cup sugar
3/4 cup light brown sugar
1 teaspoon pure vanilla extract
2 large eggs
1-12ounce bag chocolate chips (2 cups)
1 (4-ounce) good-quality semisweet or milk chocolate bar, broken into pieces along score lines. ( I used ghirardelli semi-sweet chocolate bar.)

Method:
Preheat oven to 350 degrees.
In a medium bowl, whisk the flour, baking soda, and salt. Set aside.
In the bowl of a stand mixer, at medium-low speed, mix the butter with the sugar and brown sugar. Raise the speed to medium-high and mix until creamy, light, and fluffy. Scrape down the bowl. Add the vanilla and eggs. Mix together until incorporated.
Add half of the four mixture. Mix until just combined, scrape down the bowl. Add the remaining flour mixture and mix until just combined. Stir in the chocolate chips.
Spray 6-ounce ramekins with nonstick cooking spray.
Fill each ramekin a quarter of the way with a large, golf-ball-size ball of cookie dough. Flatten to cover the bottom. Add 1 or 2, (depends on the size of the chocolate squares in the chocolate bar you use) chocolate squares in the center of the cookie dough. Cover with a second walnut-sized ball of cookie dough, flattening it to completely cover the chocolate.

Place onto a cookie sheet and bake until the tops are golden brown. Do not overbake or the end result will not be gooey. The baking time will vary from 20-25 minutes depending on the size of the  ramekin and the amount of dough you used. You can serve the cookies in the ramekins or flip them out onto individual plates. Serve warm.
Yields: about 8 6-ounce ramekins. Leftover cookie dough can be baked into regular chocolate chip cookies.

I'm Lovin' It at TidyMom http://tidymom.net/2012/nyc-pistacchio-gelato/ Come join the party!

Tuesday, July 24, 2012

Pie is the new cupcake?

I've read articles recently both from the Washington Post and the New York Times that have proposed that pie is the new cupcake. NPR declared the cupcake dead and put pie on its throne. Never fear cupcake lovers, your beloved little cakes aren't going anywhere. They just have a little competition for dessert supremacy from the lowly pie. Hand pies just may have a shot at beating out the cupcake. I have to admit, the hand pie has won my heart. Hand pies are a smaller, portable version of a pie, much like a cupcake is to a cake. However rather than frosting, its delicious filling is ensconced in a flaky, buttery crust. For me, a good pastry crust trumps frosting any day.

This month Half Baked turned 5! I can't believe it's been 5 years since I started this little blog. My own birthday is also just a couple days away. How better to celebrate than with some hand pies! I really love cherries so I filled the pies with a sweet cherry filling....move over cupcake, there's a new kid in town!


Cherry Hand Pies
Yield: about 6 hand pies
Printable recipe
FOR THE CRUST:
1 1/4 cups all-purpose flour
1/2 teaspoon salt
2 teaspoons sugar
1/2 cup(1stick) cold butter, cut in small pieces
1/8 cup shortening- chilled
3 to 4 tablespoons ice cold water

Put the flour and salt in the bowl of a food processor and pulse a few times to combine. Scatter the pieces of butter and shortening over the dry ingredients and pulse until it is coarsely cut in-you should have pieces the size of oatmeal flakes and some the size of peas. Drizzle the water over the mixture. Using on/off pulses, pulse just until the dough holds together when pinched. Turn dough out onto a lightly floured surface. Form into a disk, wrap with plastic wrap and chill for at least one hour.

FOR THE FILLING:

8 ounces fresh or frozen sweet cherries, pitted and roughly chopped
2 tablespoon sugar
1/4 teaspoon almond extract
1 teaspoon lemon juice
1 1/2 tablespoons cornstarch

Preheat oven to 375°

Pit and roughly chop the cherries. Place in a bowl and add the sugar, almond extract, lemon juice, and corn starch. Mix well and set aside.
On a lightly floured surface, roll out the pastry dough to about 1/4 inch thick. Using a 4 inch cutter cut out circles. (I got five 4 inch and 1 smaller circle out of my dough) Place the cut out pieces of dough onto a rimmed baking sheet lined with parchment or a silicone mat.

Place about 2 tablespoons of the cherry mixture onto one-half of each round. Lightly brush a little milk around the edge of the covered half of each round. Fold remaining dough over to enclose, forming a half moon. Gently press edges together with the tines of a fork to seal. Brush the tops of each pie with milk. Using a paring knife, slash the top of each pie.
Bake until golden brown, 25 to 30 minutes. Transfer pies to a wire rack to cool slightly before serving. Dust with powdered sugar. Pies can be stored in an airtight container at room temperature up to 3 days.
*NOTE: I used Rainer cherries because they are my favorite but Bing cherries are great too.You could also use sour cherries if you want, just add a little more sugar to the filling.

Just in case you thought that having pie meant you'd have to sacrifice your sprinkles, who says you can't have sprinkles on your pie? Just top the hand pie with a powdered sugar glaze and add sprinkles. Be afraid cupcakes, be very afraid!