

Monday, December 24, 2012
Friday, December 21, 2012
White Chocolate Peppermint Popcorn
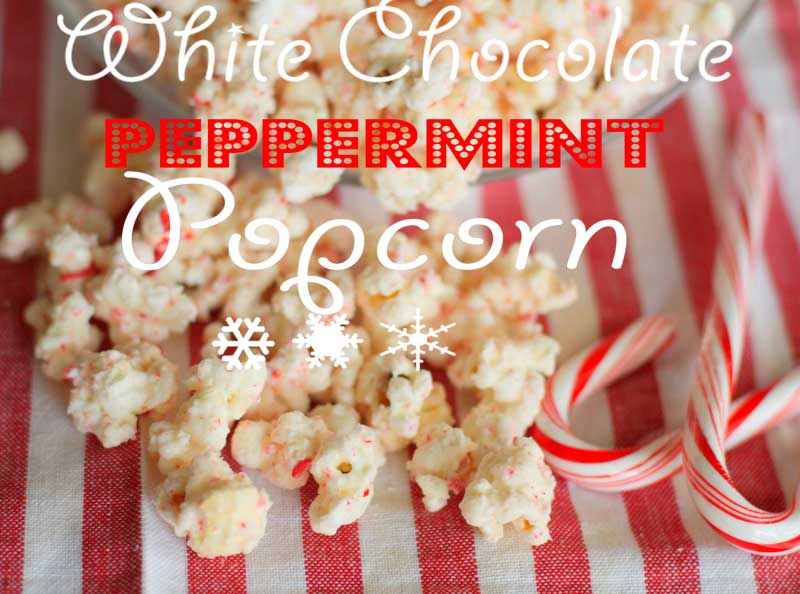

White Chocolate Peppermint Popcorn
INGREDIENTS:
16 oz. white chocolate chips or candy melts
1/2 -3/4 cup finely ground peppermint candies
4 quarts of popped popcorn (about 1/2 popcorn or two bags of microwave popcorn, with no butter)
1 1/2 teaspoon kosher salt, if popcorn is unsalted
METHOD:
Place candy canes or peppermint pieces into the bowl of a food processor fitted. Process until the candy is very well ground up.

Melt white chocolate in microwave, at 30 second intervals, stirring until smooth.
Place popped popcorn in large bowl. Mix half of the ground peppermint candies into the melted white chocolate. Pour the white chocolate peppermint mixture onto the popcorn. Stir well.
Sprinkle on the remaining half of the crushed peppermint and mix it into the popcorn.
Pour onto wax paper lined baking sheet or silicon mat.

Allow the white chocolate to set up. When hardened, break apart.
Store in airtight container.
 |
This blog post is linked to these link parties:
Tidy Mom: I'm loving it Friday's
Simply Designing
Wednesday, December 12, 2012
German Chocolate Cookies

 |
| German chocolaty goodness! |
German Chocolate Cookies
No-Chill Sugar Cookies
Source: The Adventures of Sweet Sugar Belle (adapted)
Yield: about 2 dozen 2-in. sandwich cookies
Ingredients:
1 cup (2 sticks) unsalted butter, softened
1 1/2 cups confectioner's sugar
1 egg
1 teaspoons vanilla extract
1/2 teaspoon coconut extract
2 3/4 cups all-purpose flour
2 teaspoon baking powder
1 teaspoon salt
Method:
Preheat oven to 350ºF.In large bowl, beat butter and sugar with electric mixer until light and fluffy. Beat in egg and extracts. Mix flour, baking powder and salt; add to butter mixture 1 cup at a time, mixing after each addition. Do not chill dough. Divide dough into 2 balls.
On floured surface, roll each ball into a circle approximately 12 in. diameter x 1/8 in. thick. Using a 2 inch round cutter, cut out as many cookies as possible. Dip cookie cutter in flour before each use. Bake cookies on ungreased cookie sheet 8-11 minutes or until cookies are lightly browned.
German Chocolate Filling
source: Taste of the South Dec 2012
INGREDIENTS:
4 oz semi- sweet chocolate chips
1/2 cup shredded coconut
1/4 cup chopped pecans (optional)
1/3 cup heavy cream
2 Tablespoons unsalted butter
Place chocolate, nuts, and coconut in a small bowl. Set aside. In a small sauce pan butter and cream. Bring to a boil. Remove from heat and pour over the chocolate mixture. Stir until the chocolate is melted. Allow to cool to room temperature.
Put about 1 teaspoon chocolate coconut filling on the flat side of one cookie, and top with another cookie to make a sandwich. Sprinkle the tops of the cookies with confectioners sugar. Can be stored up to one week in an airtight container.

Monday, December 3, 2012
Pepper Jelly Thumbprint Cookies

Made with green and red pepper jelly these cookies look so festive for the Christmas season. They will make a great addition to your Christmas cookie baking. Trust me they will be a hit at your cookie swap!
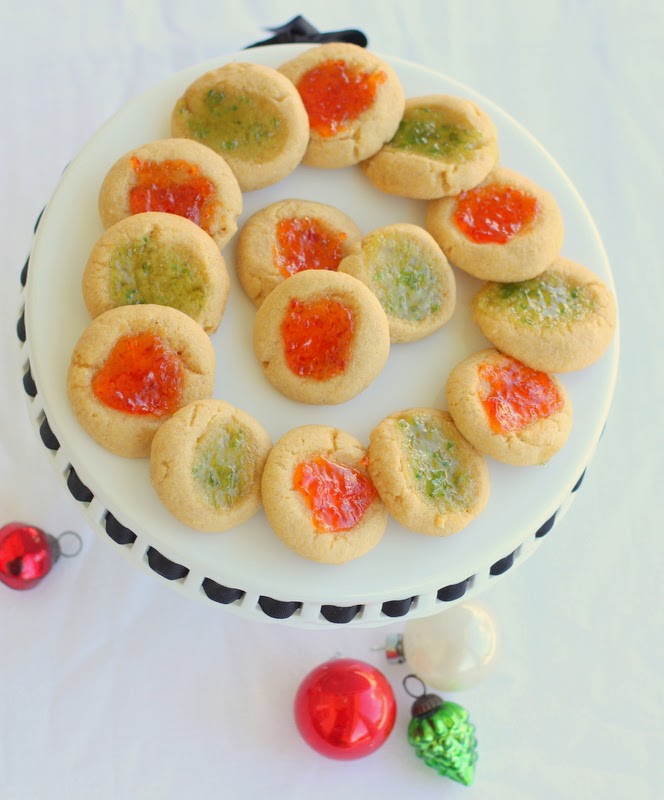
Pepper Jelly Thumbprint Cookies
source: BHG.com
yields: about 6 dozen
INGREDIENTS:
1 cup butter, softened
1 cup packed brown sugar
1/2 teaspoon baking powder
2 egg yolks
1 teaspoon vanilla
2/3 cup yellow cornmeal
2 cups all-purpose flour
1/4 cup red and/or green jalapeno jelly
METHOD:
Preheat oven to 350 degrees F.
In a large mixing bowl, beat butter with a mixer on medium to high speed for about 30 seconds. Add brown sugar and baking powder. Beat until combined, scraping side of bowl occasionally. Beat in egg yolks and vanilla until combined. Mix in cornmeal. Mix in as much of the flour as you can with the mixer. Using a wooden spoon, stir in any remaining flour.
Shape dough into 3/4-inch balls. Place one inch apart on an ungreased cookie sheet. Lightly press your thumb into the center of each ball of dough. Fill each center with about 1/8-1/4 teaspoon of the jelly.
Bake in the preheated oven about 10-12 minutes or until bottoms are lightly browned. Cool on cookie sheet for a few minutes then transfer cookies to a wire rack to cool.
Wednesday, November 21, 2012
Maple bourbon cream cheese spread

6 ounces cream cheese at room temp.
3 Tablespoons brown sugar
2 Tablespoons maple syrup
1/2 teaspoon cinnamon
pinch of freshly grated nutmeg
pinch of freshly grated nutmeg
1/2 teaspoon vanilla
1 1/2 teaspoons bourbon
Mix all the ingredients together until well combined. A great topping for quick breads, rolls, and muffins.


Monday, November 19, 2012
Baked Oatmeal with Peaches

This time of the year, with the holiday season rapidly approaching, it seems as though time speeds up. There's just never enough time in the day to get to everything done that needs to get done. I have a specialty baking business, and as you can imagine, this is the busiest time of the year for me.
Eating right is probably one of the first things I let slip. Well that and vacuuming! Anyway quite often my meal consists of a leftover sugar cookie and a cup of coffee. Too bad sugar cookies don't contain any fruits and veggies. I'm making an effort not to slip back into that rut this year and have been looking for ways to add fruits and veggies into some of my favorite meals.
Baked oatmeal is one of my favorite breakfast foods to make during the cooler months of the year. Served warm, it's like eating a fresh-from-the-oven oatmeal cookie. It's so comforting and delicious. Trying to stick to my goal of eating better, I decided to add a little more nutritional value to this meal by adding some fruit.
I changed up my usual recipe for baked oatmeal by adding Del Monte peach slices in extra light syrup. The peaches, which have 1/3 less calories than peaches in heavy syrup, added a wonderful sweetness to the baked oatmeal. I replaced some of the milk in the recipe with the syrup from the peaches which allowed me to cut down the amount of the sugar called for in the original recipe.
I like the fact that Del Monte uses high quality produce and doesn't add any artificial color or flavors to the majority of their canned fruits and vegetables. Also, the majority of Del Monte's fruits and veggies are grown in the U.S. and most are packed the same day that they are picked. This helps to lock in the nutrients and delicious flavor of Del Monte's canned fruits, vegetables and tomatoes. With a wide variety of canned fruits and vegetables, Del Monte makes it easy to Add Some Garden™ into your favorite meals!
Visit Del Monte's Add Some Garden campaign on Facebook for more ideas and recipes for using Del Monte's canned fruits and vegetables or visit their website for even more information.

Baked Oatmeal with Peaches
Ingredients
4 cups Old Fashioned Oats
1 tablespoon baking powder
1 teaspoon cinnamon
1 teaspoon salt
4 cups milk (Use the liquid from the canned fruit and reduce the amount of milk by that much.)
4 eggs, slightly beaten
1 can Del Monte sliced peaches in extra light syrup, roughly chopped, reserving the syrup
2/3 cup brown sugar
Method
Combine oats, baking powder, cinnamon and salt; stir in milk, syrup, eggs, chopped peaches and brown sugar. Pour into a greased 9x13 pan. Bake at 325 degrees for 45 minutes. Serve hot.
Tell us about meals that make you feel good & are good for you!
All comments will be entered into a sweepstakes, and Del Monte will be giving away a $100.00 Visa gift card one lucky winner!
Here are the guidelines for entering the sweepstakes:
No duplicate comments.
You may receive (2) total entries by selecting from the following entry methods:
a) Leave a comment in response to the sweepstakes prompt on this post
"b) Tweet (public message) about this promotion; including exactly the
following unique term in your tweet message: ""#SweepstakesEntry""; and leave the URL to that tweet in a comment on this post"
c) Blog about this promotion, including a disclosure that you are receiving a sweepstakes entry in exchange for writing the blog post, and leave the URL to that post in a comment on this post
d) For those with no Twitter or blog, read the official rules to learn about an alternate form of entry.
This giveaway is open to US Residents age 18 or older. Winners will be selected via random draw, and will be notified by e-mail. You have 72 hours to get back to me, otherwise a new winner will be selected.
The Official Rules are available here.
This sweepstakes runs from 11/19/2012 - 12/21/2012
Be sure to visit Del Monte's brand page on BlogHer.com where you can read other bloggers' reviews and find more chances to win!
Friday, November 16, 2012
Jellied Cranberry Sauce with Apples

Thanksgiving is less than a week away! I'm already salivating at the thought of turkey, dressing, sweet potatoes, and cranberry sauce. I know many people could care less about the cranberry sauce and merely open the obligatory can each year. It's the kind of the red headed stepchild of the Thanksgiving table.
For me the cranberries play a very important role on my Thanksgiving plate. They are the tart sweet goodness that brings everything else together for that perfect bite of Thanksgiving tastes.
Okay so most of you probably don't feel as strongly about the cranberry sauce as I do. Maybe you don't feel the need to make a couple of different cranberry sauces. (I'm making this one too!) However if you do plan to serve a cranberry sauce this Thanksgiving, this one is about as easy as it gets to make and it tastes fantastic. You may even want to join me in singing the praises of cranberry sauce... Anyway, this sauce can be made well in advance of Thanksgiving, so there's really no excuse to settle for just opening that can!


Jellied Cranberry Sauce with Apples
source: The Bitten Word, slightly adapted
INGREDIENTS:
1 12-ounce bag fresh cranberries
1 large apple, peeled and cut into 1/2-inch dice
1 cup sugar
3/4 cup water
1/2 cup pecans or walnuts, roughly chopped (optional)
DIRECTIONS:
Line an 8-by-4-inch loaf pan with plastic wrap and spray the plastic wrap with nonstick cooking spray.
In a medium heavy bottom pot, combine the cranberries, apple, sugar and water. Bring to a boil and cook over medium high heat, stirring frequently until the cranberries are completely broken down and the sauce is very thick, about 15 minutes. Stir in the chopped nuts, if using. Scrape the cranberry sauce into the prepared pan and refrigerate at least 3 hours, until completely chilled and set. Invert the jelled cranberry onto a serving plate and remove the plastic wrap. If desired, garnish the jelly with fresh and sugared cranberries, sugared pecans, and rosemary sprigs. Slice with a serrated knife before serving.
Make Ahead: can be made up to 2 weeks in advance. Just cover well with plastic wrap and keep refrigerated.
 |
| This cranberry sauce may even steal the turkey's spotlight! |

Monday, November 12, 2012
Pecan Pumpkin Butter

A few Christmases ago one of my gifts included a small jar of pumpkin butter. Pumpkin butter is similar to apple butter. The pumpkin is cooked down until thick and spreadable like butter. I thought it was fantastic stuff. At the time I wanted to try making some at home and have finally gotten around to actually doing it. I can't believe I waited so long. This pumpkin butter is super easy to make and I think this homemade one is even better than the pumpkin butter I got as a gift.
Using this recipe as a guide, my pumpkin butter recipe is the result of several batches I made this week. I played around with the amount of sugar and spices in the recipe and this combination was the one I liked the best. I also made some with maple syrup and some without. I liked the flavor the maple syrup added but you can leave it out and replace it with brown sugar. I saw several recipes that included pecans or walnuts in the butter. I like nuts in anything so I knew I wanted them in this pumpkin butter. Toasting the nuts really brings out their flavor and adds a great crunch to the butter. Feel free to leave out, add in, or change up this recipe to suit your own tastes.
At home canning is not recommended for pumpkin butter but it will last up to month in the fridge. I'll bet you, you won't have it nearly that long!

Pecan Pumpkin Butter
INGREDIENTS:
1 29-ounce can pumpkin puree (not pumpkin pie filling)
1 cup apple cider (apple juice will work too)
1 1/2 tablespoons pumpkin pie spice
1 1/2 teaspoons cinnamon
1 cup brown sugar
1/4 cup pure maple syrup
1/2 cup pecan pieces, toasted
METHOD:
Preheat oven to 350. Spread the pecans in a single layer on a baking sheet an bake for 3-5 min. Just until they start to brown. Remove from oven.
Place all of the ingredients into a large heavy bottom pot. Bring to a boil and simmer for 30 minutes, stirring occasionally. Most of the liquid should be cooked out and the pumpkin mixture should be thickened. Let cool completely. Store in the refrigerator for up to 1 month. It can also be frozen. This recipe makes about 3 1/2 cups.
 |
| Put the pecan pumpkin butter into glass jars tied with ribbon and it makes a great Christmas gift! |
Wednesday, October 31, 2012

Tuesday, October 23, 2012
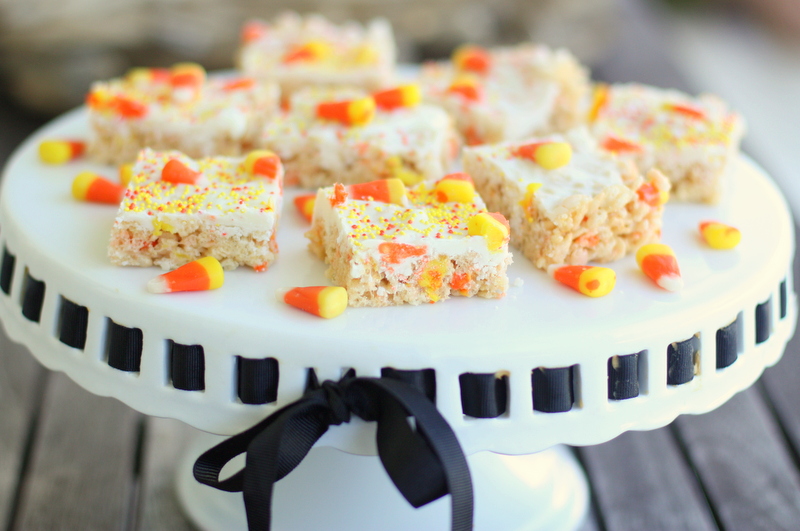
Candy Corn Rice Crispy Treats

Where has this month gone! With just a little over a week until Halloween,I thought I'd share this idea for candy corn rice crispy treats. These festive treats are perfect for Halloween parties, bake sales, etc... To make them extra special, I topped the rice crispy treats with white chocolate and added some orange and yellow sprinkles and candy corn. Super cuteness! And they taste great too.
INGREDIENTS:
4 tablespoons butter
1 (10 ounce) bag marshmallows
1/4 teaspoon salt
1 teaspoon vanilla
6 cups Crispy Rice Cereal
1 cup rough chopped candy corns
1 bag white chocolate candy melts (12 ounces)
1 (10 ounce) bag marshmallows
1/4 teaspoon salt
1 teaspoon vanilla
6 cups Crispy Rice Cereal
1 cup rough chopped candy corns
1 bag white chocolate candy melts (12 ounces)
METHOD:
Spray a 13x9 baking dish and rubber spatula with non stick spray. Place white chocolate candy melts in a bowl. Follow the manufactures instructions for melting the white chocolate. Set aside and make the rice crispy treats.
In a medium sized sauce pan over low heat, add butter and let it melt. Once melted add marshmallows, salt, and vanilla. Stir until the marshmallows have melted completely and have reached a smooth consistency. Remove from heat and fold in the cereal and candy corns until completely coated. Add the mixture to the greased baking dish and smooth out evenly.
Spoon the melted white chocolate onto the rice crispy treats. Using the back of a spoon or an off-set spatula, spread the melted white chocolate evenly over the top of the rice crispy treats. Immediately add sprinkles and decorate the top with whole candy corns, if desired.. Allow to cool before cutting into squares.
 |
| What is it about candy corn that makes them just so darn cute? |
More great ideas for Halloween/Fall parties:
Candy Corn Sugar Cookies
Saltine Toffee Bars
Halloween Pumpkin Pancakes with Black Cinnamon Syrup -Tidy Mom
Witches Brooms -Betty Crocker
Nutter Butter Ghosts
Halloween Pretzel Rods
Candy Corn Sugar Cookies
Saltine Toffee Bars
Halloween Pumpkin Pancakes with Black Cinnamon Syrup -Tidy Mom
Witches Brooms -Betty Crocker
Nutter Butter Ghosts
Halloween Pretzel Rods
Monday, October 8, 2012
Give a dog a pumpkin bone

About a week ago I saw these dog biscuits on Pinterest. The recipe was developed by Marilyn at Simmer Till Done. She made them for her dog that was having stomach problems because her vet told her pumpkin could help calm a dog's stomach when they've eaten something they shouldn't have eaten. Good to know. Maisy's been know to eat some pretty weird and disgusting things...but this is a food blog so I'll just leave that to your imagination!
I read through the recipe and saw that it was also wheat-free so Maisy could have these treats. I made them for her today. There was a lot of tail wagging going on while she ate the first one so I think she approves.
 |
| Maisy, a couple of days after we brought her home seven years ago. I should have known then that she liked pumpkin! |
Pumpkin Dog Biscuit
Source: Simmer Till Done
2 eggs1/2 cup canned pumpkin
2 tablespoons dry milk
1/4 teaspoon sea salt
2 1/2 cups brown rice flour
Preheat oven to 350.
In large bowl, whisk together eggs and pumpkin to smooth. Stir in dry milk, and sea salt. Add brown rice flour gradually, to form a stiff, dry dough. Turn out onto surface lightly dusted with some of the brown rice flour. If dough is a little crumbly, knead it a bit, pressing the crumbly pieces in to combine.
Roll dough the dough to 1/2" thickness Using a cookie cutter or biscuit cutter, cut out the dough. Re-rolling the scraps as needed. Place the cut out dough on cookie sheet lined with parchment or a silpat. Poke the tines of a fork in the center of each biscuits before baking, lightly pressing down about halfway through dough. Bake for 20 minutes. Remove from oven and carefully turn each biscuits and bake for an additional 20 minutes. Allow to cool completely on rack.
 |
| Who wants a treat! |
 |
| I'm such a good dog! |
 |
| Please give a dog a bone! Do I have to beg??! |
 |
| Mom also got me a new toy today. |
 |
| because all of my other toys look like this. I'm not very nice to my toys. |
 |
| If you give me another one of those treats I promise to be nice to this toy...for a while. |
Tuesday, October 2, 2012
Pumpkin Cheesecake Muffins

If you've been a reader of this blog for any amount of time than you are already aware of my slight pumpkin obsession. I can't resist a pumpkin based baked good. I've blogged about everything from my favorite pumpkin pie to pumpkin biscotti and pumpkin latte's. So it's Fall again and my obsession is back in full swing!
A pumpkin roll (pumpkin sponge cake filled with a cream cheese filling) is one of my favorite Fall desserts. (I can't believe I haven't posted a recipe...soon!) These muffins have all the same components as a pumpkin roll, spicy pumpkin cake with a cream cheese swirl, baked up in muffin form. Plus because it's a muffin it's now okay to eat pumpkin roll it for breakfast, right?

Pumpkin Cheesecake Muffins
Yield: 1 doz. regular sized muffins or 2 doz. mini muffins
PRINTABLE RECIPE
MUFFINS:
1 15 oz can pumpkin puree, not pumpkin pie filling
1/4 cup coconut oil or any vegetable oil
2 large eggs
1 cup sugar
1 teaspoon vanilla
1 1/2 cups all-purpose flour
1 teaspoon baking powder
1/2 teaspoon baking soda
1/2 teaspoon ground cinnamon
2 teaspoons pumpkin pie spice
1/2 teaspoon salt
FILLING:
8 ounces cream cheese, at room temperature
1 large egg yolk
1/2 cup sugar
1/8 teaspoon vanilla extract
METHOD:
Preheat oven to 350°
In a large mixing bowl, combine canned pumpkin, oil, and sugar together.
Add in eggs, one at a time, mixing well after each one.
Stir in vanilla.
Stir the flour mixture to liquids, combining thoroughly and scraping the sides of the bowl with a spatula until well combined.
Spray your muffin pan well with cooking spray. Fill each muffin about 2/3 full. Divide the filling evenly placing a large dollop on each muffin.
With a skewer or a knife, swirl the cream cheese mixture into the the pumpkin.
Bake for 20-25 minutes for regular muffins or about 18 minutes for mini muffins. The muffins are done when a toothpick inserted in the center comes out clean. Allow to cool for 5 minutes and remove from the pan.
*NOTES: If you want you could top the muffins with chopped pecans or walnuts.

I made half the batch in regular-size and half mini-sized. The mini muffins are very popable!
Links:
Monday, September 24, 2012
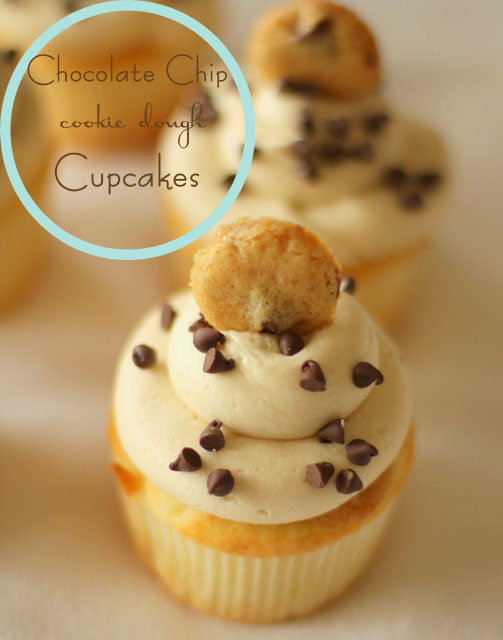
Chocolate Chip Cookie Dough Cupcakes
A couple of weeks ago I was asked to make a cupcake for someone that adores chocolate chip cookies. I did what I always do when I'm looking for inspiration and Googled it. I was shocked at how many recipes there were out there for cupcakes filled with chocolate chip cookie dough. Where have I been? Somehow I had missed this one! Anyway I made these for the birthday girl's party and have been getting requests to make these cupcakes ever since.
They really are fantastic. The cupcake is very good and has a hidden surprise of cookie dough baked into the center. But the frosting...ooh my goodness the frosting!! It's what knocks this cupcake out of the park. It tastes just like chocolate chip cookie dough. I couldn't believe it when I first tasted it. I could just sit and eat it with a spoon, but I didn't do that. I used it frost the cupcakes. Well okay maybe, I might have snuck a couple of spoonfuls when no one was looking...maybe that happened...then possibly I licked the bowl...and the paddle attachment...
Anyway the combo of cupcake, cookie dough, and frosting make this a chocolate cookie dough lovers dream!

Chocolate Chip Cookie Dough Cupcakes
FOR THE COOKIE FILLING:
2 1/4 cups all-purpose flour1 teaspoon baking soda
1 teaspoon salt
1 cup (2 sticks) butter, at room temp
3/4 cup sugar
3/4 cup light brown sugar
1 teaspoon pure vanilla extract
2 large eggs
1-12ounce bag chocolate chips (2 cups)
FOR THE CUPCAKES:
3 sticks softened butter
1 1/2 cups light brown sugar, packed
4 large eggs
2 2/3 cups all purpose flour
1 tsp. baking powder
1 tsp. baking soda
1/4 tsp. salt
1 cup milk
2 tsp. vanilla extract
FOR THE FROSTING:
3 sticks softened butter
3/4 cup light brown sugar, packed
3 1/2 cups powdered sugar
1/2 tsp. salt
2 tbsp. milk
1 tsp. vanilla extract
METHOD:
To make the cookie dough:
In a medium bowl, whisk the flour, baking soda, and salt. Set aside.
In the bowl of a stand mixer, at medium-low speed, mix the butter with the sugar and brown sugar. Raise the speed to medium-high and mix until creamy, light, and fluffy. Scrape down the bowl. Add the vanilla and eggs. Mix together until incorporated.
Add half of the four mixture. Mix until just combined, scrape down the bowl. Add the remaining flour mixture and mix until just combined. Stir in the chocolate chips.
Using a small ice cream/melon baller, scoop, shape the dough into balls. Freeze on a baking sheet lined with a silicon mat or parchment paper.

To make the mini cookie topper:
Use the leftover cookie dough to make mini cookie toppers for the cupcakes. Spread all the leftover dough on a cookie sheet lined with parchment or a silicone baking mat. Try to spread it fairly evenly. Bake until the cookie is lightly browned, do not over cook. Let cool about a minute. While the cookie is still warm cut out mini cookies using a the end of a large piping tip or a mini round cutter. Do this before the cookie cools down too much or you may not be able to cut the mini cookies out.

To make the cupcakes:
Preheat the oven to 350° F. Line cupcake pan with paper liners.
In a medium bowl, combine the flour, baking powder, baking soda, and salt. Set aside. The bowl of a stand mixer, combine the butter and brown sugar. Beat together on medium-high speed until light and fluffy. Mix in the eggs one at a time, beating well after each addition and scraping down the sides of the bowl as needed.Mix in the vanilla.
Add the dry ingredients to the mixer bowl on low speed, alternating with the milk, beginning and ending with the dry ingredients, add it into the batter in thirds. Mix each addition just until incorporated.
Fill the prepared cupcake liners 2/3 full with the cupcake batter. Place a frozen cookie dough ball on the top center of each cupcake.
Bake at 350 for 16-20 mins.
To make the frosting:
Fill the prepared cupcake liners 2/3 full with the cupcake batter. Place a frozen cookie dough ball on the top center of each cupcake.
Bake at 350 for 16-20 mins.
To make the frosting:
Combine the butter and brown sugar in a mixing bowl and cream on medium-high speed until light and fluffy. Add in the powdered sugar, beating until smooth. Add in the salt, milk, and vanilla extract until combined.
When the cupcakes are cool, frost, sprinkle with mini chips and top with a mini chocolate chip cookie.
 |
| If you like eating cookie dough straight from the bowl, then this is your cupcake! |
Wednesday, September 12, 2012
Apple Cinnamon Pull-Apart Bread

I'm not sure what I really need to say about this pull apart bread. Just look at it! It speaks for itself...and it's saying "you know you want me!" There are several steps involved in making the bread but it's completely worth the extra effort. Seriously what's not to like about apples, cinnamon, and pecans, baked up into sweet dough? All that's missing is a cup of coffee.

Cinnamon Apple Pull Apart Bread
Source: kingarthurflour.com adapted
Yield: 1 loaf, about 12 to 15 servings.
PRINTABLE RECIPE
For the filling:
2 tablespoons unsalted butter
1/2 cup packed brown sugar
1 tablespoon ground cinnamon
1/2 teaspoon vanilla extract
3 medium apples (about 2 cups), peeled, cored, and thinly sliced
For the filling:
2 tablespoons unsalted butter
1/2 cup packed brown sugar
1 tablespoon ground cinnamon
1/2 teaspoon vanilla extract
3 medium apples (about 2 cups), peeled, cored, and thinly sliced
1/2 cup pecans or walnuts, chopped (optional)
For the dough:
1/4 cup (4 tablespoons) unsalted butter, melted
1/3 cup lukewarm milk
1/4 cup lukewarm water
2 large eggs
1 teaspoon vanilla extract
3 cups King Arthur Unbleached All-Purpose Flour
1/4 cup sugar
1/2 teaspoon salt
2 1/4 teaspoons instant yeast
For the dough:
1/4 cup (4 tablespoons) unsalted butter, melted
1/3 cup lukewarm milk
1/4 cup lukewarm water
2 large eggs
1 teaspoon vanilla extract
3 cups King Arthur Unbleached All-Purpose Flour
1/4 cup sugar
1/2 teaspoon salt
2 1/4 teaspoons instant yeast
1 cup powdered sugar
1 tablespoon milk
mix both ingredients together in a small bowl. Add more milk if necessary to get desired consistency. I like it to be the consistency of a thick syrup.
To make the dough:
Whisk together the butter, milk, water, eggs, and vanilla extract.
In the bowl mixer, mix together the flour, sugar, salt, and yeast, then add the wet ingredients. Using the dough hook attachment mix and knead, until the dough is smooth. The dough will be quite soft. If it seems too dry add a little water, if it seems too sticky add just a little flour, up to a 1/4 cup.
Place the dough in a lightly greased bowl, cover, and allow to rest until doubled in size, about 1 hour.
Grease a 9" x 5" loaf pan.
Gently deflate the dough and turn it out onto a lightly greased surface.* Roll the dough into a 12" x 20" rectangle.
Stir the vanilla into the melted butter. Spread the butter mixture over the entire top on the dough, Use a pastry brush to get the butter even spread over the surface of the dough. Sprinkle the brown sugar over the top, using your hand to spread it evenly over the butter. Sprinkle the cinnamon evenly over the dough. Add the apples, on top of the cinnamon and sugar and sprinkle on the nuts, if using.
Cut the dough crosswise into six 3 1/2" x 12" strips. Stack the strips on top of one another. Cut the stack into six pieces, about 2" x 3 1/2" each. This part is a little messy but it doesn't have to be perfect.
Turn the pieces on edge, and place them in the loaf pan one in front of the other from one end of the pan to the other, squeezing them in tight. I sprinkled any nuts or apples that had fallen off over the top of the dough after I put it into the pan.
Cover the pan and allow the loaf to rise for 30 to 60 minutes, until it's almost doubled in size. While the loaf is rising, preheat the oven to 350°F.
Bake the loaf for 45 to 55 minutes in the center of the oven, tenting it with foil after 30 minutes. Remove the loaf from the oven, and transfer it to a rack to cool for 15 to 20 minutes before turning it out of the pan to cool completely.
While still slightly warm, spoon the glaze over the top of the bread.
*Notes: I lightly sprayed a non-stick mat with cooking spray.
I kind of diced up my apples but after making the bread, I think sliced apples would be easier to keep on the pieces of dough as you stack them. (Which is what the recipe stated but I like to do things my aka the hard way!)
The long pieces are hard to move on top of one another. I kind of rolled the ends of each slice inward toward the center to make them easier to pick up to move. I had to spread the nuts and apples back into place but it made it easier for me to get the pieces stacked. Don't freak out if your apples and nuts fall off (they will!) just put them back on the dough after you've moved it onto the stack. (Hopefully these instructions will make sense when your actually making the bread!) I cooked mine the full 55 minutes. I probably could have taken it out at about 50 minutes.

Whisk together the butter, milk, water, eggs, and vanilla extract.
In the bowl mixer, mix together the flour, sugar, salt, and yeast, then add the wet ingredients. Using the dough hook attachment mix and knead, until the dough is smooth. The dough will be quite soft. If it seems too dry add a little water, if it seems too sticky add just a little flour, up to a 1/4 cup.
Place the dough in a lightly greased bowl, cover, and allow to rest until doubled in size, about 1 hour.
Grease a 9" x 5" loaf pan.
Gently deflate the dough and turn it out onto a lightly greased surface.* Roll the dough into a 12" x 20" rectangle.
Stir the vanilla into the melted butter. Spread the butter mixture over the entire top on the dough, Use a pastry brush to get the butter even spread over the surface of the dough. Sprinkle the brown sugar over the top, using your hand to spread it evenly over the butter. Sprinkle the cinnamon evenly over the dough. Add the apples, on top of the cinnamon and sugar and sprinkle on the nuts, if using.
Cut the dough crosswise into six 3 1/2" x 12" strips. Stack the strips on top of one another. Cut the stack into six pieces, about 2" x 3 1/2" each. This part is a little messy but it doesn't have to be perfect.
Turn the pieces on edge, and place them in the loaf pan one in front of the other from one end of the pan to the other, squeezing them in tight. I sprinkled any nuts or apples that had fallen off over the top of the dough after I put it into the pan.
Cover the pan and allow the loaf to rise for 30 to 60 minutes, until it's almost doubled in size. While the loaf is rising, preheat the oven to 350°F.
Bake the loaf for 45 to 55 minutes in the center of the oven, tenting it with foil after 30 minutes. Remove the loaf from the oven, and transfer it to a rack to cool for 15 to 20 minutes before turning it out of the pan to cool completely.
While still slightly warm, spoon the glaze over the top of the bread.
 |
| Roll the dough into a 20"x 12" rectangle |
 |
| Add the filling |
 |
| Slice crosswise into six even pieces |
 |
| Stack the pieces on top of one another. |
 |
| Slice the stack into six pieces. |
 |
| Turn the pieces on their side and put them into the bread pan. |
I kind of diced up my apples but after making the bread, I think sliced apples would be easier to keep on the pieces of dough as you stack them. (Which is what the recipe stated but I like to do things my aka the hard way!)
The long pieces are hard to move on top of one another. I kind of rolled the ends of each slice inward toward the center to make them easier to pick up to move. I had to spread the nuts and apples back into place but it made it easier for me to get the pieces stacked. Don't freak out if your apples and nuts fall off (they will!) just put them back on the dough after you've moved it onto the stack. (Hopefully these instructions will make sense when your actually making the bread!) I cooked mine the full 55 minutes. I probably could have taken it out at about 50 minutes.

 |
| There's no need for a knife with this bread. It really does just pull apart! |
Subscribe to:
Posts (Atom)