Thursday, February 21, 2013

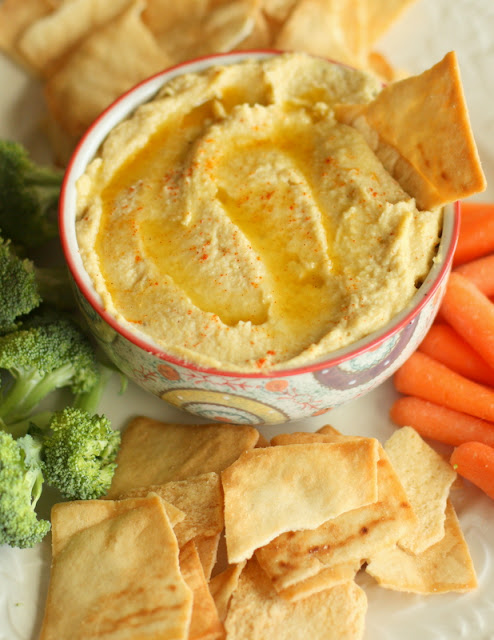
The Oscar for the best hummus goes to...


I read somewhere that February is National Snack Foods month. Apperently it was started as a marketing ploy to bump up sales of snack foods during a typically low month for sales. I assume the drop in snack food sales is caused by all those New Years resolution diets that begin in January. Maybe the marketers figure they can lure us into throwing in the resolution towel by naming February snack food month...pretty ingenious I must say! With the Super Bowl, Mardi Gras, Valentine's Day, and the Oscars, all in February there's no lack of snack food worthy events to celebrate. So Happy National Snack Food month. Good thing it's a short month!
My ultimate snack food is probably chips and dip. Salty, crunchy, creamy...diet? what diet? Hand me the chips and pass that dip! This hummus is healthier alternative to traditional chips and dips. If eaten with carrots and broccoli it falls into the downright good for you category! The best part is it's delicious and doesn't make you feel like your giving up something or missing out. Feel free to dig into this snack food and enjoy National Snack Foods month without the guilt!


Artichoke Hummus

INGREDIENTS:

1 can (14 oz) chickpeas, drained with liquid set aside
1 can (14oz) artichoke hearts,  drained
1 tablespoon tahini
3 tablespoons olive oil
1 clove of garlic, crushed
2 tablespoon lemon juice
1 teaspoon soy sauce

METHOD:

In a food processor, combine chickpeas, artichokes, garlic, and tahini. Blend. Slowly add olive oil, soy sauce, and lemon juice. Blend to a smooth consistency. If artichoke hummus is too thick, add some of  chickpea liquid, a little at a time, until you get the consistency you want. Place in serveing bowl. I like to drizzle the top with a little good quality olive oil and a dash of smoky paprika.

This makes a great party dip. If your having an Oscar party (or like me just like to munch while you watch) this hummus is perfect. I plan to snarf on it while watching uber skinny actresses strut their stuff on the red carpet. Less guilt than with regular chips and dip, which allows me to believe that I'd look just as good strutting my stuff down the red carpet!

Thursday, February 14, 2013

Royal Icing or Glaze Icing?

Happy Valentine's Day!

I've been swamped making dozens of these conversation heart cookies. One of my friends asked for a glaze type icing instead of royal icing. The rest of the cookies I made were done with royal icing. This was the first time I had done an actual side-by-side comparison of the two. So I thought I'd break down a few of my pros and cons for each. I've had my issues with royal icing in the past but we have learned to play nice with each other. (lots of practice helps!) Glaze icing is super simple to make and for the novice decorator, can be a little less frustrating than royal icing. Both are great options for making cute delicious cookies.

Pros for glaze icing:
1. you can make a huge batch of icing in about 2 minutes with just a bowl and a spoon
2. it's easy to get the right flooding consistency.
3. it stays really shiny when dry
4. doesn't dry hard, like royal icing, but hard enough to stack and bag
Cons:
1. the flooded cookies are more likely to overflow the outline
2. it's sticky, like really sticky, to work with
3. it doesn't work well for more intricate designs because it doesn't hold its shape well
4. lots of air bubbles unless it sits for a long time after mixing, even then lots of air bubbles.

Here is the glaze icing recipe I used for these cookies.

Glaze iced cookies: Shiny, but less perfect looking (writing is royal icing)

Pros for royal icing:
1. holds it's shape when piped
2. if you have the right consistency in the icing, it's easier than glaze to achieve a "perfect" looking cookie
3.It's very versatile, can be used to decorate cookies, on cakes, as glue for fondant pieces, thinned out to cover cake boards...
4. dries hard
Cons:
1.I call it finicky, because you have to be very precise when you make it. Too little or too much of anything really changes the icing and how it looks when it's dry.
2. dries matte (which isn't always a con, I liked the less shiny look better for these heart cookies)
3. getting the right flood consistency can be tricky (again lots of practice)

Royal icing cookies
A couple of tips for royal icing that have helped me:

Finding the right recipe. This one from Antonia74 is amazing, if you follow her recipe exactly. This is the only way I make my royal icing now but if you have a recipe you like then stick with it.
Weigh your sugar, unless you can be certain that you can measure it exactly the same every time. This simple step has made all the difference for me when making royal icing.
Don't over-mix the icing. Don't mix at too high of a speed. This prevents cracking and really cuts down on air bubbles.

Mostly relax and have fun, it's just a cookie!

So there you have it, my take on royal icing verses glaze. Both are a great option for decorating cookies. What is your favorite icing for decorating cookies?? I'd love hear any tips you want to share as well!
Happy decorating!


Monday, February 11, 2013

DIY chocolate heart decorations


These decorations are super simple and don't require any special skills or equipment to make. If you can draw a heart shape then you've pretty much got the skill set needed to make these chocolate hearts. Use them as cupcake toppers or to decorate a cake. They're so cute they'll make you look like a decorating superstar!

What you'll need:

Candy melts, (any colors you want) can be found in the cake decorating section of Wal-Mart or any major craft store.

Wax paper or parchment paper

zip top baggies, or if you want you can use pipping bags and tips but they aren't necessary to make the hearts.

How To:


Place a piece of the wax paper or parchment paper onto a cookie sheet..

Put approximately 1/2 cup of candy melts into the zip top baggie. Melt them in the microwave for 30 seconds.

Knead the bag and heat them for 15-20 seconds until melted.

Push the melted chocolate toward one corner of the baggie. Cut a very small tip from one corner of the baggie.

Fold the top of the bag over and squeeze as you draw some heart shapes onto the wax paper.

If you think you need a pattern, or want them to all to be exactly the same size, you can print out some hearts on paper and place the paper under your wax paper to use as a guide. Alternately, you could trace around some small cookie cutters onto parchment paper, flip the paper over and follow the pattern.

I like to do them freehand. I like making different sizes and shapes.


Get as fancy as you like. Fill in the hearts completely, make curlicues, whatever! Any mistakes are easily to get rid of, just pop it in your mouth and mistake...gone!
Let the chocolate candy heart set up for 30 minutes to an hour. They should be dry enough to pick up easily. If they stick a bit, carefully slide a spatula or off-set decorating spatula under the hearts to lift them up. Try not to handle the hearts too much. The warmth from your hand softens the chocolate and can make them break.

Tuesday, February 5, 2013

It's World Nutella Day


Grab a spoon and prepare to celebrate!

Sara from Ms. Adventures in Italy and Michelle from Bleeding Espresso solemnly declare Sunday, February 5th “World Nutella Day 2013″ – a day to celebrate, to get creative with, and most importantly, to EAT Nutella!

My submission to this fun event are these cute and delicious Nutella Meringue Cookies. This recipe comes from Cream Puffs in Venice one of the bloggers that first inspired me to join into the food blogging world and start a blog of my own. Thanks Ivonne! That was way back in 2007.  Which is also about the same time that Sara and Michelle started World Nutella Day. A day for flooding the internet with all things Nutella. Thanks ladies for making the internet more delicious! 
Happy World Nutella Day!
Crispy on the outside, chewy chocolaty on the inside, divine!

Nutella Meringues
Source: Cream Puffs in Venice

INGREDIENTS:
1/4 cup Nutella
3 large egg whites, at room temperature
a pinch of salt
a pinch of cream of tartar
1/2 cup + 1 tablespoon, granulated sugar

METHOD:
Heat oven to 300°F. Line two baking sheets with parchment paper and set aside.
Warm the Nutella in a microwave safe bowl in 15 second intervals until just barely melted.

In the bowl of a stand mixer, fitted with the whisk attachment, place the egg whites. Beat on medium-high speed until they are completely foamy.
Add the cream of tartar and the salt and continue whipping at medium-high speed until when you lift the whisk attachment, soft peaks form. This will take a few minutes.
Once you have reached the soft peak stage, increase the speed to high. At this point, start adding the sugar, slowly,  a few spoonfuls at a time.
Once all the sugar is in, the meringue should be very thick. When you lift  the whisk stiff  peaks should remain.


Drizzle in the Nutella. Gently fold the Nutella into the meringue three or four times. You want the meringue to to be streaky and not to deflate, so don't so over-mix.
You can either pipe the meringues onto the parchment-lined trays using a pastry bag fitted with a large open round tip or using two spoons, drop the meringue onto the baking sheets in large dollops.
Place in the oven for 5 minutes. After 5 minutes, immediately lower the heat to 200°F and rotate the trays. Bake for one hour.
After an hour, check the meringues. They should look and feel dry. If you see any shine or moisture on them, continue baking them for another 10 minutes. Shut off the oven and leave the meringues to cool with the oven for a few hours or overnight. When you remove them from the baking sheet, they should release easily from the parchment and sound dry when you tap them.
The meringues will keep in an airtight container for about a week.

Feel free to make these into sandwich cookies with more nutella!


Saturday, February 2, 2013

Sweet and Spicy Party Mix


Tomorrow is Super Bowl Sunday. A big day for football and partying for many. I'm not really into NFL football, (college football is another story!) I'm not even sure which two teams are playing this year. So for me the Super Bowl means two things: funny commercials and tailgate food. It's really just an excuse to break out the chips and dips, chicken wings, and see how many foods can be made into the shape of a football. I stashed this recipe away for just such an occasion. The combo of sweet and spicy make this party mix the perfect addition to your Super Bowl parties. Make a big bowl of this or it might not last until halftime. (like how I threw in that football reference?!?)  Whether or not you watch the game or just the commercials, grab a handful of this party mix and enjoy!


 *full disclosure: Hubs won't be home for the Super Bowl this year so I'll actually be munching this while watching Downton Abbey.  I'm still upset/angry about last weeks episode, so party food will be needed!


Sweet and Spicy Party Mix
Source: Hannah Klinger  DECEMBER 2012

INGREDIENTS:
3 tablespoons brown sugar
2 teaspoons chopped fresh thyme, divided
3/4 teaspoon kosher salt
1/2 teaspoon ground cinnamon
1/4 to 1/2 teaspoon ground red pepper
1/2 cup pecan halves
1/2 cup plain whole almonds
1 1/2 tablespoons butter
3 cups mini  pretzels
1 cup crispy rice cereal squares
2 tablespoons maple syrup

METHOD:
Preheat oven to 350°.
In a small bowl, combine brown sugar, 1 teaspoon thyme, salt, cinnamon, and red pepper.
Put the pecans and almonds on a jelly-roll pan. Bake at 350° for 10 minutes or until the nuts begin to brown. Keep an eye on them because the nuts can burn quickly! In a medium bowl, combine the nuts with the butter ,stirring until butter melts.Stir in pretzels, cereal, and syrup. Sprinkle the sugar mixture over pretzel mixture; toss gently to coat. Spread pretzel mixture in a single layer on jelly-roll pan. Bake at 350° for 10 minutes, stirring once. Sprinkle with the remaining 1 teaspoon thyme. Cool completely.