Monday, September 26, 2011

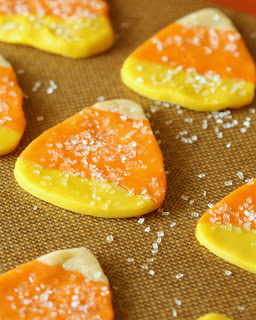
Candy Corn Sugar Cookies


Hubs tells me all the time that I like to do things the hard way. He says this when I choose to make something rather than buy it or make do with what I have rather than buy something new. Even if that something new would make my life easier. Usually it's because I'm being cheap thrifty. However sometimes it's because I get an idea and just want to see if it will work. That's how these cookies came about. I was wasting time doing important research on Pinterest. In the interest of public safety, I feel I must warn those that don't already know about Pinterest. I'm not sure what happens, maybe a quantum time leap, or perhaps it's in its own time zone or something. All I know is that when you visit Pinterest, what feels like 5 minutes in Pinterest time is actually an hour in real time. Consider yourselves warned! Anyhooo, back to the cookies, so I saw some cute candy corn shaped sugar cookies while surfing around Pinterest. I liked that they looked like candy corn but didn't have to be decorated. They looked easy, a departure from my usual way of doing things. This was a week or two ago and I didn't pin the picture, which I realize kind of defeats the purpose of Pinterest. I couldn't find the picture again so I decided I'd just wing it and see if I could make some cookies like the ones I had seen. I have since seen other ways to make candy corn cookies but I like how these came out and they really are easy to make.

These are perfect for when you need a fun Fall/Halloween dessert, like school parties. You could go super easy and use store bought sugar cookie dough to make these cookies. No judgement here! However this recipe for sugar cookies is simple to make and tastes delicious. The dough doesn't need to be chilled before using, so it's quick to make as well.

Easy No-Chill Sugar Cookies
Source: Food.com submitted by Chef.Jules
Ingredients:
1 cup unsalted butter
1 1/2 cups granulated sugar
1 egg
2 teaspoons vanilla
2 3/4 cups all-purpose flour
2 teaspoons baking powder
1 teaspoon salt

orange and yellow gel food coloring
candy corn cookie cutter (or you could cut out triangles)

Method:
Preheat oven to 400 degrees.
In mixing bowl, cream butter with sugar until light and fluffy. Beat in egg and vanilla.
Mix flour, baking powder, and salt in a separate bowl; add to butter mixture 1 cup at a time, mixing after each addition. Divide dough into two balls.

To make Candy Corn Cookies:
Divide your cookie dough into three equal pieces. Knead orange gel food coloring into one piece and yellow into another. Leave the third piece white. Roll the dough into logs about 1 inch wide and 6-8 inches long. Put each of the logs side-by-side and slightly push them together like in the picture below.


Roll the cookie dough out approximately 12" wide and about 1/8" thick and cut out with a candy corn shaped cookie cutter. If you don't have a candy corn cutter you can just cut out triangles.
Kind of has a 70's vibe going!


I sprinkled some with sanding sugar and left some plain.
Bake on ungreased cookie sheet for 6 - 7 minutes or until cookies are lightly browned. I line my pans with parchment paper or a silpat for easy cookie removal.


I didn't waste the leftover pieces of cookie dough. I gathered them all together, added more orange gel coloring, rolled out the dough again and cut out pumpkins.


I got a little over a dozen candy corn cookies. I made small and large pumpkins and had a dozen pumpkin cookies when I was done.

Tuesday, September 20, 2011

Chewy Pumpkin Granola Bars


With the first day of Fall just around the corner, I'm so ready to break out the pumpkin and spices! I was in the grocery store a few days ago and noticed that Kashi has pumpkin granola bars. I like Kashi products and considered buying the bars but at over $4.00 for 6 bars, I put the box back on the shelf. Making granola is fun and super easy so I decided I'd try to make my own pumpkin granola. When I got home I decided to adapt the recipe from the Silver Palate for Outrageous Granola that I've made countless times but I wasn't sure what I wanted to use to bind the granola so that I could cut it into bars. I Googled pumpkin granola bars and sure enough some of my fellow bloggers had already beaten me to the pumpkin granola idea. Several linked back to this recipe from Two Peas and their Pod. I sort of used a combination of the two recipes and threw in some toasted wheat germ to up the healthfulness of the bars. I used things I already had in my pantry to make these bars but they are easily adapted so feel free to use any combination nuts, chocolate chips, or dried fruit that want. 

Chewy Pumpkin Granola Bars

Ingredients:
3 cups old fashioned oats
1/2 teaspoon pumpkin pie spice
1 teaspoon cinnamon
1/4 teaspoon nutmeg
1/2 teaspoon salt
1/4 cup toasted wheat germ (optional)
1/2 cup brown sugar
1/2 cup maple syrup
1/2 cup pumpkin puree
1/4 cup applesauce cup
2 teaspoon vanilla extract
1/2 cup chocolate chips
1/2 cup pepitas (pumpkin seeds)
1/2 cup slivered almonds

Method:
Preheat oven to 350 degrees. Spray an 8 by 8 baking pan with cooking spray.
In a large bowl, mix oats, spices, salt, and wheat germ (if using), together. Set aside.
In a medium bowl, whisk brown sugar, pumpkin, applesauce, maple syrup, and vanilla extract until smooth. Pour over oats and stir well, until all of the oats are moist. Stir in chocolate chips, pumpkin seeds, and almonds.
Evenly press oat mixture into prepared baking pan. Bake for 30-35 minutes or until golden brown. The pumpkin and applesauce add a lot of moisture to the bars so bake them until they are golden and set or they will be too soft. Remove from oven and let cool for about 5 minutes. Using a sharp knife, cut into bars. Remove from pan and cool completely. 
The pumpkin keeps the bars very moist for several days if kept sealed in an airtight container and refrigerated.

Recipe adapted: Two Peas and their Pod and Silver Palate Outrageous Granola 
Pumpkin and spice!

Monday, September 12, 2011

Apple-Butterscotch Blondies

with praline frosting.

I thought about calling these stress relief bars. Not because they have any magical stress relieving ingredients or powers. They don't. Although they taste so good, you might momentarily forget about your worries. No, while the blondies themselves are not stress relieving, the act of making them is, at least for me. I'd have to say, and I'm sure those that know me would agree, I inherited  more traits from my father then my mother. I look more like my dad than I do my mother but I also, for better or worse, share more of his personality traits. He would say that's a good thing but the jury is still out on that one.
One thing that I most definitely inherited from mother was my love of baking. Mom is a great cook, but baking is her true love. Growing up there was always some freshly baked good being made or consumed in our home. Mom bakes all the time, but if life ever gets a little stressful or she's really worried about something, look out. She turns into a baking maniac. We laughingly joke that we can gauge moms stress level by how much baking she's done. If only one pie is being made, it's okay, she's fine. During one particularly stressful time several years ago, my sister called and said that she knew mom was stressed out because she'd made two loaves of fresh bread, two pies and a pan of cinnamon buns. Another time when a hurricane was headed our way, she was in the kitchen furiously whipping up a batch of cookies. When asked why she was making cookies, she said that they were "emergency cookies".  Just in case, you never know the power might go out, hence the emergency cookies. Mom has always said baking makes her feel better. Baking is about more than just the end product, for me as well. Don't get me wrong, I love a good (emergency) cookie, but many times I enjoy the act of making the cookies almost as much as eating them...almost!
 Life has thrown us for quite a loop in the past couple of weeks. I know things will work out in the end, but change is rarely easy. So lately I, like mom, find myself wanting to measure, chop, and stir. Perhaps its being in control of that little bit of life that makes it so satisfying. I don't know what it is but I do know it's a lot cheaper than going to a therapist, so hand me a whisk!

The original recipe was just the blondies but when they came out of the oven they looked a little plain jane so  I added the praline frosting. I'm sure they are good without the frosting but they are superb with the frosting!

Apple Butterscotch Blondies with Praline Frosting
Printable recipe
Ingredients:
Blondies:
1 cup chopped pecans
2 cups firmly packed dark brown sugar
1 cup butter, melted
2 large eggs, lightly beaten
2 teaspoons vanilla extract
2 cups all-purpose flour
2 teaspoons baking powder
1/2 teaspoon salt
2 large Granny Smith apples, peeled and diced  (about 2 cups)

Praline Frosting:
1/2 cup firmly packed light brown sugar
1/4 cup butter
3 tablespoons milk
1 teaspoon vanilla extract
1 cup powdered sugar
Toffee pieces, optional

Method:
Preheat oven to 350º. Bake pecans in a single layer in a shallow pan 8 to 10 minutes or until toasted and fragrant, stirring halfway through.
Stir together brown sugar, melted butter, eggs and vanilla.
In a separate mixing bowl, stir together flour and next 2 ingredients; add to brown sugar mixture, and stir until blended. Stir in apples and pecans. Pour mixture into a greased and floured or foil lined, 8-by-8-inch pan; spread in an even layer.
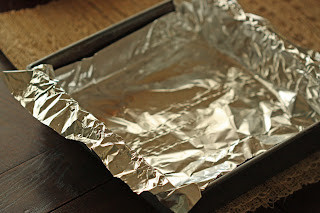
I line my brownie/blondie pan with foil with about an inch overhang. It makes getting them out of the pan a snap. When cool simply lift them out and cut.

Bake at 350º for 40 to 50 minutes or until a wooden pick inserted in center comes out clean. Cool completely (about 1 hour).
To prepare frosting:
Bring 1/2 cup brown sugar, 1/4 cup butter, and 3 Tbsp. milk to a boil in a 2-qt. saucepan over medium heat, whisking constantly; boil 1 minute, whisk constantly. Remove from heat; stir in vanilla. Gradually whisk in powdered sugar until smooth; stir gently 3 to 5 minutes or until mixture begins to cool and thickens slightly. Pour immediately over cooled blondie. Top with more toasted pecans and toffee.

Source: Southern Living
September 2011 (Adapted)


Wednesday, August 31, 2011

Two-Bite Peanut Butter S'mores


Can you improve a classic s'more? The simple delicious combination of graham crackers, chocolate and toasted marshmallows, what could be better? How about crushing the graham crackers, combining them with peanut butter, making them into little cups filled with rich chocolate ganache, topped with toasted marshmallows? Oh yeah. It's are like having a Reese cup and s'more all in one delicious bite. Or make that two-bites... truth be told, although I called these Two-Bite Smore's, I can totally eat these little smore's in one delicious bite.

Two Bite Peanut Butter S'mores
Ingredients:

1 cup graham cracker crumbs (or about 7 graham crackers, crushed)
1/4 cup sugar
5 tablespoons peanut butter, softened in the microwave for 10-15 seconds
1tablespoon butter, melted

1 recipe of ganache, recipe below
12 large marshmallows

Method:
In a bowl, mix together the graham cracker crumbs, sugar, softened peanut butter, and melted butter. 
Place about 1 tablespoon of crumb mixture in each cup of mini muffin pan. Press crumbs to form shallow cups with your fingers or a mini tart press, in you have one. Bake 4-5 minutes until slightly browned. Remove from oven and allow to cool, in the pan.

Chocolate Ganache Filling
Ingredients:
6 ounces semisweet or bittersweet chocolate, chopped finely (or use chips)
1/2 cup heavy whipping cream
2 tablespoons unsalted butter
1/4 teaspoon vanilla

Method:
Pour chopped chocolate (or chocolate chips) into a mixing bowl.
Heat whipping cream and butter in the microwave in 30 second intervals until it's almost to a boil but don’t let it actually come to a boil. You should see bubbles forming around the edges. If you’re using a thermometer, heat it to about 180 degrees. Stir in vanilla.
Immediately pour hot cream mixture over chocolate and use a small whisk to mix until completely smooth. Allow ganache to cool and thicken somewhat. I put in into the fridge for about 20 minutes. When cool, stir the ganache a few times. It should be a scoop-able consistency. If it seems too firm, microwave it in 10 second intervals until you get the right consistency. Fill the peanut butter graham cracker cups with the ganache. I used about 2 teaspoons of ganache for each cup, give or take.

Cut marshmallows in half horizontally with kitchen shears or a sharp knife, dipped in cold water. Place one marshmallow half, cut-side down, into each cup. Return to oven with the broiler turned on. Broil on high for 1-2 minutes or until marshmallows start to get a little color. Do not walk away from the oven the s'mores burn quickly. Remove from oven and cool for 15 minutes. Carefully remove cups from pan.

* Note: I found that a small off-set spatula worked great for getting the s'mores out of the mini muffin pans. If the bottoms of the s'mores are sticking to the pan, dip the bottom of the pan into warm water. This will warm the graham cracker crust slightly making it easier to remove them from the pan.

Who needs two bites?

Sunday, August 21, 2011

Caramel Cheesecake Apple Dip

Is anyone else starting to crave the flavors of Fall?
I know there's a good bit of summer still left but I'm already looking forward to a change of season and all the flavors of Fall. Caramel apples always bring Fall-ish thoughts to mind. Growing up, my mom would buy those caramel apple kits from the grocery store. The kits came with those flat sheets of caramel that we had to stretch and wrap around an apple with a popsicle stick stuck in it. Then we'd heat them in the oven, while waiting in anticipation for them to be ready to bite into. As a kid I thought those apples were the best thing ever, even though the caramel really stuck to my teeth. I haven't had one of those apples in years but I still love the caramel and apple combo. This dip is caramel apples for grown-ups. It has all the things you like about a caramel apple layered between sweet cream cheese. It's creamy, caramely, goodness with a little chocolate and toffee thrown in for good measure. It's seriously good stuff.  This cheesecake dip looks pretty on a serving plate, which makes it a great to serve at parties. Plus unlike those caramel apples we'd make as kids, you won't have any caramel stuck to your teeth! 
 
As pretty as it is delicious!
Caramel Cheesecake Apple Dip
(Printable Recipe)

Ingredients:
12 ounces cream cheese, at room temperature
3 Tbs. heavy cream
1/4 cup powdered sugar
1/2 tsp. vanilla

Caramel sauce (recipe below) or store bought
Heath milk chocolate pieces
mini chocolate chips
2-4 Granny Smith or other crisp tart apples, sliced and soaking in lemon juice/water until ready to serve

Method:
This is the method is to make a layered dip, for a quick method see note below.
Line a six inch cake pan or springform pan with plastic wrap. Use enough plastic wrap to hang over the sides of the pan about 2 inches.
Place softened cream cheese in a mixing bowl and beat on medium speed until smooth. Scrap down the sides of the bowl. Add the heavy cream and powdered sugar, mix well, until smooth. Place half of the cream cheese mixture in the lined pan and smooth with the back of a spoon. (If you dip the spoon into warm water before you start to smooth the cream cheese, it will be much easier to spread.) Spoon on a layer of caramel. Sprinkle with a layer of chocolate chips and the Health pieces. How much you use is up to you but don't go to overboard or you may have trouble spreading the top layer of cream cheese.

Oh yeah, that's the stuff!
Place in the refrigerator for about 20 minutes. This will let the caramel set up a bit and make topping it with the remaining cream cheese much easier. Scoop the remaining cream cheese on top and smooth out using the back of a dampened spoon, like you did for the first layer. Fold the overhanging plastic wrap over the top and refrigerate for at least 2 hours, up to overnight. Pull back the plastic wrap so that the top of the cheesecake is exposed. Place a serving plate on top of the pan and invert. Remove the pan and the plastic wrap. Spoon caramel sauce over the top of you cheese cake and top with more of the Heath pieces and chocolate chips. Place the sliced apples around the dip and serve.
*Note: If you want to throw this together super fast, just spread all the cream cheese on a serving platter and top with the caramel, Heath bits, and the mini chocolate chips.

Caramel Sauce
Ingredients:
1 cup sugar
1/4 cup water
8 tablespoons unsalted butter, cut into pieces
1/2 cup heavy cream
2 teaspoons vanilla (or 1 teaspoon vanilla and 2 teaspoons bourbon)
pinch of sea salt

Method:
Place sugar in a small heavy sauce pan. Pour water evenly over the top. Turn stove top to medium-high heat. Hold sauce pan by the handle and swirl occasionally until sugar has dissolved. Turn heat to high, and boil until syrup turns brown around the edges of the pan, about 6-8 minutes. Swirl the syrup occasionally until it turns a deep amber and just begins to smoke.
Remove pan from heat. Add butter and whisk, until all butter is mixed in. Stir in cream. Take care adding the butter and cream as the caramel will boil up and sputter quite a bit.
If sauce has any lumps, set pan over low heat and stir until smooth then turn off heat again.
Stir in vanilla and salt.


Friday, August 12, 2011

Zucchini Cornbread

By mid-August, if you're anything like me, you've probably eaten zucchini in almost every incarnation possible! It's so plentiful and I love it, but we've eaten it grilled, fried, roasted, sauteed...I have even baked it into cupcakes. So I was looking for some new way to use up what was left of my two pounds of zucchini I had purchased at the farmers market. I had bookmarked this recipe for zucchini cornbread from last month's Bon Appetit. Zucchini bread is one of my favorite summertime treats but was looking for something I could serve with dinner. I liked the idea of a savory zucchini bread and corn muffins are one of my favorite things. So this was the perfect combo!

The recipe was for one large loaf, but I decided to make one mini loaf and the rest I made into muffins. I really liked how the muffins turned out. They were the perfect size for serving with dinner. The best part is I have another great use for that never ending summer zucchini!

Zucchini Cornbread
source: Bon Appetit, July 2011, Recipe by Sara Dickerman
Yields: 1loaf, or 2 mini loaves, or about 12 muffins
(Printable Recipe)
Ingredients:
1/2 cup (1 stick) unsalted butter
2 large eggs, lightly beaten
1/2 cup buttermilk
1 large zucchini (about 10 ounces)
1 cup all-purpose flour
1/2 cup whole wheat flour
1/2 cup sugar *
1 teaspoon baking powder
3/4 teaspoon salt
1/2 teaspoon baking soda
3/4 cup medium-grind cornmeal


Method:

Position a rack in the middle of oven and preheat to 350°. Spray with cooking spray or butter a 9 x 5 x 3" loaf pan, mini loaf pans or a muffin tin, depending on which you choose to use.

Melt 1/2 cup butter in a small saucepan over medium-high heat. Continue cooking until butter solids at bottom of pan turn golden brown, about 3 minutes. Scrape butter into a medium bowl. Set aside and let cool. Whisk in eggs and buttermilk.

Trim zucchini ends. Thinly slice five 1/8" rounds from 1 end of zucchini, if making the large loaf, and reserve for garnish. (You will need more zucchini slices if making the mini loaves or muffins. I used one small zucchini sliced in 1/8 inch slices.) Coarsely grate remaining zucchini. Add to bowl with butter mixture and stir until well blended.

Sift both flours, sugar, baking powder, salt, and baking soda into a large bowl. Whisk in cornmeal. Add zucchini mixture; fold just to blend (mixture will be very thick). Transfer batter to prepared pan and smooth top. Place reserved zucchini slices atop batter down center in a single layer.

Bake bread until golden and a tester inserted into center comes out clean, 55-65 minutes. *The mini loaves take about 35 minutes and the muffins take about 25 minutes to cook. Let cool in pan 10 minutes. Remove from pan; let cool completely on a wire rack.  Can be made 1 day ahead. Store airtight at room temperature.
*The bread is delicious as is but next time I think I'll cut back on the sugar just a bit, for a slightly more savory bread.
Sorry for the bad lighting in this photo, but this muffin kinda reminded me of Alfalfa from The Little Rascals!
is it just me or can you see it too??!!

Wednesday, August 10, 2011

Life is just a . . .

bowl of cherries

Life is just a bowl of cherries
Don't take it serious,
Life's too mysterious
You work,
You save,
You worry so
But you can't take your dough
When you go, go, go

So keep repeating "It's the berries."
The strongest oak must fall
The sweet things in life
To you were just loaned
So how can you lose
What you've never owned

Life is just a bowl of cherries
So live and laugh,
Laugh and love
Live and laugh at it all!
Judy Garland
When life seems like it's the pits, celebrate the little things like these gorgeous Rainer cherries.  They're even better baked up in this cake because the pits have been removed!
This cake is so quick and simple, you could whip it up at a moments notice and everyone will think you're a domestic goddess. This recipe is adapted from a recipe from Gourmet for a raspberry buttermilk cake. The cake itself is perfect for almost any soft fruit. It's a moist cake that can be changed slightly for a variety of different variations. I added almond extract and slivered almonds because I thought those flavors would compliment the sweet cherries. I used Rainer cherries but any sweet cherry would work as well.


Buttermilk Cake with Sweet Cherries
Source: Gourmet, June 2009,by Melissa Roberts(adapted)
(Printable Recipe)
Ingredients:
1 cup all-purpose flour
1/2 teaspoon baking powder
1/2 teaspoon baking soda
1/4 teaspoon salt
4 Tablespoons (1/2 stick) unsalted butter, softened
2/3 cup
1 1/2 tablespoons turbinado sugar (or regular sugar)
1/2 teaspoon almond extract
1 large egg
1/2 cup well-shaken buttermilk
1 cup fresh cherries, pitted and halved
1-2 Tablespoons of slivered almonds (optional)


Method:
Preheat oven to 400°F with rack in middle. Butter and flour a 9-inch round cake pan.
Whisk together flour, baking powder, baking soda, and salt.
Beat butter and 2/3 cup sugar with an electric mixer at medium-high speed until pale and fluffy, about 2 minutes,add the almond extract. Add egg and beat well.
At low speed, mix in flour mixture in 3 batches, alternating with buttermilk, beginning and ending with flour, and mixing until just combined.
Spoon batter into cake pan, smoothing top. Scatter cherries and almond slivers evenly over top and sprinkle with remaining 1 1/2 tablespoons turbinado sugar.
Bake until cake is golden and a wooden pick inserted into center comes out clean, 25 to 30 minutes. Cool in pan 10 minutes, then turn out onto a rack and cool to warm, 10 to 15 minutes more. Invert onto a plate.


That's just got to put a smile on your face!