Showing posts with label Easter. Show all posts

Wednesday, March 27, 2013

Hot Cross Buns

I have had this recipe for hot cross buns stuck in a notebook that I use to save recipes I want to make sometime. It's been in there for several years now, a relic from the days when I'd print off recipes I wanted to make and keep them in a notebook. Thank goodness for Pinterest, now I can save recipes that I may never make and not be haunted by a notebook full of wasted paper! Anyway, I did finally get around to making the hot cross buns. Now only several hundred more recipes to go...plus all my new pins...

This was my first attempt at making hot cross buns. They are lightly sweet, spicy bun, containing dried fruits  such as raisins, and marked on top with a cross. Traditionally these buns where made to be served on Good Friday, The cross was made on them to represent the Crucifiction.

I was pretty satisfied with the results. I did make a few minor changes to the original recipe, mainly replacing the candied lemon and orange peel, with zest of each instead. I'm not a fan of candied peels and also they can be difficult to find in the grocery stores in my area. Which means I would have to make them if I wanted to add them to this recipe and since I don't care for them much, zest was a good sub. If you want to use the candied peels, then by all means go ahead and use them in your buns.

I also used golden raisins that I "plumped". Way back when I first started blogging, I made Sherry Yard's oatmeal cookies, which still the absolute best oatmeal cookie I've ever had. She says the secret to her cookies are "fat raisins". She has you boil the raisins with orange juice, rum, sugar and white wine. The liquid causes them to plump up, hence the name fat raisins. I've been using this idea in lots of recipes ever since I made those cookies. For this recipe I just squeezed the juice of one orange over the raisins and popped them into the microwave for just long enough for the liquid to come up to a boil. I just allow the raisins to cool in the liquid, drain and and use in the recipe. You could use just water if you don't have juice but I wanted to add a little more orange flavor to my buns so I used orange juice. Try these raisins in any of your baked goods calling for raisins, you won't believe how good they are!

For those of you that are wondering, yes, I did sing the Hot Cross Buns song while I made these buns. This recipe makes some big buns, definitely worth two a penny, I would think!
Truly traditional hot cross buns have candied fruit peels and the crosses are made from pastry, not sugar. I guess you can call mine hot cross-ish buns...but that's harder to sing!

Hot Cross Buns
SOURCE: Country Living Magazine (adapted)
PRINTABLE RECIPE

INGREDIENTS:
1 cup milk, warmed to 110°F
1 package dry active yeast
3/4 cup sugar plus 1 teaspoon sugar
2 1/4 cup all-purpose flour
2 cup bread flour
1/2 cup raisins, regular or golden, plumped*(optional)
1 heaping teaspoon lemon zest
1 heaping teaspoon orange zest
1 teaspoon salt
1/2 teaspoon cinnamon
1/4 teaspoon ground nutmeg
1/8 teaspoon ground cloves
4 tablespoon unsalted butter, melted
2 large eggs

Egg Wash
1 large egg yolk
1 tablespoon water

Glaze
2/3 cup confectioners sugar
1/4 teaspoon vanilla
1 tablespoon milk

*Plumping raisins, place raisins in a microwave safe bowl, add about a half of cup of liquid, water or orange juice or a mixture. You could also use a couple of tablespoons of rum or brandy, in place of some of the water or juice. Heat in the microwave for 30 seconds, or until the liquid boils. Allow the raisins to soak in the liquid for about 10 minutes, drain any excess liquid, and use in the recipe.

METHOD:

Coat a large bowl with oil and set aside. Mix together the 1 cup warmed milk, yeast, and the 1 teaspoon sugar in a small bowl and let stand while you do the next step. Combine the flours, 3/4 cup of sugar, raisins, lemon and orange zest, salt, and spices in the bowl of a standing mixer fitted with a dough hook. Stir the dry ingredients together. Add in the butter, eggs, and the milk/yeast mixture. Mix using the dough hook until all the flour is mixed in and a sticky dough is formed, about 3 minutes. **Transfer the dough to a lightly floured surface and knead by hand until smooth, about 5 minutes. Dusting your hands with flour or rubbing a little vegetable shortening on them will help keep the dough from sticking to your hands as much. The dough will be sticky, just keep lightly sprinkling it with flour. I used about a tablespoon or less worked it in until the dough stuck to my hands then sprinkled lightly with flour again, just until you get a nice smooth dough. The dough is sticky but don't go crazy with the flour or you'll end up with heavy buns. 
 Form the dough into a ball, put it into the oiled bowl, turning to coat all sides with the oil. Cover with a damp kitchen towel and let rise in a warm, draft-free place until it doubles in volume, about 1 hour.

Line a baking pan with parchment paper and set aside. Punch the dough down, transfer to a lightly floured surface, and knead for 3 minutes. Divide the dough into 12 equal-sized pieces, about 3 1/2 ounces each. If you want small buns, divide the dough into 24 equal pieces. (You will probably need two baking pans for 24 buns) Shape each piece into a ball and place the balls about 1 inch apart in four rows of three (for 12 buns, use two pans for 24) on the prepared pan. Cover and let rise until the buns double in volume and touch one another, about an hour or so.
Preheat your oven to 400 degrees about 30 minutes before you plan to bake the buns.

When the buns are done rising,make the egg wash. In a small bowl, combine the egg yolk with 1 tablespoon water. Using a pastry brush, lightly brush the mixture on the top of each bun. Place buns in the lower third of the oven. Bake until golden brown, about 20  minutes (check at 12-15 minutes, if you made smaller buns). Transfer to a wire rack to cool.
In a small bowl, combine the confectioners' sugar, milk, and vanilla. Stir until smooth. Allow buns to cool slightly, about 10 minutes, drizzle a horizontal line across each row of buns followed by a vertical line to form a cross on the top of each bun.

**I followed the original recipe's instructions for kneading the dough, but next time I think I'll leave them in the mixer to knead because the dough was a bit too sticky for hand kneading, in my opinion.

In English folklore, they believe sharing a hot cross bun with another is supposed to ensure friendship throughout the coming year, particularly if  you say,"Half for you and half for me, Between us two shall goodwill be" before you eat them...Maybe I'll make up tune to go with that one and mix it up a bit!

Monday, March 18, 2013

Lemon Curd Filled Bunny Ear Cakes


The recipe for the cake part of this recipe on Nigella Lawson's How to be a Domestic Goddess. She calls them  fairy cakes, which are sometimes also called butterfly cakes when the cakes have a filling and a buttercream frosting. Butterfly cakes are sort of an English version of a cupcake. I realize probably just offend all of my English readers by comparing the two! Before making this recipe and reading many heated comments from English bakers on the differences of fairy/butterfly cakes and cupcakes, I was unaware how deep the feelings ran in this debate! Yes there is a difference between an American cupcake and an English fairy cake, but you have to admit, they are kind of similar...cake baked in a muffin tin, topped with a frosting...please don't send me nasty emails! :)
Anyhoo as I was putting the "wings" on my lovely lemon curd filled cupcakes butterfly cakes, ensconced in their adorable Spring-y baking cups, it occurred to me that if I placed the pieces upright rather than on their sides, they would look like rabbit ears instead of wings. How perfect with Easter just around the corner. Ta da! Lemon curd filled bunny ear cakes! Which are nothing like cupcakes and kind of like  English butterfly cakes...either my bases are covered or I've just offended both sides of the fairy cake/cupcake debate!

Nigella's fairy cake recipe couldn't be easier to make. It only takes a few minutes to whip up the cakes and they bake in under 20 minutes. Then they're ready to be made into bunnies or butterflies, which ever suits your fancy!

Bunny Ear Cakes (Butterfly Cake)
Source: Nigella Lawson, How to be a Domestic Goddess
Yield 10-12 regular size cupcakes
Printable recipe

INGERDIENTS:
1/2 cup, (1 stick) unsalted butter, softened
1/2 cup sugar
2 eggs
3/4 cup self-rising flour
1/2 teaspoon vanilla extract
3 tablespoons milk

lemon curd, store bought or homemade

METHOD:
Preheat oven to 375 degrees.
Line a 12 cup muffin pan with paper liners.
I baked mine in these paper baking cups I had, but a muffin tin lined with cupcake liners works just as well.

Put all the ingredients except for the milk into a food processor filled with the blade and process until smooth, about a minute. Pulsing quickly, while adding the milk down the funnel till just blended. Spoon batter into muffin pan, filling about 2/3 full.
Bake for 15-18 minutes or until they are golden on top. Cool completely

With a sharp knife and cut a circle out of the top of each cake at an angle (kind of a cone shape) about 1/2 inch from the edge of the cakes.
Cut each circle in half and set aside.

Fill the cakes with about 2 teaspoons of lemon curd. Fill a piping bag fitted with a tip with the frosting. (Alternately  you can put the frosting into a zip lock bag with a hole cut into one corner, to pipe out the icing.) Pipe the frosting onto the tops of the lemon curd filled cakes. Top with the cut out pieces of the cakes. I stood them upright to look like a bunnies ears. Dust with powdered sugar. Serve immediately or keep refrigerated until served. The cakes can be stored in an airtight container in the fridge for 3 or 4 days but are best the day they are made.

Frosting

1 stick butter, room temp
2 1/2 cups confectioner's sugar
Enough heavy cream to get a cream consistency
1 teaspoon of either lemon or vanilla extract

Mix butter and sugar together in a medium bowl with an electric mixer. Gradually add in enough cream to produce the desired consistency for spreading or piping. Mix in flavoring of your choice.

Happy Easter!


Thursday, March 14, 2013

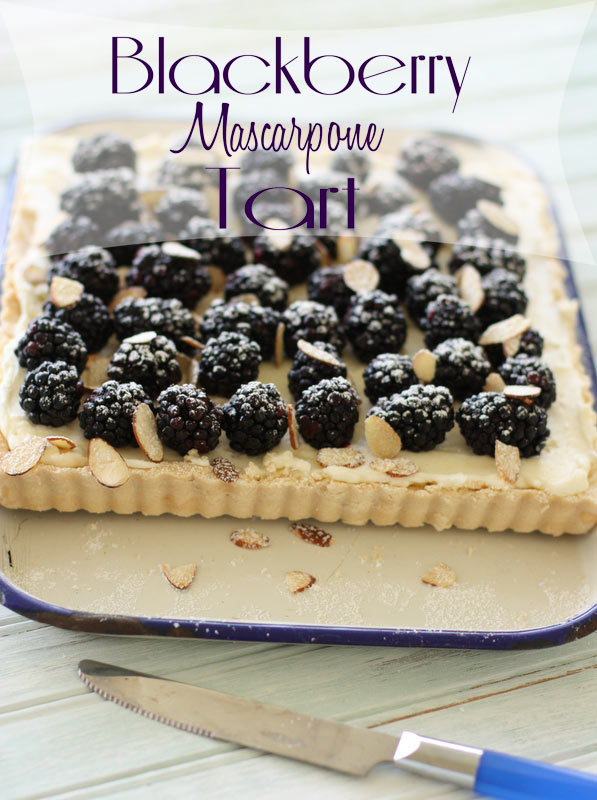
Blackberry Mascarpone Tart


Spring fever has struck me this week! Here in the South, Spring starts playing peek-a-boo with us right about now. The trees are starting to bud, the azaleas and dogwoods are beginning to break out. In the morning I'm reaching for a sweater, but by late afternoon, I'm contemplating breaking out the flip flops. I'm sooo ready for the flip flops but unfortunately I'll probably have to wait awhile to actually be able to wear them without my toes turning the color of these blackberries. Oh well I guess I have to settle for Spring desserts for now.

It may be a bit early to break out the flip flops but this blackberry tart is like Spring on a plate. This tart is not only absolutely delicious but so pretty it could be the center piece on your Easter table. Oh and did I mention, it couldn't be easier to make. Perfect!

Hello Spring!

Blackberry Mascarpone Tart
Printable Recipe

INGREDIENTS:
1 stick unsalted butter at room temperature
1 cup sugar
1/2 teaspoon salt
1/2 cup almond flour*
1 cup unbleached all-purpose flour
1 8 ounce package of mascarpone
1 cup confectioner’s sugar
1/2 cup heavy cream
3 cups blackberries
1/4 cup toasted almonds (optional)
powdered sugar, for dusting top

METHOD:
Preheat oven to 350 degrees. In the bowl of an electric mixer fitted with the paddle attachment, cream the butter and the granulated sugar. Add in salt and flours and mix until just combined. Press dough into a 9 inch tart pan. Bake for 20 minutes, or until edges begin to brown. Allow to cool completely.

In an electric mixer bowl, fitted with the paddle attachment, combine cheese and confectioner’s sugar. Add the cream. When it is all incorporated, switch to the whisk attachment, and increase the speed to high. Whisk until stiff peaks form.

Remove tart shell from the pan. Spread the cheese filling into the shell. Place the blackberries on top of the mascarpone mixture. Refrigerate until ready to serve. Before serving sprinkle with toasted almonds, if desired, and dust top of tart with powdered sugar.


*This recipe is not only easy but very adaptable as well. The almond flour can be replaced with any finely ground nut or with regular flour but I recommend a nut flour. It makes this tart just a little extra special. The mascarpone can be replaced with cream cheese, but the tart won't be quite as luscious. Almost any berry can be substituted for the blackberries, strawberries would be fantastic.

The wild azaleas are in bloom in the woods behind my house....flip flops are sure to follow!

Tuesday, April 10, 2012

Strawberry Roulade

Like most families, our holiday traditions revolve are food. That's especially true for Easter in our family. We have pretty much the same menu from year to year. The same was true this year. We had our annual Easter lunch at the farm on Sunday afternoon. It was a gorgeous day. My contribution to the meal was this Strawberry Roulade. It was delicious, very light, a perfect Spring dessert. The cake is a light sponge cake filled with a mascarpone whipped cream and fresh strawberries. It's kind of like a rolled up strawberry shortcake.


If you've never made a roulade before don't be intimidated by the process. It can be a little nerve racking to roll up a cake in a towel, but it's easier than it looks.  


Strawberry Roulade
Source: TheBakingPan.com (adapted) 


Printable recipe
For the Cake:
2/3 cup all-purpose flour
1 teaspoon baking powder
1/2 teaspoon salt
4 large eggs, separated
3/4 cup granulated sugar, divided
2 tablespoons water
1 teaspoon pure vanilla extract

Method:
Preheat oven to 375 degrees F. Prepare one 10½ x15½ x1 inch Jelly Roll pan; lightly grease the pan or spray with baking spray, line with parchment paper, and then lightly spray with baking spray.

Sprinkle a clean towel with 1/4 cup confectioners’ (powdered) sugar. Set aside to use after the cake is baked. A small kitchen towel that is a little larger than the 15x10 inch pan works well.

In a medium mixing bowl, combine flour, baking powder, and salt; sift or whisk together to mix. Set aside.
In a large bowl of an electric mixer, add the egg yolks and beat 3 to 5 minutes on medium-high speed until the egg yolk foam becomes thick and lemon colored. With the mixer on medium speed, VERY slowly add 1/2 cup of the sugar to the eggs, either one tablespoon at a time, or in a very slow steady stream, taking from 2 to 3 minutes to add all of the sugar, and beating until the eggs and sugar are fully incorporated. Scrape down the sides and bottom of the bowl with a rubber spatula. The mixture will be thick and a pale yellow color. Add the water and vanilla and continue mixing for another 1 minute until well blended.
With the mixer on low speed, gradually add about 1/2 of the flour mixture, mix just until blended, and then add the remaining half, mix just until blended, scraping down the side of the bowl as needed.
In another large mixing bowl and using clean beaters, beat the egg whites with an electric mixer until soft peaks form. Gradually add the remaining 1/4 cup sugar; continue beating until stiff peaks form. Using a balloon type whisk or large rubber spatula, gently fold about 1/4 of the beaten egg whites into the batter to lighten the batter, and then fold the remaining egg whites in.

Bake:
Spoon the batter into the prepared pan and smooth the surface with the back of a large spoon or large offset spatula. Bake for 12 to 15 minutes or until the top of the cake springs back when lightly touched. Remove from oven, immediately loosen edges of cake from pan and turn the cake over onto the prepared towel. Carefully peel off the parchment paper, and then roll the cake and towel together tightly, starting with the narrow end. Place seam side down on a wire cooling rack to cool completely.

For the Filling:
1 1/2 cups heavy whipping cream, cold
1/2 cup mascarpone
1 teaspoon vanilla
2/3 cup of powdered sugar
Sliced strawberries (about 1 1/2 cup)
*(1/2 cup Strawberry Jam, optional)

To make the filling, whip together the mascarpone, heavy cream, sugar and vanilla until stiff peaks form.

Assembly:

Carefully unroll cooled cake but don’t try to make the cake lie completely flat, the edge should remain curled so that the cake doesn’t split.


Spread whipped cream over the cake and under the curled edge and leaving a 1 1/2 inch border on the far side. Sprinkle strawberries over the whipped cream. Gently re-roll the cake without the towel, starting with the curled end. Place seam side down on a serving plate. Cover and refrigerate at least 2 hours before serving. Dust with additional powdered sugar if desired.


*Note: The original recipe called for 1/2 cup of strawberry jam spread over the cake before spreading on the whipped cream. I didn't have strawberry jam so I left it out but the jam would add a bit more strawberry flavor to the cake so I think I'll add it next time I make this.


A great dessert to impress your friends with!


Tuesday, April 3, 2012

Stenciled Easter Cookies


I get asked to make a lot of decorated sugar cookies and I have a love/hate relationship with royal icing. That's actually an improvement over the outright hatred I used to feel for it. We've worked out most of our issues, (well I've done the all work) and now have a pretty good working relationship. Although sometimes, on occasion, I still yell at it, call it mean names, and threaten to throw it away and never use it again...rrrr love/hate! When it came to these cookies I didn't feel like dealing with my frenemy royal icing. I was just making these cookies for fun and didn't want to work that hard. So here is my lazy girl answer to royal icing decorated sugar cookies. I went easy all the way. I made a no-chill sugar cookies, really just roll out, cut out, and bake...easy!  Instead of high maintenance, finicky, royal icing, I made super easy corn syrup icing, no whipping or thinning, just mix and use...also very easy. Then I iced cookies, when the icing dried, I threw a stencil on the cookies and sprayed with some Wilton color mist. So easy and cute! The only problem with these cookies is that the stenciling was really fun and now I'm coveting  this airbrush cake decorating kit. Maybe one day!

How adorable are these cookies!
No-Chill Sugar Cookies
Source: Wilton recipes

Yield: about 3 dozen 3-in. cookies

Ingredients:
1 cup (2 sticks) unsalted butter, softened
1 1/2 cups granulated sugar
1 egg
1 1/2 teaspoons vanilla extract
1/2 teaspoon no-color almond extract 
2 3/4 cups all-purpose flour
1 teaspoon baking powder
1 teaspoon salt

Method:
Preheat oven to 350ºF.

In large bowl, beat butter and sugar with electric mixer until light and fluffy. Beat in egg and extracts. Mix flour, baking powder and salt; add to butter mixture 1 cup at a time, mixing after each addition. Do not chill dough. Divide dough into 2 balls.
On floured surface, roll each ball into a circle approximately 12 in. diameter x 1/8 in. thick. Dip cookie cutter in flour before each use. Bake cookies on ungreased cookie sheet 8-11 minutes or until cookies are lightly browned.
Note: These cookies taste great but do spread a little when baking, unlike this recipe, but for simple sugar cookies, it's a great choice.

When the cookies cool, pipe an outline(you can skip this but it helps keep the icing from running), spread icing on the rest of the cookie. Let the icing dry, about 6 hours, overnight is best. 

Corn Syrup Icing
Source: Karen's Cookies  
2 lb powdered sugar
½ C plus 2 T milk (10 T)
½ C plus 2 T corn syrup (10 T)
1 Tablespoon flavoring, anything you like: a combination of clear vanilla and almond extract is nice. I also like lemon flavoring for this icing.

Mix together till smooth. Divide up and color as desired.
You can use this icing just the way it is for both outlining and filling in. If you're looking for more detail, you can thicken up your outline color with a bit more powdered sugar if desired. The formula is not set in stone, feel free to experiment with different ratios of liquid to sugar to get the consistency you like the best.
Note: Love this icing....so much easier than royal icing. However, the consistency is too thin for piping intricate designs (so I'll still be using royal icing for those cookies) but it's perfect for a simple iced cookie, like these.

Now for the fun part.... stenciling! I found this pack of stencils at Wal-Mart in the craft section.
So cute and they're the perfect size for cookies!
Lay stencil on top

Spray iced cookie with color spray.
Ta da!
Notes: Be sure to cover your work area well, there's quite a bit of over spray. It takes a couple of tries to get the feel for using the color mist. I practiced on a paper towel first. The first couple of cookies still didn't turn out perfectly.  Doing couple of light coats works better than one heavy coat. There's a little bit of a learning curve but even the less than perfect cookies are delicious! 
This is one of the first ones I made...not exactly perfect!
zebra stripes!
Easter basket ready!


Wednesday, March 28, 2012

Lemon Lime Baby Cakes

 Sing Sing it's Spring!!
Beautiful Spring days like today bring back to mind a song from my childhood. As a young child, I loved playing my records on the family record player. I realize I'm probably dating myself by admitting we had a record player, as I'm sure some of you never had/used a record player. We had a record player even after CD's were readily available. New-fangled technology was not at all important to my parents and the record player worked just fine, so why change? My sisters and I had quite a few records that were recorded books with songs. The books to follow along with, accompanied the records. Each one of these records started with instructions on what sound to listen for to know when to turn the pages of the book. We had all the classics, Peter Pan, Alice in Wonderland, etc. But my favorite was the Black Beauty record/book and I could probably still sing the songs from that record. Anyway, one of the story records had a song called "Sing Sing it's Spring" on it. That's all I remember from that particular record but this morning when I woke up to the sounds of happy chirping, that old song popped into my head. 
That recollection has absolutely nothing at all to do with these baby cakes, except that the light fresh lemon lime flavor of these cakes will have you singing for Spring too!
Tint the glaze with some food coloring in pastel colors and these little babies are perfect for Easter! 
Lemon Lime Baby Cakes
Printable Recipe

Source: April 10th, 2009 - by Stephanie Younger
Yields: 18-24 mini cakes using a mini muffin tin or 12 cakes using a regular muffin tin
Ingredients:
1 1/2 cups all purpose flour
1 teaspoon baking powder
1/4 teaspoon salt
1/2 cup butter, at room temperature
1 cup granulated sugar
2 eggs
1 tablespoon fresh lemon juice
2 teaspoons fresh lime juice
1 tablespoon fresh lemon zest
1 teaspoon fresh lime zest
1/2 teaspoon vanilla extract
1/8 teaspoon almond extract
1/2 cup plain yogurt

For the drizzle:
1 1/2 cups confectioners’ sugar
lemon and lime juice or use several tablespoons of frozen lemonade or limeade concentrate, thawed
Tint with food coloring, if desired
I added some sprinkles too!
Whisk together the flour, baking powder and salt. Set aside. In a mixer, beat the butter and sugar until fluffy. Add eggs one at a time, mixing well between additions. Add lemon and lime juice and zests, vanilla and almond extract and yogurt. Add the flour mixture, mix just until combined. Grease the pan of your choice and fill the cups half way. Bake at 350 degrees for 15-17 minutes or baked through and when cooled, transfer to a wire rack. In a small bowl combine the confectioners’ sugar and enough lemon and lime juice or lemon-aid concentrate to make a nice consistency for the drizzle. Drizzle over the cakes.

Are you singing yet??

Tuesday, March 13, 2012

Strawberry Swirl Cream Cheese Pound Cake

Spring has sprung here in the Southeast. I don't know what that means to you but for me it means strawberry season!  For many years, my parents grew strawberries on a commercial level. So as you can imagine, I've eaten a lot of strawberries, in almost anyway imaginable.  One of my favorite ways to use strawberries is to macerate them. Are you impressed by that term?? It's not nearly as impressive as it sounds. It's just sliced berries with sugar that sit until the juices release. We like to mash the berries slightly (I use a potato masher). We called mashed strawberries....fancy, I know, but that's just how we are around here.  At this point you can do anything with the mashed strawberries. They're delicious on top of ice cream, yogurt, pancakes, the list goes on, but pile them on top of a hunk of buttery pound cake maybe a bit of freshly whipped cream...simply wonderful!   
Last month's Southern Living featured a pound cake with strawberries swirled through it, on the cover.  When I read through the recipe it sounded delicious but called for a strawberry glaze for the swirl. I'm not a fan of strawberry glaze. It has a kind of artificially taste that I don't like. I decided to cook down some berries and make my own glaze to swirl in the cake. I was going to strain the berries and make a syrup more like the original recipe called for but I decided I liked the idea of having strawberry pieces baked into the cake. I could have my mashed berries baked right into the cake...perfect!

Strawberry Swirl Pound Cake


Source: Nancy H. Test, West Chester, Ohio,  

MARCH 2011 (adapted)
Printable Recipe
Ingredients:
1 1/2 cups butter, softened
3 cups sugar
1 (8-oz.) package cream cheese, softened
6 large eggs
3 cups all-purpose flour
1/2 teaspoon almond extract
1 teaspoon vanilla extract
1 teaspoon lemon zest

2/3 cup strawberry glaze
1 (6-inch) wooden skewer

Method:
Preheat oven to 350°. Beat butter at medium speed with a heavy-duty electric stand mixer until creamy. Gradually add sugar, beating at medium speed until light and fluffy. Add cream cheese, beating until creamy. Add eggs, 1 at a time, beating just until blended after each addition. Scrape down the sides of the bowl.
Gradually add flour to butter mixture. Beat at low speed just until blended after each addition, stopping to scrape bowl as needed. Stir in the lemon zest, almond, and vanilla extracts. Pour one-third of batter into a greased and floured *10-inch 14 cup tube pan (about 2 2/3 cups batter). Dollop 8 rounded teaspoonfuls strawberry glaze over batter, and swirl with wooden skewer. Repeat procedure once, and top with remaining third of batter.

Bake at 350° for 1 hour to 1 hour and 10 minutes or until a long wooden pick inserted in center comes out clean. Cool in pan on a wire rack 10 to 15 minutes; remove from pan to wire rack, and cool completely (about 1 hour).

Notes:*the original recipe said to use a 10-inch 14 cup tube pan but I used my 10-inch 12 cup bundt pan.

Strawberry Swirl
Strawberry Swirl
Ingredients:
2 cups strawberries(about 1 lb), quartered
1/3 cup sugar
1/2 cup water
2 teaspoons lemon juice
1 tablespoon corn starch

Method:
Combine the water, strawberries, sugar, and lemon juice in a large saucepan on high heat. Stir and bring up to a boil.
After the mixture begins to boil, reduce the heat to medium low. Cook for 5-8 minutes, until the strawberries have completely broken down.  As the strawberries soften, use a wooden spoon or potato masher to break up the berries. (At this point you could strain the strawberries through a sieve for a smooth glaze, but I decided to leave the bits of strawberry in mine.)
Meanwhile, whisk the cornstarch with 3 tablespoons of water in a small bowl. Then, pour into the strawberries.
Increase heat to high, and continue to whisk the mixture until it thickens and the cornstarch becomes clear and loses it's cloudy appearance, approximately 3-5 minutes.
Remove  from heat, and pour into separate bowl to cool down. Use 3/4 a cup to swirl in the cake. Any leftovers are great served along with the cake.
This is a BIG cake when it's done. With that lovely swirl of berries running through it, this cake would be perfect for our family Easter gathering. Can't wait for an excuse to make this again!
Strawberry swirl!

Wednesday, April 8, 2009

Cautionary Tail..making peeps at home is not as easy as it looks!


It's happened again. Every time I do it I swear to myself "never again!". But hey I'm a mere human and she is not so it's not really my fault. No definitely not my fault, all the blame should go to Martha. She puts insanely cute things on her website and magazine and I'm sucked right back in. I know that it's probably humanly impossible to replicate the things she does but she makes it sound so simple. Just follow a few easy steps and Voila! I don't know what it is subliminal messages maybe but,I find myself thinking "yeah that looks easy, I could make that". Okay to be fair to Martha I do usually think if somebody else can do something, so can I, granted that it doesn't involve special training. I don't think I can perform surgery or fix you car or anything, but I can make a marshmallow peep...right? I mean Martha made it look so simple and the little rabbits were just so adorable. I'm pretty handy with a pastry bag and I'm a Daring Baker after all so you don't scare me!!! Those are all the thoughts I had when I saw the marshmallow peeps recipe on her website. Oh and by the way, yes you do scare me a little. haha
So yet again, like a crack addict, I convinced myself that this time I knew what I was doing and it would turn out great. I was going to make these adorable little peeps. They would be cute and probably taste really good as well.
That's what I thought anyway but that's not exactly how it turned out. I made the marshmallows for the peeps, no problem. No the problem came when I tried to take that marshmallow cream and make it into a rabbit. First of all Martha says you have to work fast, I should have known then and there to run away from this fast! But no it still looked easy...well not so much. You have to quickly get the marshmallow into the pastry bag. First problem for me was I needed a smaller tip to make the ears. I tried making the whole rabbit with the same tip, but the ears looked way to big and it just looked like a blob. So I ran grabbed another bag shoved a tip in and made the ears. Then tried to "pat down the spikes" which got my sugar wet which then stuck in a clump to my bunny, but only on the top. For some reason the sugar didn't want to stick to the sides on the rabbit. I guess I wasn't fast enough, meanwhile the marshmallow cream in the bag got cooler so the next rabbits came out a little lumpy but I kept trying! I did try to make ears that stood up to make mine look more like rabbits. It didn't help much.

The picture at the top is from Martha's site. My rabbits turned out, well lets just say a little less than that perfect than that. My rabbits look like they may have been exposed to toxic chemicals and mutated.
Consider yourself warned, they are not cute but here are my little mutant rabbits.


Here's the instructions for the peeps if you, like me, think you'd like to make these adorable little bunnies. Good luck getting them to look like Martha's bunny, but it was fun to try!

Fill rimmed baking sheet or small bowls with about 1 1/2 cups sugar. If desired, color white sugar by stirring in luster dust or sparkle dust a little at a time. Pipe shapes onto sugar. Bunnies and chicks must be completed one at a time. (I never made it to trying the chicks!)

Ingredients

Makes about 1 1/2 cups

1 unflavored gelatin (2 1/2 teaspoons)
1/3 cup cold water, for gelatin, plus 1/4 cup for syrup
1 cup sugar

Directions (this part IS pretty easy)

1. In the bowl of an electric mixer, sprinkle gelatin over 1/3 cup cold water. Allow gelatin to soften, about 5 minutes.
2. In a small saucepan, combine 1/4 cup water and sugar, and stir over medium-high heat until sugar is dissolved. Stop stirring, and place a candy thermometer into sugar water; wipe sides of pan with a wet brush if sugar crystals have splattered up. Boil sugar until temperature reaches the soft-ball stage (238 degrees). Remove syrup from heat; add to softened gelatin. Using the whisk attachment of an electric mixer, hand-stir the mixture a few minutes to cool; place bowl on the mixer stand. Beat on medium high with the whisk attachment until soft peaks form and the marshmallow mixture holds shape, 8 to 10 minutes.
3. Transfer marshmallow mixture to a large (14-inch) pastry bag fitted with a 1/2 inch (No. 11 Ateco) tip, and use immediately.

Bunny How-To
1. Pipe a small marshmallow mound onto sugar, about 1 1/2 inches long and 1/2 inch tall. Pipe two smaller mounds on either end for the head and tail. (umm right it sticky!)

2. Pipe the ears, starting from the top of the head onto the body, pulling forward and off to finish. With a damp finger, pat down any marshmallow spikes formed from piping.

3. Immediately sprinkle sugar over the entire surface of the bunny. Allow a few minutes for the shape to set. (right and while you're doing this the marshmallow cream in you pastry bag is quickly getting to cool and your next bunny will be lumpy!)

4. Pipe on a royal-icing face with a #1 Ateco icing tip; lift bunny out of sugar with a spoon or small offset spatula. Place in a parchment-lined airtight container until ready to serve, or for up to 2 weeks.

Well I was right about one thing, these peeps do TASTE really good. Way better then the mass produced ones.
I bow to you Martha you've proven to me once again that I am a mere mortal and I need to buy my peeps at Wal-Mart!