Showing posts with label dessert. Show all posts

Wednesday, January 15, 2014

Pink Champagne Cake


Happy New Year!! Ok I know I'm really just a tiny bit late to the party, but I brought a pink Champagne cake. Hopefully this will make up for my tardiness in posting!!
I recently came across a recipe for this cake and have been dying to make it ever since. I was putting together a cake tasting for a bride this week and thought this cake would be a perfect for a wedding. Everything about this cake just screams celebration!

This would be a great cake for any celebration...perfect for Valentine's day!!

Here are just a couple of my thoughts on this cake. If you don't like the taste of Champagne/sparkling wine, you probably won't like the cake. It has two cups of champagne in it and it has a distinct champagne flavor. I thought it tasted a bit like a Zabaglione, which is one of my favorite desserts. Also, you need to use a sweet, not a dry (brut) Champagne or sparkling wine. It doesn't necessarily have to be a pink champagne but it should be more sweet than dry. I used a sparkling Rose for this cake.
Once again, you really can taste the flavor of the Champagne, so buy one that would be good enough to drink.

Tuesday, August 13, 2013

Chocolate Espresso Mousse


Hello lover..oh excuse me,..but this mousse has stolen my heart! I've yet to find a chocolate that's too dark or too rich for me and this mousse fits into both of those categories. It's dark, silky, and completely luscious. (I like throwing in the word luscious whenever possible, I mean, how often can you really use it?? Try it. I dare you!...so there you go word of the day.) (You're welcome!)Anyhoo... If chocolate is your addiction, this mousse is sure to satisfy. The espresso and Kahlua in this mousse just serve to deepen the chocolate's (luscious) flavor. Also this mousse is really quick and easy it is to make. It only takes a few ingredients, all of which I almost always have on hand! So don't wait until your throwing a fancy dinner party to make it. Whip up a batch, top it with a dollop of whipped cream and some sprinkles, to up the fun factor, and enjoy this oh so luscious dessert any time!


Friday, May 24, 2013

Ultimate Peanut Butter Pie


In case I've never mentioned it before, I am in fact, a resident of The Peanut Capital of the World. Jealous? I thought so... In the Fall we, here in the Peanut Capital of the World, have a week long festival to celebrate all things peanut. Through the years, I've had many versions of the peanut butter pie. Peanut Butter pie is a truly a classic Southern dessert.  Most of the recipes I've seen for the pies are made using frozen whipped topping. I'm just not a fan of the stuff. Anything that looks and tastes like cream but contains no dairy just kinda scares me. The original recipe for this pie was also made with whipped topping but I decided to just whip up some cream and see what happened. Well let me tell you, it made a heavenly combo of peanut and cream. This is one decant pie, a creamy peanut buttery filling studded with chocolate and peanut butter chips, all held together with an Oreo cookie crust. Is your mouth watering yet?!? I made this pie for our family Memorial Day get together but I would be a perfect Father's day celebration pie as well. That sounds like a good excuse to make it again!

Thursday, May 9, 2013

Lemon Cheesecake with Ginger Shortbread Crust

I was recently invited by Walkers Shortbread to become an ambassador for their company. I've been a lifelong fan of Walkers Shortbread, so I jumped at the chance to join their program. One of the things I love about Walkers products is that they are made with all natural ingredients. The original shortbread is still made with just four ingredients: flour, butter, sugar, and salt, that's it!
As an ambassador, Walkers Shortbread has supplied me with several boxes of their cookies (score!). Included in this box was a box of the stem ginger shortbread cookies. I had never had the stem ginger cookies, one of Walkers' gourmet line of shortbreads but they may have become my new favorite. They are the perfect marriage of a shortbread cookie and gingersnap! I decided to grind them up and use the ginger cookies to make the crust for my lemon cheese cake.

Lemon Cheesecake with Ginger Shortbread Crust

For the Crust:
1 5.3 ounce package of Walkers Stem Ginger Cookies, finely ground
2 Tablespoons butter, melted

For the Filling:
1 lb cream cheese, at room temperature
2/3 cup granulated sugar
1/2 cup sour cream
3 eggs, at room temperature, lightly beaten
2 tablespoons lemon juice
Zest of 1 lemon
1 teaspoon vanilla extract

Cheesecake topping:
3/4 cup sour cream
3 tablespoons granulated sugar
1/3 cup whipping cream

 Blackberry Topping:
2 1/2 cups of fresh blackberries, divided
1/4 cup sugar
1 teaspoon lemon juice
1 teaspoon freshly grated ginger

METHOD:

For the Crust:
Preheat oven to 400 degrees. Lightly butter the sides of an 8 inch springform pan.
Place the Walkers ginger shortbread cookies into a food processor and process until they become crumbs with no large pieces. Stir in the melted butter and press the mixture evenly over the bottom of an 8 inch springform pan.
Place the springform pan on top of a flat baking pan or cookie pan. Bake the crust for about 5-8 minutes of until it starts to brown a bit around the edges.

For the Cheesecake Filling:
 In the bowl of an electric mixer, cream together the cream cheese and sugar until smooth. Mix in the  sour cream. Add the in beaten eggs, in a slow stream and mix until well combined. Scrape down the bowl, and stir in lemon juice, zest, and vanilla.
Pour into baked ginger crust and place in oven. Immediately turn heat down to 300 degrees F and bake for one hour.
Turn oven off. Crack open the oven door and let cake sit in oven for another 30 minutes. Remove cake from the oven and set on rack while mixing up the topping.

For cheesecake topping:
Set oven temp to 350 degrees.
In a bowl, combine all three ingredients, mix with a spoon until smooth.
Spread the mixture over top of baked cheesecake. If your cheese cake has any cracks on top,use the topping to fill them in.
Bake until set, about 10-15 minutes. Allow cake to cool for several hours before removing side of springform pan. Chill until ready to serve.

For the blackberry topping:
Place 1 1/2 cups of the blackberries into a small sauce pan. Add the rest of the ingredients, cook over medium high heat until the berries release their juices, about 5 minutes. Remove from the heat and stir in the remaining blackberries. Top the cooled cheesecake with the blackberry mixture. 

Cheesecake can be wrapped closely in plastic and refrigerated for about four days or frozen two weeks.

 This lemony cheesecake has a ginger-laced shortbread crust and is topped with a blackberry compote. It would be the perfect ending for your Mother's Day lunch or brunch.

Walkers has provided me with a special promo code for my readers to save 20% off your next purchase from, www.walkersus.com. Go to the site, place your order for any of their regular priced products and when you check out enter the code #HBBSPRING to receive the 20% discount on your order. This is offer is good until May 24th, 2013, so don't miss out!


Wednesday, April 24, 2013

Blueberry Upside Down Cake


Several years ago while searching for a blueberry dessert, I found this recipe for blueberry upside down cake. It comes from Thibeault's Table, a wonderful blog from Canada with lots of great recipes. Ann, the blogs author, and her husband also make and sell gorgeous hardwood cutting boards. They are truly one of a kind works of art and I really want one!
Anyway, the first time I made this cake I fell in love with it. Since then it's become one of my favorite go-to recipes for a quick, but really delicious fruit dessert. I've made it so many times over the years that I was positive that I had already shared it here. After looking through my archive it appears that I some how overlooked posting about this wonderful little cake. Well let me just fix that right now!

This cake is so amazing served warm, right out of the oven, especially with a little vanilla ice cream. However, as great as that is, I love it equally as much the next day with a cup of hot coffee. For me adding the cinnamon to the cake, gives it more of a coffee cake flavor. If you leave the cinnamon out it's more a vanilla cake. Either way you can't go wrong, but with the cinnamon, this cake and cup of coffee are a match made in heaven!

Blueberry Upside Down Cake
Source: Thibeault's Table (slightly adapted)
PRINTABLE RECIPE

INGREDIENTS:
1/4 cup melted butter
1/2 cup brown sugar
2 cups blueberries
1 tablespoon lemon juice
1/2 cup butter
3/4 cup granulated sugar
1 egg
1/2 teaspoon vanilla
1/4 teaspoon almond extract
1 1/3 cups all-purpose flour
2 teaspoons baking powder
1/4 teaspoon salt
1 teaspoon cinnamon (optional)
3/4 cup buttermilk
METHOD:
Preheat oven to 350 degrees  Combine melted butter and brown sugar. Spread evenly on bottom of a 9 inch round cake pan with at least 2 inch sides. Spread blueberries evenly over the brown sugar mixture and drizzle the lemon juice over the berries.
With an electric mixer, cream the butter and sugar together, beating until light and fluffy, about 3 minutes. Scrape down the bowl and beat in egg, almond extract, and vanilla. Sift together the flour, baking powder, salt and cinnamon (if using). Mix in one third of the dry ingredients. Add in half the milk. Mix in another third of the dry ingredients, when just mixed, add in the rest of the milk. Add the remaining dry ingredients, mix until just incorporated. Spread batter evenly over blueberry layer. Bake for 45 minutes or until toothpick inserted in center comes out clean. Let the cake cool 10 minutes in pan, then invert on to large flat plate or cake plate.

Follow my blog with Bloglovin

Monday, April 8, 2013

Strawberry Cake

Strawberry cakes are a Southern cake staple. However, almost every recipe I've found are made with a cake mix and strawberry flavored jello. I have been looking for strawberry cake recipe that's made from scratch,for quite sometime. I was thrilled when I found this recipe by I Made That using pureed strawberries in the batter. No cake mix or jello required! 


A couple of weeks ago, I was drooling over the keyboard browsing King Arthur's website, and came across a product they sell called cake enhancer. It's supposed to make cakes, and other baked goods, lighter, fluffier, and last longer. It can be used in almost any type of baked good from cakes to bread. I was intrigued and ordered a box to try. I decided to use it in this cake and see what happened. My cake did have a really nice light fluffy (almost box mix like) texture. I can't wait to use the cake enhancer in some of my other recipes. 
Cake enhancer was not in the original recipe so don't feel that you need to have it to make this cake. 

Strawberry Cake
Source: I Made That, ( slightly adapted)
PRINTABLE RECIPE

2 1/2 cups cake flour
2 Tablespoons King Arthur cake enhancer (optional)
1 tsp baking soda
1/2 teaspoon kosher salt
1/3 cup buttermilk
1/4 cup canola oil
1/4 teaspoon almond extract
1 teaspoon vanilla paste or extract
1/2 cup butter (one stick), room temperature
1 1/2 cups sugar
2 large eggs, room temperature, lightly beaten
1 cup pureed strawberries (put berries in the food processor or blender to puree)
1 teaspoon lemon zest

Preheat oven to 350 degrees. Line two 9" (or three 8") cake pans with rounds of parchment and butter well or spray with a non stick baking spray.
In a medium bowl, sift together the flour, baking soda, salt, and cake enhancer, if using. In another bowl, combine the buttermilk, oil, and vanilla and almond extract. Set aside.
In an electric mixer fitted with the paddle attachment, beat the butter and sugar for 3-5 minutes until it forms a paste like texture.  Scrape the bowl down well, and gradually add the eggs in a slow stream, beating  for about 1 minute at medium speed. Gradually add the buttermilk mixture. Mix for 1 minute at medium speed. Reduce the speed of the mixer to low and add the flour mixture. Mix until just combined. Stir in the pureed strawberries and the lemon zest.
Divide the batter equally into the prepared cake pans and bake 20-25 minutes or until the cakes spring back when touched lightly in the center. Allow the cakes to cool before removing from the pan.

Strawberry Cream Cheese Frosting
source: Recipe.com
8-ounces cream cheese
1 cup unsalted butter, softened
6 Tablespoons strawberry preserves
1  teaspoon vanilla extract 
4  cups confectioners' sugar
1  pinch salt

In a large mixing bowl, beat cream cheese and butter at medium-high speed  until smooth. Add strawberry preserves and vanilla, beat until combined. Add confectioners' sugar and salt. Beat at medium/low speed until the sugar is combined and the icing is smooth. If necessary, add in a little milk to get a smooth consistency. 


Sunday, January 20, 2013

White Chocolate Strawberry and Lime Cheesecake Bars

Want to be a hero at your next gathering? Make these cheesecake bars. The combo of lime, strawberry, and white chocolate is outstanding. The bars are creamy, slightly tart, really really good, oh, and super easy to make. You don't even have to turn on the oven. Feel free to keep that info to yourself and just bask in the praise and adoration from the lucky recipients of these bars.  Big pay off for minimal effort...pretty perfect!


White Chocolate Strawberry and Lime Cheesecake Bars

For the filling:

6 ounces high-quality white chocolate, chopped
3/4 cup chilled whipping cream
1 8-ounce package cream cheese, room temperature
3 tablespoons sugar
3 tablespoons fresh lime juice
Zest of 2 small limes
1 cup thinly sliced strawberries

For the crust:
1-1/4 cups graham cracker crumbs
1/4 cup sugar
1/3 cup butter, melted


Method:
Line 8x8x2-inch square baking pan with foil, extending over all sides. Mix all the crust ingredients together. Press firmly into the prepared pan. Chill for about 15 minutes in the freezer or 1 hour in the refrigerator.
Place the white chocolate into a microwave safe bowl. Put your bowl in the microwave and heat for about 1 minute. Stir. (Your chocolate will not look melted until you stir it.) If still lumpy, heat in 15-30 second intervals until it stirs smooth and creamy. Do not overheat or chocolate will burn and be unusable. Set aside while you make the filling.
Beat whipping cream in medium bowl until peaks form, set aside. In a large mixing bowl, beat cream cheese until smooth. Scrape down the sides of the bowl and add in the sugar, lime juice, and lime peel, beat until smooth. Beat in the melted white chocolate. Fold in whipped cream in 2 additions. Gently fold in the sliced strawberries. Spread the mixture onto the prepared graham cracker crust. Smooth the top with an off-set spatula or knife. Chill until filling is slightly firm, at least 2 hours. Using the foil, lift cheesecake out of pan. Cut into 9 pieces for large bars. Garnish with chocolate curls and sliced strawberries, if desired.

These cheesecake bars would make the perfect Valentine's dinner dessert!


Monday, September 24, 2012

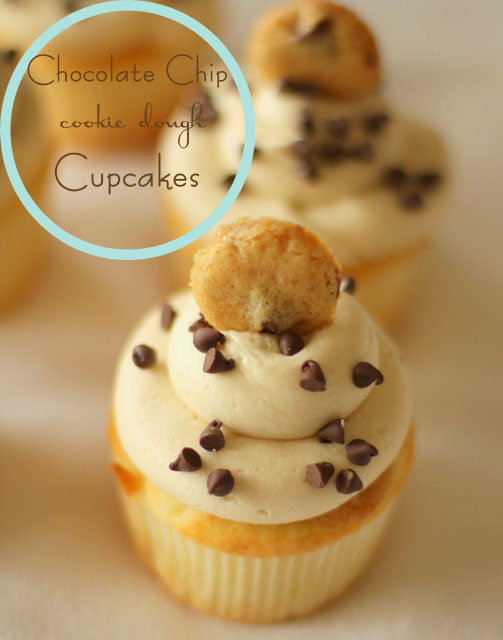
Chocolate Chip Cookie Dough Cupcakes

A couple of weeks ago I was asked to make a cupcake for someone that adores chocolate chip cookies. I did what I always do when I'm looking for inspiration and Googled it. I was shocked at how many recipes there were out there for cupcakes filled with chocolate chip cookie dough. Where have I been? Somehow I had missed this one! Anyway I made these for the birthday girl's party and have been getting requests to make these cupcakes ever since. 
They really are fantastic. The cupcake is very good and has a hidden surprise of cookie dough baked into the center. But the frosting...ooh my goodness the frosting!! It's what knocks this cupcake out of the park. It tastes just like chocolate chip cookie dough. I couldn't believe it when I first tasted it. I could just sit and eat it with a spoon, but I didn't do that. I used it frost the cupcakes. Well okay maybe, I might have snuck a couple of spoonfuls when no one was looking...maybe that happened...then possibly I licked the bowl...and the paddle attachment...
Anyway the combo of cupcake, cookie dough, and frosting make this a chocolate cookie dough lovers dream! 
  
Chocolate Chip Cookie Dough Cupcakes
source: Kevin and Amanda, slightly adapted
yield: about 2 doz

FOR THE COOKIE FILLING:
2 1/4 cups all-purpose flour
1 teaspoon baking soda
1 teaspoon salt
1 cup (2 sticks) butter, at room temp
3/4 cup sugar
3/4 cup light brown sugar
1 teaspoon pure vanilla extract
2 large eggs
1-12ounce bag chocolate chips (2 cups)
FOR THE CUPCAKES:
3 sticks softened butter
1 1/2 cups light brown sugar, packed
4 large eggs
2 2/3 cups all purpose flour
1 tsp. baking powder
1 tsp. baking soda
1/4 tsp. salt
1 cup milk
2 tsp. vanilla extract
FOR THE FROSTING:
3 sticks softened butter
3/4 cup light brown sugar, packed
3 1/2 cups powdered sugar
1/2 tsp. salt
2 tbsp. milk
1 tsp. vanilla extract
METHOD:

To make the cookie dough:
In a medium bowl, whisk the flour, baking soda, and salt. Set aside.
In the bowl of a stand mixer, at medium-low speed, mix the butter with the sugar and brown sugar. Raise the speed to medium-high and mix until creamy, light, and fluffy. Scrape down the bowl. Add the vanilla and eggs. Mix together until incorporated.
Add half of the four mixture. Mix until just combined, scrape down the bowl. Add the remaining flour mixture and mix until just combined. Stir in the chocolate chips.
Using a small ice cream/melon baller, scoop, shape the dough into balls. Freeze on a baking sheet lined with a silicon mat or parchment paper. 
To make the mini cookie topper:
Use the leftover cookie dough to make mini cookie toppers for the cupcakes. Spread all the leftover dough on a cookie sheet lined with parchment or a silicone baking mat. Try to spread it fairly evenly. Bake until the cookie is lightly browned, do not over cook. Let cool about a minute. While the cookie is still warm cut out mini cookies using a the end of a large piping tip or a mini round cutter. Do this before the cookie cools down too much or you may not be able to cut the mini cookies out.


To make the cupcakes:
Preheat the oven to 350° F. Line cupcake pan with paper liners.
In a medium bowl, combine the flour, baking powder, baking soda, and salt. Set aside. The bowl of a stand mixer, combine the butter and brown sugar. Beat together on medium-high speed until light and fluffy. Mix in the eggs one at a time, beating well after each addition and scraping down the sides of the bowl as needed.Mix in the vanilla.
Add the dry ingredients to the mixer bowl on low speed, alternating with the milk, beginning and ending with the dry ingredients, add it into the batter in thirds. Mix each addition just until incorporated.
Fill the prepared cupcake liners 2/3 full with the cupcake batter. Place a frozen cookie dough ball on the top center of each cupcake.
Bake at 350 for 16-20 mins.

To make the frosting:
Combine the butter and brown sugar in a mixing bowl and cream on medium-high speed until light and fluffy. Add in the powdered sugar, beating until smooth. Add in the salt, milk, and vanilla extract until combined.

When the cupcakes are cool, frost, sprinkle with mini chips and top with a mini chocolate chip cookie.
If you like eating cookie dough straight from the bowl, then this is your cupcake!

Tuesday, July 24, 2012

Pie is the new cupcake?

I've read articles recently both from the Washington Post and the New York Times that have proposed that pie is the new cupcake. NPR declared the cupcake dead and put pie on its throne. Never fear cupcake lovers, your beloved little cakes aren't going anywhere. They just have a little competition for dessert supremacy from the lowly pie. Hand pies just may have a shot at beating out the cupcake. I have to admit, the hand pie has won my heart. Hand pies are a smaller, portable version of a pie, much like a cupcake is to a cake. However rather than frosting, its delicious filling is ensconced in a flaky, buttery crust. For me, a good pastry crust trumps frosting any day.

This month Half Baked turned 5! I can't believe it's been 5 years since I started this little blog. My own birthday is also just a couple days away. How better to celebrate than with some hand pies! I really love cherries so I filled the pies with a sweet cherry filling....move over cupcake, there's a new kid in town!


Cherry Hand Pies
Yield: about 6 hand pies
Printable recipe
FOR THE CRUST:
1 1/4 cups all-purpose flour
1/2 teaspoon salt
2 teaspoons sugar
1/2 cup(1stick) cold butter, cut in small pieces
1/8 cup shortening- chilled
3 to 4 tablespoons ice cold water

Put the flour and salt in the bowl of a food processor and pulse a few times to combine. Scatter the pieces of butter and shortening over the dry ingredients and pulse until it is coarsely cut in-you should have pieces the size of oatmeal flakes and some the size of peas. Drizzle the water over the mixture. Using on/off pulses, pulse just until the dough holds together when pinched. Turn dough out onto a lightly floured surface. Form into a disk, wrap with plastic wrap and chill for at least one hour.

FOR THE FILLING:

8 ounces fresh or frozen sweet cherries, pitted and roughly chopped
2 tablespoon sugar
1/4 teaspoon almond extract
1 teaspoon lemon juice
1 1/2 tablespoons cornstarch

Preheat oven to 375°

Pit and roughly chop the cherries. Place in a bowl and add the sugar, almond extract, lemon juice, and corn starch. Mix well and set aside.
On a lightly floured surface, roll out the pastry dough to about 1/4 inch thick. Using a 4 inch cutter cut out circles. (I got five 4 inch and 1 smaller circle out of my dough) Place the cut out pieces of dough onto a rimmed baking sheet lined with parchment or a silicone mat.

Place about 2 tablespoons of the cherry mixture onto one-half of each round. Lightly brush a little milk around the edge of the covered half of each round. Fold remaining dough over to enclose, forming a half moon. Gently press edges together with the tines of a fork to seal. Brush the tops of each pie with milk. Using a paring knife, slash the top of each pie.
Bake until golden brown, 25 to 30 minutes. Transfer pies to a wire rack to cool slightly before serving. Dust with powdered sugar. Pies can be stored in an airtight container at room temperature up to 3 days.
*NOTE: I used Rainer cherries because they are my favorite but Bing cherries are great too.You could also use sour cherries if you want, just add a little more sugar to the filling.

Just in case you thought that having pie meant you'd have to sacrifice your sprinkles, who says you can't have sprinkles on your pie? Just top the hand pie with a powdered sugar glaze and add sprinkles. Be afraid cupcakes, be very afraid!

Wednesday, July 18, 2012

Don't even think about turning the oven on!


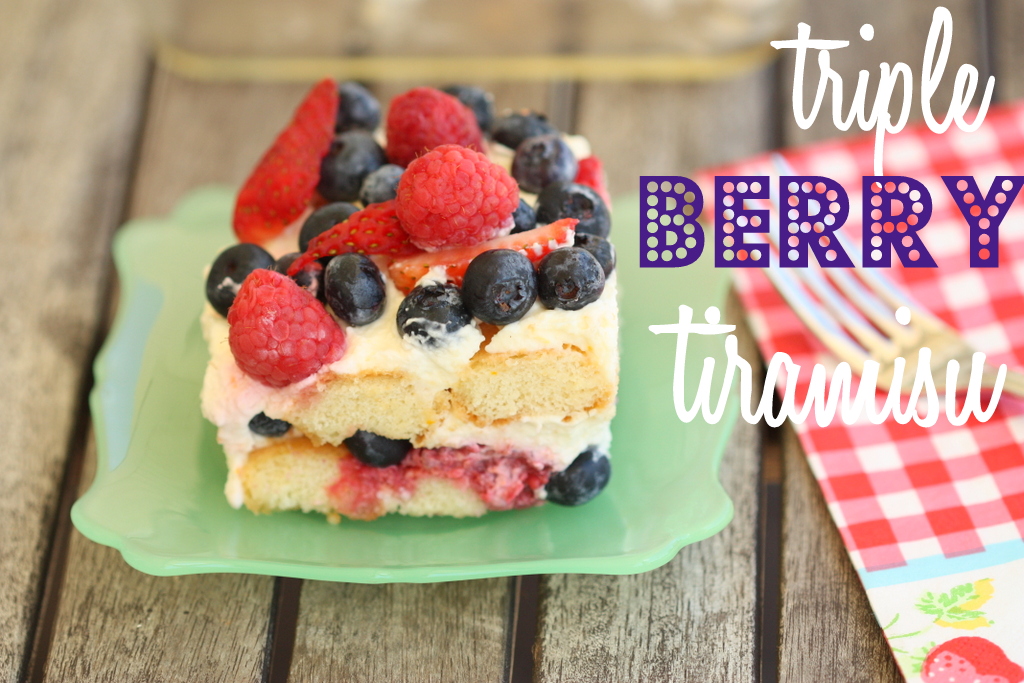
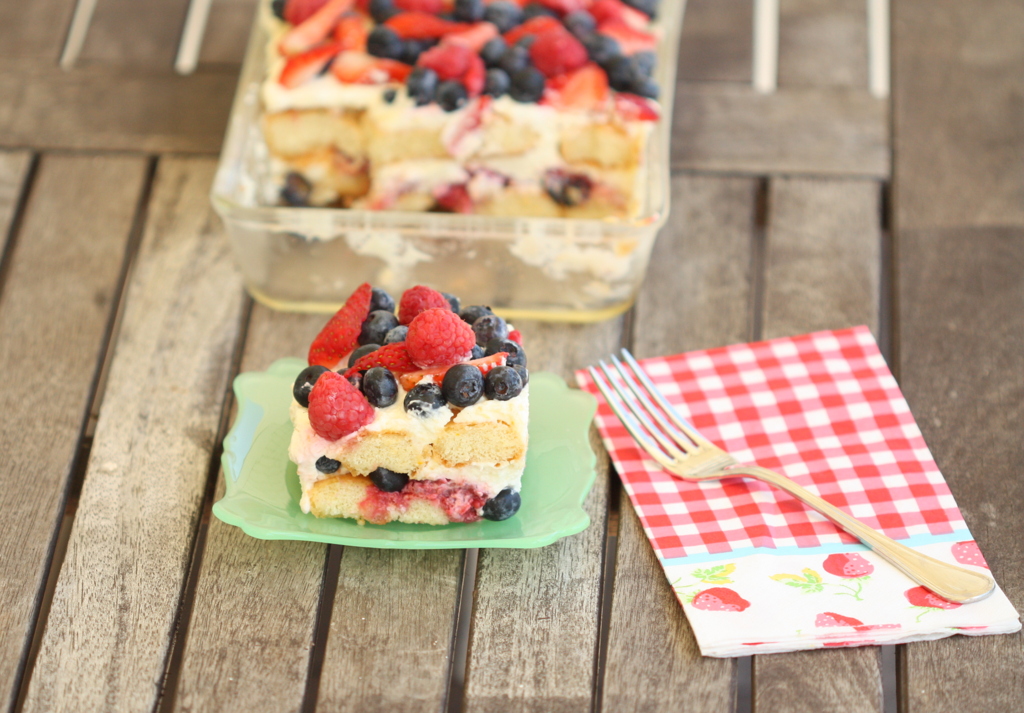
Most of the country has been hit with triple digit temps for the last couple of weeks. In places like Minnesota and Wisconsin, it's called an epic heatwave. Here in the deep South, we just call it summer. We rarely make it through a summer without at least a few days of 100+ temps. That kind of heat just makes me want to find a cool spot, a good book, and a glass of sweet tea. The last thing I want to do is turn on the oven, but since we still have to eat, I try to find things that can be made with as little cooking as possible. This triple berry tiramisu is the perfect dessert for those hot summer days. It's no-bake, yeah! Full of ripe fresh berries tucked into a lemony cream, yeah! And, it's served COLD, woohoo! Okay, so you do have to turn on the stove for like 5 minutes to make the syrup, but that's it as far as having to cooking anything for this dessert. This tiramisu is the perfect antidote for a sweltering hot summer day!

Triple Berry Tiramisu
Source: King Arthur website, Fresh Berry Tiramisu, Adapted
Printable Recipe
2-7ounce packages of ladyfinger cookies

SYRUP
Zest of 2 lemons, peeled in strips with a peeler
Juice of 2 lemons (1/3 to 1/2 cup lemon juice)
3/4 cup sugar
3/4 cup water
2 tablespoons Grand Marnier or orange juice (optional)

FILLING
1 pound mascarpone cheese
2 tablespoons lemon zest
1 cup whipping cream
1/2 cup confectioners’ sugar
2 quarts berries: raspberries, blueberries, strawberries or any combination you like

TO MAKE THE SYRUP: Combine all the syrup ingredients in a small pot and bring the mixture to a simmer, stirring occasionally until the sugar dissolves. Once the mixture is clear, remove the syrup from the heat, strain it, and allow it to cool.

TO MAKE THE FILLING: Place the mascarpone in a mixing bowl, and stir in the lemon zest. Add the whipping cream a third at a time, stirring between additions until the mixture is smooth and starts to thicken slightly. Stir in the confectioner’s sugar.


TO ASSEMBLE: Lightly spray a 9-inch square pan with cooking spray. Drop the ladyfingers one at a time, into the cooled lemon syrup. Be sure to flip them over to coat both sides with the syrup. Do not over soak the ladyfingers or the tiramisu will be soggy. Fit as many ladyfingers into you pan as you need to cover the bottom of the pan, you may need to break a few to fit them in. Add a layer of your mixed fruit on top of the ladyfingers. Top the fruit with half of the cream mixture and add another layer of ladyfingers that have been dipped in the syrup. Spread the rest of the cream mixture on top of the lady fingers. Arrange the rest of the fruit on top. Chill the tiramisu for at least one hour before serving.


Tuesday, July 3, 2012

Happy 4th of July!

Here's just a quick, fun idea for a dessert for your 4th celebration. I made this one bowl vanilla cake. It's from Culinate, a great food centered website. You can use any white cake you want, but this recipe is easy and tastes great. I let the cake cool completely. I wanted to make individual cakes so I cut the cake into stars with my 3" star cookie cutter. You can also leave the cake whole, if you'd rather not bother with cutting out the stars, but how cute are they??!

I split the stars horizontally and spread on a layer of strawberry preserves, and put the stars back together. If you want you could use fresh strawberries, sliced and sprinkled with a little sugar instead of the preserves. Then I made some sweetened whipped cream, pipped it on top and decorated with a few fresh blueberries.  Easy, festive, and delicious! I hope you have a safe and happy 4th of July!


Thursday, June 14, 2012

Green Tomato Cake


I can hardly believe that June is almost half gone already! I've been working on a new project out at the farm and I've neglected to post here much this month. I'm so excited about my latest venture, the Route 52 Farm Trail but it's been very time consuming. Anyway, earlier this week Mom and I were canning some of the gorgeous San Marzano tomatoes my dad grew this year, when a summer storm hit. If you've every lived in the South, then you know that sometimes they seem to come from nowhere and are gone almost as quickly. This one was really intense for about 30 minutes and then was gone. We really needed the rain but the strong winds caused a few green tomatoes to fall off the plants. I brought them home with me and thought I fry them for dinner. I was looking in The Crescent City Farmers Market Cookbook , (in New Orleans), for a recipe when I came across this recipe for green tomato cake. Forget fried green tomatoes, cake it is! It may sound odd to put tomatoes in a cake, but green tomatoes have the texture that's similar to an apple, so they work perfectly in cake. The recipe in the cookbook didn't have a frosting, but I decided to top it with a brown butter icing. It's so good, I may be picking some more green tomatoes, just so that I can make this cake again!!


Green Tomato Cake 
Source: Kitty Hooper (Crescent City Farmers Market green tomato vendor)
Printable Recipe
Ingredients:
3 cups plain flour
2 cups sugar
2 eggs
2/3 cup vegetable oil
1 teaspoon baking soda
1 teaspoon cinnamon
1/2 teaspoon salt
3 cups chopped green tomatoes
1 cup chopped walnuts
Directions
Preheat oven to 350 degrees.
Method:
In a mixing large bowl, combine flour, sugar, eggs, oil, baking soda, cinnamon, and salt; mix well. Stir in tomatoes and walnuts The mixture is very thick! Pour batter into greased and floured bundt pan and bake at 350 degrees for about 1 hour. Remove from oven and let the cake cool in the pan or cake will fall.

Serves 8-10


Browned Butter Icing
1/2 cup  butter
1 cup confectioners' sugar

After the cake has cooled and can be removed from the pan, make the frosting. In a medium saucepan over low heat, melt butter. Cook 6 to 8 minutes, or until butter is lightly browned. Whisk in confectioners' sugar until smooth. Drizzle over the cooled cake.

The brown butter icing is fantastic!

Just in case you thought I did this whole blogging thing all on my own, I do have a very faithful assistant...
My "assistant" checking for crumbs after the photos are taken.


Sunday, April 29, 2012

Lemon Thyme Cake


I made these cakes for a ladies group I spoke at about using herbs in cooking. Most of the women in the group were fairly familiar with cooking with herbs like thyme, but very few had ever used any herb, other than mint, in baking. Thyme is from the mint family and has a slightly minty, lightly lemony flavor which makes it perfect to use in baking. Thyme pairs perfectly with this lemony cake. I added thyme to the cake batter. After the cakes were baked I poked holes into them with a skewer and topped them with a lemon thyme syrup. The syrup adds even more lemon thyme flavor. Poking holes into the cake allows the syrup to get all the way into the cake and keeps it extremely moist. In fact, these cakes seem to taste better the longer they sits. If you've never tried baking with herbs, this cake is a great place to start!

Lemon Thyme Cake
Source: Martha Stewart (adapted)
Yields: 2 loaf cakes or one bundt cake
Printable Recipe
Ingredient:
1 cup (2 sticks) unsalted butter
3 cups all-purpose flour
3/4 cup low-fat buttermilk
Zest of 2 lemons, finely grated
1 tablespoon fresh thyme,chopped, (if the center stem of the thyme is tough, pick the leaves off and discard the stem).
1/3 cup fresh lemon juice (about 2 lemons)
1 1/2 teaspoons salt
1/2 teaspoon baking powder
1/2 teaspoon baking soda
2 cups sugar
5 large eggs

Lemon Thyme Syrup 
1/4 cup water
1/4 cup lemon juice
3/4 cup sugar
Zest of one lemon, finely grated
5-6 sprigs of fresh thyme

Method:
Preheat oven to 350 degrees, with rack in lowest position. Butter and flour or spray with cooking spray, two 4 1/2-by-8-inch (6-cup) loaf pans.
Make the syrup:
In a small pot, stir together the lemon juice, zest, sugar, and thyme. Heat the mixture on medium for about 10 minutes, until the sugar is dissolves and the liquid is clear. Take off the heat, cover and set aside while you prepare the cake.
For the cake:
In a a 2 cup liquid measuring cup,combine buttermilk with lemon juice and fresh thyme. In a medium bowl, whisk together flour, salt, baking powder, and baking soda.
In a separate bowl mix lemon zest and sugar together. Rub the sugar together with the zest until the sugar is slightly damp. 
With an electric mixer, cream butter and sugar/zest until light and fluffy about 3 minutes. Add eggs, one at a time, beating well after each addition.
With mixer on low, add flour mixture in three parts alternately with the buttermilk mixture in two, beginning and ending with flour; beat just until smooth (do not overmix).
Divide batter evenly between pans; smooth tops. Bake until a toothpick inserted in centers comes out clean, 50 to 60 minutes (tent with foil if browning too quickly). Cool 15 minutes in pan. Turn out cakes onto a rack; cool for about 20 minutes before glazing with the syrup.
Set rack with cakes over a baking sheet lined with waxed paper. Poke holes in the cakes over the top with a skewer or a thin knife. Pour the syrup over cakes, letting it run down the sides; let dry, about 30 minutes.

I also want to congratulate Kerry S. on winning our Woodland Fairy giveaway!! Our fairy party was also featured on two wonderful blogs last week. Woohoo! 
Check out our feature on Happy Hour Project and Kate from A Creative Cookie picked our party to be featured on Sugar Bee Crafts! Thanks ladies, I am honored!


Tuesday, April 10, 2012

Strawberry Roulade

Like most families, our holiday traditions revolve are food. That's especially true for Easter in our family. We have pretty much the same menu from year to year. The same was true this year. We had our annual Easter lunch at the farm on Sunday afternoon. It was a gorgeous day. My contribution to the meal was this Strawberry Roulade. It was delicious, very light, a perfect Spring dessert. The cake is a light sponge cake filled with a mascarpone whipped cream and fresh strawberries. It's kind of like a rolled up strawberry shortcake.


If you've never made a roulade before don't be intimidated by the process. It can be a little nerve racking to roll up a cake in a towel, but it's easier than it looks.  


Strawberry Roulade
Source: TheBakingPan.com (adapted) 


Printable recipe
For the Cake:
2/3 cup all-purpose flour
1 teaspoon baking powder
1/2 teaspoon salt
4 large eggs, separated
3/4 cup granulated sugar, divided
2 tablespoons water
1 teaspoon pure vanilla extract

Method:
Preheat oven to 375 degrees F. Prepare one 10½ x15½ x1 inch Jelly Roll pan; lightly grease the pan or spray with baking spray, line with parchment paper, and then lightly spray with baking spray.

Sprinkle a clean towel with 1/4 cup confectioners’ (powdered) sugar. Set aside to use after the cake is baked. A small kitchen towel that is a little larger than the 15x10 inch pan works well.

In a medium mixing bowl, combine flour, baking powder, and salt; sift or whisk together to mix. Set aside.
In a large bowl of an electric mixer, add the egg yolks and beat 3 to 5 minutes on medium-high speed until the egg yolk foam becomes thick and lemon colored. With the mixer on medium speed, VERY slowly add 1/2 cup of the sugar to the eggs, either one tablespoon at a time, or in a very slow steady stream, taking from 2 to 3 minutes to add all of the sugar, and beating until the eggs and sugar are fully incorporated. Scrape down the sides and bottom of the bowl with a rubber spatula. The mixture will be thick and a pale yellow color. Add the water and vanilla and continue mixing for another 1 minute until well blended.
With the mixer on low speed, gradually add about 1/2 of the flour mixture, mix just until blended, and then add the remaining half, mix just until blended, scraping down the side of the bowl as needed.
In another large mixing bowl and using clean beaters, beat the egg whites with an electric mixer until soft peaks form. Gradually add the remaining 1/4 cup sugar; continue beating until stiff peaks form. Using a balloon type whisk or large rubber spatula, gently fold about 1/4 of the beaten egg whites into the batter to lighten the batter, and then fold the remaining egg whites in.

Bake:
Spoon the batter into the prepared pan and smooth the surface with the back of a large spoon or large offset spatula. Bake for 12 to 15 minutes or until the top of the cake springs back when lightly touched. Remove from oven, immediately loosen edges of cake from pan and turn the cake over onto the prepared towel. Carefully peel off the parchment paper, and then roll the cake and towel together tightly, starting with the narrow end. Place seam side down on a wire cooling rack to cool completely.

For the Filling:
1 1/2 cups heavy whipping cream, cold
1/2 cup mascarpone
1 teaspoon vanilla
2/3 cup of powdered sugar
Sliced strawberries (about 1 1/2 cup)
*(1/2 cup Strawberry Jam, optional)

To make the filling, whip together the mascarpone, heavy cream, sugar and vanilla until stiff peaks form.

Assembly:

Carefully unroll cooled cake but don’t try to make the cake lie completely flat, the edge should remain curled so that the cake doesn’t split.


Spread whipped cream over the cake and under the curled edge and leaving a 1 1/2 inch border on the far side. Sprinkle strawberries over the whipped cream. Gently re-roll the cake without the towel, starting with the curled end. Place seam side down on a serving plate. Cover and refrigerate at least 2 hours before serving. Dust with additional powdered sugar if desired.


*Note: The original recipe called for 1/2 cup of strawberry jam spread over the cake before spreading on the whipped cream. I didn't have strawberry jam so I left it out but the jam would add a bit more strawberry flavor to the cake so I think I'll add it next time I make this.


A great dessert to impress your friends with!