Showing posts with label chocolate. Show all posts

Friday, February 14, 2014

Happy Valentine's Day


Need some inspiration for a sweet treat for that special someone in your life?? Here are a few great treats that are sure to make your sweetheart swoon!

1.Chocolate Valentino Cake The name says it all! This rich decadent flourless chocolate cake will have your sweetie falling at your feet...end you don't have to tell them how easy it is to make!
2. Strawberry Panna Cotta  So pretty and delicious...the perfect end to a romantic dinner.
3.Brown Sugar Fruit Dip...perfect paired with ripe strawberries....or anything else you want to dip. Use you imagination!...umm I was thinking like pineapple or grapes...what were you thinking??? wink wink
4.Knock-off Salted Chocolate Caramel Candies  Made with store bought caramel squares, these take only a few minutes to make but will have your Valentine begging for more!
5. Pink Champagne Cake It's cake made with Champagne...what's not to love!
6. Chocolate Espresso Mousse Richly chocolate but light and fluffy. Definitely swoon inducing!
(from left to right)


Happy Valentine's Day!

Friday, December 13, 2013

Fudgy Chocolate Peppermint Crunch Chip Cookies

This is a rich chocolate cookie that has a wonderful fudge like texture inside. The cookies are great even without the glaze icing but they are extra special with the icing and extra peppermint crunch on top. Chocolate and peppermint are the perfect Christmas time combo which makes this fudgy peppermint cookie perfect for Christmas cookie exchanges!They are festive looking and oh so delicious.
Fudgy Chocolate Peppermint Crunch Cookies
Yeilds: 3 1/2 to 4 dozen cookies
METHOD:1 stick butter
12 ounces semisweet chocolate
1 1/2 cups flour
1/4 cup unsweetened cocoa powder
1 1/2 teaspoons baking powder
1/4 teaspoon salt
1 1/4 cups (packed) brown sugar
3 eggs, at room temperature
1 1/2 teaspoons pure vanilla extract
1 teaspoon espresso powder or coffee extract
1 cup Andes peppermint crunch baking chips

Chocolate Glaze Icing
 2 cups confectioners' sugar
 4 tablespoons unsweetened cocoa powder
 2 tablespoon butter, softened
 1/2 teaspoon vanilla extract
 4 tablespoons milk

METHOD:
For the cookies:
In a medium bowl, whisk together the flour, cocoa powder, baking powder and salt.
Using an electric mixer, beat the sugar, eggs and vanilla at low speed until smooth, 2 minutes. Mix in the cooled chocolate mixture just until blended. With the mixer running, slowly add in the flour mixture. Mixing on low speed until just combined. Refrigerate the dough for at least 1 hour. 
Position a rack in the upper third of the oven; preheat to 325 degrees . Line 2 large cookie sheets with parchment or a silicon baking mat. Using a tablespoon, scoop the dough and roll between your palms to form 1-inch balls. Arrange balls 2 inches apart on each cookie sheet, flattening the tops slightly. Bake until the tops of the cookies crack, about 12 minutes. Don't over bake. You want the cookies to be soft and fudgy!

For the Chocolate Icing:
In a small bowl, combine butter with sugar and cocoa.
Add vanilla. Add milk gradually until smooth.

Just add a glass of milk

Tuesday, October 8, 2013

Cinnamon Chip Hot Chocolate Mix


I woke up this morning and there was a definite nip in the air. For those of you that don't live in the very deep South, you have probably had several weeks of such weather already this season. As soon as there's even a slight chill in the air, I start to crave hot chocolate. I stumbled on this recipe while searching for recipes to use the cinnamon chips I'd just bought. Have you tried cinnamon chips yet? If not go get some right away! A word of warning though, if you are like me and lack self restraint, buy them at you own risk. It's hard to resist just eating those little guys right from the bag...in one sitting. Really! For a cinnamon lover like myself they are down right addictive. I catch myself grabbing a handful every time I walk near the kitchen. Anyway, I found this recipe for cinnamon hot chocolate mix and had to give it a try. Luckily I didn't need an entire bag of chips to make this recipe, as let's just say the bag wasn't quite full anymore. 
I'm so glad I made this hot chocolate. It's fantastic. Rich cocoa with a cinnamon kick makes this the perfect beverage for a cool Fall day.

The recipe is for a dry hot chocolate mix. You make the mix up and keep it in an airtight container. All that's needed is a cup of boiling water and you can have a rich cinnamon-y mug of cocoa anytime! 
This hot chocolate could also serve as a hostess or teachers gift. Double or triple the recipe and divide the hot chocolate mix into mason jars. Tie the jars with a cute ribbon, add a tag or label with instructions and it's gift giving ready!      

Monday, September 30, 2013

Halloween PEEPS S'mores Trifle


My mail, probably yours as well, consists of bills, junk, a few magazines, more junk, maybe something I ordered, and more bills. Every once in a while something unexpected and fun comes along with the usual daily mail. It's the hope that there might be something fun and exciting in the day's mail that makes me keep an eye out for the mail delivery truck. A couple of days ago I received a box full of Halloween PEEPS in the mail. Now that's what I call fun mail! The nice folks at PEEPS sent me a few of their Halloween themed PEEPS to try. Thanks PEEPS!
In case, if you didn't already know, PEEPS are not just for Easter anymore. Nope they've gone multi-holiday! There are now Halloween and Christmas PEEPS, in addition to the traditional Easter PEEP. No more waiting and entire year for PEEPS to return! 
Anyway, I wanted to use my PEEPS in a fun Halloween-ish dessert. With PEEPS being super fun marshmallow treat, I immediately thought of doing s'mores. PEEPS and s'mores, are a perfect match, but I didn't want to melt my  PEEPS, I mean look at how cute they are! So I decided to layer the PEEPS in a s'mores trifle. How cute and yummy is that? PEEPS, chocolate, whipped cream...Happy Halloween!


Monday, September 24, 2012

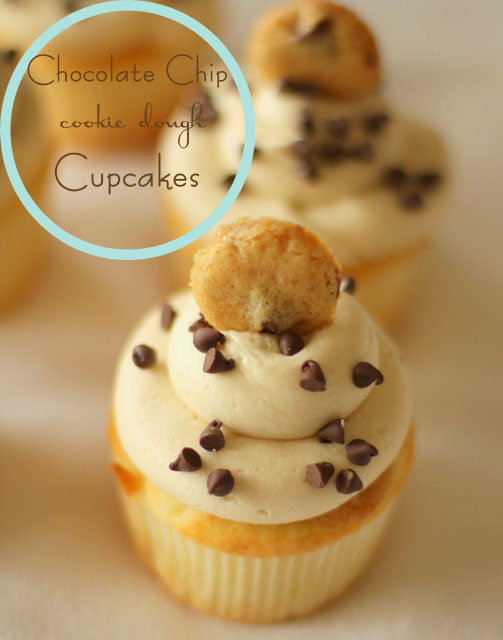
Chocolate Chip Cookie Dough Cupcakes

A couple of weeks ago I was asked to make a cupcake for someone that adores chocolate chip cookies. I did what I always do when I'm looking for inspiration and Googled it. I was shocked at how many recipes there were out there for cupcakes filled with chocolate chip cookie dough. Where have I been? Somehow I had missed this one! Anyway I made these for the birthday girl's party and have been getting requests to make these cupcakes ever since. 
They really are fantastic. The cupcake is very good and has a hidden surprise of cookie dough baked into the center. But the frosting...ooh my goodness the frosting!! It's what knocks this cupcake out of the park. It tastes just like chocolate chip cookie dough. I couldn't believe it when I first tasted it. I could just sit and eat it with a spoon, but I didn't do that. I used it frost the cupcakes. Well okay maybe, I might have snuck a couple of spoonfuls when no one was looking...maybe that happened...then possibly I licked the bowl...and the paddle attachment...
Anyway the combo of cupcake, cookie dough, and frosting make this a chocolate cookie dough lovers dream! 
  
Chocolate Chip Cookie Dough Cupcakes
source: Kevin and Amanda, slightly adapted
yield: about 2 doz

FOR THE COOKIE FILLING:
2 1/4 cups all-purpose flour
1 teaspoon baking soda
1 teaspoon salt
1 cup (2 sticks) butter, at room temp
3/4 cup sugar
3/4 cup light brown sugar
1 teaspoon pure vanilla extract
2 large eggs
1-12ounce bag chocolate chips (2 cups)
FOR THE CUPCAKES:
3 sticks softened butter
1 1/2 cups light brown sugar, packed
4 large eggs
2 2/3 cups all purpose flour
1 tsp. baking powder
1 tsp. baking soda
1/4 tsp. salt
1 cup milk
2 tsp. vanilla extract
FOR THE FROSTING:
3 sticks softened butter
3/4 cup light brown sugar, packed
3 1/2 cups powdered sugar
1/2 tsp. salt
2 tbsp. milk
1 tsp. vanilla extract
METHOD:

To make the cookie dough:
In a medium bowl, whisk the flour, baking soda, and salt. Set aside.
In the bowl of a stand mixer, at medium-low speed, mix the butter with the sugar and brown sugar. Raise the speed to medium-high and mix until creamy, light, and fluffy. Scrape down the bowl. Add the vanilla and eggs. Mix together until incorporated.
Add half of the four mixture. Mix until just combined, scrape down the bowl. Add the remaining flour mixture and mix until just combined. Stir in the chocolate chips.
Using a small ice cream/melon baller, scoop, shape the dough into balls. Freeze on a baking sheet lined with a silicon mat or parchment paper. 
To make the mini cookie topper:
Use the leftover cookie dough to make mini cookie toppers for the cupcakes. Spread all the leftover dough on a cookie sheet lined with parchment or a silicone baking mat. Try to spread it fairly evenly. Bake until the cookie is lightly browned, do not over cook. Let cool about a minute. While the cookie is still warm cut out mini cookies using a the end of a large piping tip or a mini round cutter. Do this before the cookie cools down too much or you may not be able to cut the mini cookies out.


To make the cupcakes:
Preheat the oven to 350° F. Line cupcake pan with paper liners.
In a medium bowl, combine the flour, baking powder, baking soda, and salt. Set aside. The bowl of a stand mixer, combine the butter and brown sugar. Beat together on medium-high speed until light and fluffy. Mix in the eggs one at a time, beating well after each addition and scraping down the sides of the bowl as needed.Mix in the vanilla.
Add the dry ingredients to the mixer bowl on low speed, alternating with the milk, beginning and ending with the dry ingredients, add it into the batter in thirds. Mix each addition just until incorporated.
Fill the prepared cupcake liners 2/3 full with the cupcake batter. Place a frozen cookie dough ball on the top center of each cupcake.
Bake at 350 for 16-20 mins.

To make the frosting:
Combine the butter and brown sugar in a mixing bowl and cream on medium-high speed until light and fluffy. Add in the powdered sugar, beating until smooth. Add in the salt, milk, and vanilla extract until combined.

When the cupcakes are cool, frost, sprinkle with mini chips and top with a mini chocolate chip cookie.
If you like eating cookie dough straight from the bowl, then this is your cupcake!

Monday, August 27, 2012

Hurricane Survival Brownies


You may have heard there's a storm a-brewn' out in the Gulf of Mexico. I live in the Southeast corner of Alabama, just over an hour from the Florida coast. Hurricanes are pretty much a fact of life around here. We track them, keep a stash of batteries and bottled water on hand, and reminisce about Camille, Opal, and Katrina every time a hurricane starts making it's way toward us. The only good thing about a hurricane headed your way, (if there is such a thing) is that you get plenty of warning that it's coming. This gives us time to batten down the hatches and make plans to make due with possible power outages, road closings, etc for a period of time. I've shared with you here how my mother always whips up a batch of emergency cookies/brownies whenever a hurricane is headed our way. This morning I decided I needed to make some brownies, "just in case". In case of what, I'm not sure. Possible baked good deprivation, I guess! I called my mom to make sure they were prepared to ride out the weather and mentioned that I'd just made a batch of brownies. She informed me that she had just pulled a batch of brownies out of the oven as well and had them cooling on the counter. So yes, we're all prepared for Isaac.
This is probably my favorite brownie recipe. It's rich and fudge-like. Topped with the peanut butter frosting they are down right addictive! These brownies are fantastic whether or not a hurricane is headed your way. So don't wait for emergency weather to whip up a batch.

I've got my hurricane survival kit all ready to go!

Best Cocoa Brownies with Peanut Butter Frosting
Printable Recipe

Source: Epicurious  | November 2003
Alice Medrich (adapted)

Source:
10 tablespoons unsalted butter
1 1/4 cups sugar
3/4 cup plus 2 tablespoons unsweetened cocoa powder (natural or Dutch-process)
1/4 teaspoon salt
1 teaspoon espresso powder
1/2 teaspoon pure vanilla extract
2 cold large eggs
1/2 cup all-purpose flour
1/2 cup chocolate chips (optional)


Position a rack in the lower third of the oven and preheat the oven to 325°F. Line the bottom and sides of the baking pan with parchment paper or foil, leaving an overhang on two opposite sides.
Combine the butter, sugar, cocoa, espresso powder, and salt in a medium heatproof bowl and set the bowl in a wide skillet of barely simmering water. Stir from time to time until the butter is melted and the mixture is smooth and hot to the touch. Remove the bowl from the skillet and set aside briefly until the mixture is only warm, not hot.
Stir in the vanilla with a wooden spoon. Add the eggs one at a time, mixing well after each one. When the batter looks thick, shiny, and well blended, add the flour and stir until incorporated, then beat vigorously for 40 strokes with the wooden spoon or a rubber spatula. Stir in the chocolate chips, if using. Spread evenly in the lined pan.
Bake until a toothpick plunged into the center emerges slightly moist with batter, 20 to 25 minutes. Let cool completely on a rack.
Spread peanut butter icing over the top of the brownies.
Lift up the ends of the parchment or foil liner, and transfer the brownies to a cutting board. squares.

Peanut Butter Cream Cheese Frosting

Ingredients:
1/2 cup peanut butter
3 ounces cream cheese
3 tablespoons milk
1 tsp vanilla
1 1/2 tablespoons unsalted butter
2 1/3 cups confectioner's sugar

In a mixing bowl, mix peanut butter, cream cheese,a and butter together until smooth. Mix in confections sugar, milk, and vanilla. Mix until smooth adding more milk  if necessary.

If I have to evacuate, I'm taking the brownies!


Tuesday, August 7, 2012

Molten Deep-Dish Chocolate Chip Cookies


I clearly remember my first experience with a molten chocolate cake. It was at a high-end restaurant in the 90's. I had to order it when I placed my dinner order if I wanted it for dessert. The waiter waxed poetic about it at length and of course I ordered one. When it came to the table I thought it looked nice but rather ordinary, then I cut into the center. Oh my, I think I heard angels sing! It was divine. The cake seemed somehow to be more than the sum of it's parts. There's something pretty wonderful about cutting into your dessert and having a warm chocolaty center ooze out.

Hot from the oven homemade chocolate chip cookies are one of my favorite things in the world. They are definitely near the top of my all-time favorite desserts. Possibly the only way to improve on a chocolate chip cookie is for a them to have a warm oozy chocolaty center.


These cookies are as easy to make as regular chocolate chip cookies. They are just baked in a ramekin instead of on a cookie sheet. The recipe for the cookies is the one I always use for my chocolate chip cookies. It's a pretty standard recipe, I got it from the back of the Ghirardelli semi-sweet chips bag. Just place a square of chocolate candy between two layers of cookie dough, bake, and I'll bet you'll be hearing angels sing too!


Molten Deep-Dish Chocolate Chip Cookies
Source: Kosher by Design - Teens and 20-Somethings, by Susie Fishbein

2  1/4 cups all-purpose flour
1 teaspoon baking soda
1 teaspoon salt
1 cup (2 sticks) butter, at room temp
3/4 cup sugar
3/4 cup light brown sugar
1 teaspoon pure vanilla extract
2 large eggs
1-12ounce bag chocolate chips (2 cups)
1 (4-ounce) good-quality semisweet or milk chocolate bar, broken into pieces along score lines. ( I used ghirardelli semi-sweet chocolate bar.)

Method:
Preheat oven to 350 degrees.
In a medium bowl, whisk the flour, baking soda, and salt. Set aside.
In the bowl of a stand mixer, at medium-low speed, mix the butter with the sugar and brown sugar. Raise the speed to medium-high and mix until creamy, light, and fluffy. Scrape down the bowl. Add the vanilla and eggs. Mix together until incorporated.
Add half of the four mixture. Mix until just combined, scrape down the bowl. Add the remaining flour mixture and mix until just combined. Stir in the chocolate chips.
Spray 6-ounce ramekins with nonstick cooking spray.
Fill each ramekin a quarter of the way with a large, golf-ball-size ball of cookie dough. Flatten to cover the bottom. Add 1 or 2, (depends on the size of the chocolate squares in the chocolate bar you use) chocolate squares in the center of the cookie dough. Cover with a second walnut-sized ball of cookie dough, flattening it to completely cover the chocolate.

Place onto a cookie sheet and bake until the tops are golden brown. Do not overbake or the end result will not be gooey. The baking time will vary from 20-25 minutes depending on the size of the  ramekin and the amount of dough you used. You can serve the cookies in the ramekins or flip them out onto individual plates. Serve warm.
Yields: about 8 6-ounce ramekins. Leftover cookie dough can be baked into regular chocolate chip cookies.

I'm Lovin' It at TidyMom http://tidymom.net/2012/nyc-pistacchio-gelato/ Come join the party!

Tuesday, February 21, 2012

Banana Chocolate Mousse Pie


After making it, I wasn't sure what to call this pie. I thought about calling it Clean Out the Fridge Pie but that name didn't sound very appealing, even though that is how this pie came to be. I had chocolate mousse and chocolate ganache, leftover from other baking I had to do this week, that I wanted to use up. I had also over purchased banana's...yet again. So what to do? Make a Nilla wafer crust and throw everything in and call it a Too Many Bananas, Leftover Chocolate Mousse and Ganache Pie...hmmm a bit of a mouthful! Although this pie was born out of a necessity to use up some leftovers, I'll be making this pie again, even if I don't have leftovers to use up. So I guess, Banana Chocolate Mousse Pie it is!


Banana Chocolate Mousse Pie


For the pie:
1 nilla cookie crust, cooled (recipe below)
1/2 cup chocolate ganche (recipe below)
chocolate mousse (recipe below)
2 medium bananas, thinly sliced
whipped cream, for garnish, (optional)

Vanilla Wafer Crumb Crust
3 cups vanilla wafer cookies
1 tbsp sugar
5 tbsp butter, melted and cooled

Preheat oven to 350F.
In the food processor, pulse vanilla wafer cookies until reduced to crumbs. Add in the sugar and melted butter and pulse to combine. Mixture should resemble wet sand.
Pour into a 9-inch pie plate (or 9-inch square baking dish) and gently spread into an even layer over the bottom and sides. Press crumbs in firmly to create a tight crust.
Bake for 10 minutes, or until crust just begins to turn golden brown around the edges.
Cool completely before using.

Makes 1 pie crust.

Chocolate Ganache
3 ounces chocolate, finely chopped (if you're using chocolate chips, this is 1/2 cup)
1/4 cup heavy cream
1 teaspoon vanilla extract

In a microwave-proof bowl, heat all ingredients at full power for 30 seconds. Stir and heat again at full power for 10 seconds. Remove from microwave. The chocolate will still have some unmelted pieces, stir chocolate until completely melted. If it doesn't melt completely place it back in the microwave for another 10 seconds. Take care not to overheat the chocolate. The chocolate it will seize up and become very stiff if overheated. If this happens add a bit more cream and heat for in 10 second increments, stirring in between, until the chocolate is smooth.


Chocolate Mousse
1 cup semisweet chocolate chips
1 1/2 cups cold, heavy cream, plus an additional 1/2 cup heavy cream
1/2 cup confectioners' sugar
1/4 cup granulated white sugar
2 teaspoons vanilla extract

In a medium saucepan, combine the confectioners' sugar and 1/2 cup heavy cream. Stir over low heat.
Add the semisweet chocolate chips, stirring frequently as they melt and the mixture becomes well blended.
Remove from heat, stir in the vanilla and set this mixture aside.
In a separate, large bowl, beat the remaining 1 1/2 cup heavy cream on medium speed and gradually add the granulated sugar. When all the sugar has been incorporated, beat the mixture on high speed until stiff peaks form.
Fold the whipped cream into the chocolate mixture, taking care not to overmix.

Whipped cream for garnish 
2/3 cup whipping cream, cold
2 tablespoons sugar

In a chilled bowl, whip cold cream with a hand mixer. When it's slightly thickened slowly add in the sugar and continue whipping until the cream holds peaks. Place whipped cream in a pastry bag fitted with a star tip and pipe border around the edge of the pie. 


Assembling the pie:
Make the pie crust, while it is cooling make the ganache. Pour the ganache, while still warm, into the pie crust. Using an off-set spatula, spread the ganache evenly on the bottom of the pie crust. Make the chocolate mousse. Slice the bananas layer them into the crust. Top with the chocolate mousse and pipe around a whipped cream border, if desired. Refrigerate for at least 4 hours, or overnight before slicing.

Now that's my idea of using up leftovers!


Wednesday, February 15, 2012

Knock-Off Salted Chocolate Caramel Candy


Since Hubs and I have been married, we've had the good fortune to have been able to travel to many places. One thing I've noticed during our travels is that no matter where you go, if it's a place that attracts tourist, there will most definitely be someone there trying to sell you something. Most often they're hocking a knock-off of some expensive name brand item. You can pick up a look alike Rolex watch, a Louis Vuitton purse, and a Hermes scarf, all for under $100.00, sometimes all from the same person. Some of the people selling these faux items can be pretty persistent. A firm "no thank-you" as we quickly walked on usually did the trick and the hawker would simply move on to some else. However, while we where visiting Rome, we had gotten lost while searching for what was supposedly the best pizza in Rome.(Finding the "best" whatever is a theme in our travels!) We ended up somewhat off the beaten path and ended up in a fairly secluded area where we ran into a man selling purses. We walked past him quickly and then realized we were going the wrong direction and had to walk back by him again. He took this as a sign that I really wanted a purse and began to try to get me to stop and look at the purses. Hubs and I hesitated just long enough that the purse hawker was sure he could close the deal. He began pulling out Prada's', Louis Vuitton's, etc... explaining what great quality they were and that they were the real deal. When Hub's said he knew they were fakes, the man got very animated. How dare we question the authenticity of these wonderful purses. Of course they were the real deal and very good quality as well. He insisted we feel the leather and all but forced me to take a Prada bag from him and hold it. At this point he felt he'd sealed the deal and began hounding Hubs to buy me the purse. I gave the bag back to him and tried to walk away. He grabbed a second bag and began to try to barter with Hubs on a price for not only a genuine Prada bag but he was going to throw in a Tom's bag practically free. He followed us down the mostly deserted street and long story short, I ended up with not one but two knock-off purses that day. I gave the "Prada" to my little sister, who loved it, and I kept the "Toms" bag. I still give Hubs a hard time about giving into the purse guy, but truthfully I used the "Toms" bag as a travel bag until the handle broke off several years later. 
These candies are like the knock-off Toms bag. I know homemade caramels are fantastic, way better then the cellophane wrapped knock-offs, but they are time consuming to make. So if your looking for a quick chocolately caramely fix, you can be popping this knock-off version in your mouth in almost no time flat. Since no one needs to know how easy they are to make, you can impress your family and friends with your confectionery prowess!

I'm not sure that a recipe is really necessary for these. It's pretty simple but here's a basic guide:

Salted Chocolate Caramel Candy
Ingredients:

Semi-sweet or bittersweet chocolate chips (I used about 1 cup)
Caramel candies, unwrapped 
Sea salt

Method:
Put the amount of chocolate chips called for in the recipe into the microwave-safe bowl and place the bowl in the microwave.
Set the microwave to 50 percent power for one minute. Chocolate burns easily and must always be melted using low heat.
Stir the chocolate chips after one minute. When melted in the microwave, chocolate chips hold their shape until pressed with a spoon. Don't rely on how the chocolate chips look to determine if they're adequately melted.
Return the chocolate chips to the microwave for 15 to 60 seconds, depending on how close they are to being melted. Stop heating the chocolate chips when they're slightly more than half melted and stir until smooth. Residual heat from the melted chocolate will melt any remaining un-melted pieces.

Drop the unwrapped caramels, one or two at a time into the melted chocolate. Roll the caramels in the chocolate until they are completely covered. Using a fork, lift the caramels out of the chocolate and place on a cookie cooling rack to set up. (If you place the rack over a cookie sheet it will keep the caramels from dripping chocolate all over your counter tops.) Sprinkle the tops of each caramel with a pinch of sea salt. Allow the chocolate on the caramels to cool until the chocolate sets. Enjoy!
I made these for Valentine's Day so I added a little heart sprinkle!

Tuesday, January 31, 2012

Double Dark Chocolate Cherry Cookies


Growing up, my mom would on occasion, usually around the holidays, buy a bag of Hersey's mini chocolate bars. My sisters and I would play this game where we'd have to reach into the bag without looking and take out a candy bar. You had to take the one you got. I remember there was a very specific pecking order in the way us kids ate those chocolate bars. Krackel was King. All of us wanted the Krackel bars. If we got a Krackel bar out of the bag, would it eat slowly with great relish. All this was done to cause as much torture and jealousy as possible to those that didn't have a Krackel bar. The Hersey bar was next in line, followed by the Mr. Goodbar. That left the Hersey's Special Dark, which none of us wanted. Those were the only bars that we allowed each other to toss those back into the bag to try our luck again. Mom always offered to eat the Special Dark bars. We thought she was a great mom for settling for the reject candy,while we feasted on Krackels. Nice job, Mom. We all fell for it. You had us fooled for all those years, but no more!  Now I'm with mom, you can have the Krackel, the milk chocolate, even the peanuts, I'll happily take those Special Dark Chocolates off your hands. These cookies are like those Special Dark bars, they are for serious chocolate lovers. They are a delicious dark chocolate cookie studded chocolate chips and tart cherries,  The perfect balance of bittersweet. All that's needed is a glass of ice cold milk.
Just for fun, I dipped  some fresh cherries in chocolate and then into sprinkles. Cute and tasty!

Double Dark Chocolate Cherry Cookies
Source: The Sweet Melissa Baking Book
Printable Recipe
Ingredients:
1 cup all purpose flour
3/4 cup unsweetened Dutch-process cocoa powder
1 tsp baking soda
1/4 tsp kosher salt
1/2 cup (1 stick) unsalted butter, at room temperature
2/3 cup granulated sugar
1/4 cup brown sugar, firmly packed
1 large egg, at room temperature
1/4 tsp vanilla extract
3/4 cup semi-sweet or bittersweet chocolate chips
1/3 cup dried sour cherries

Directions:

In a medium bowl, whisk together flour, cocoa powder, baking soda and salt. In the bowl of an electric stand mixer fitted with a paddle attachment, cream together butter and sugars until fluffy (about 3 minutes). Add the egg, mixing well. Stir in the vanilla.
With the mixer on low speed add the flour mixture n three batches, mixing until incorporated after each addition. Stir in chocolate chips and cherries down the sides of the bowl.
Refrigerate the dough for a few hours until firm.
Turn the dough onto a clean work surface and divide it in half. Roll out into 2 uniform logs about 12” long. Wrap in plastic wrap and refrigerate again until firm enough to slice. At least 1 hour. (I left mine overnight).   At this stage you could wrap the log again in foil and freeze for up to 1 month.
Place one rack in the top third and one in the bottom third of the oven and preheat to 350°F. Line the bottom of 2 rimmed cookie sheets with parchment paper or a silicone mat. Place the slices about an inch or so apart.
Bake for 12-15 minutes, or until the dough looks just baked . Don’t over bake, the cookies should be tender. Transfer the pan to a rack and let the cookies cool.

Makes about 2 dozen cookies
Great for Valentine's Day!

Wednesday, October 12, 2011

Saltine Toffee Bars

AKA: crack

Seriously this stuff should probably come with a warning. I've heard that some people become addicted to crack after just one use. I don't know about crack, but these toffee bars had me addicted after just one bite. They are sweet, salty, chocolatly, caramley, crunchy...in short, delicious! Everything that I love about toffee with the added salty crunch from the saltine cracker. The list of ingredients for these bars may leave you somewhat unimpressed. If you've never had them before, you maybe be thinking; saltine crackers, really?!? I know, it's kind of odd and  not a very exciting sounding ingredient. I've heard these bars referred to as trailer trash toffee. If you make them, you'll wonder how you've lived your life without them and won't care what they're called.
Most times in baking, you have to put in a good bit of time/effort to achieve results this scrumptious. Fortunately (or maybe unfortunately!) these saltine toffee bars are so easy and quick to make, you can feed your addiction anytime.

Saltine Toffee Bars

Ingredients:
1-1/2 sleeves of saltine crackers
1 stick (1/2 cup) butter
1 cup packed brown sugar
2 cups chocolate chips

Method:

Preheat the oven to 350 degrees. Prepare a baking sheet by lining it with aluminum foil and spraying the foil with nonstick cooking spray.


 Arrange the crackers in a single layer on the baking sheet so that there are no empty spaces in between them. Crush a few remaining crackers into small crumbs, to be used as topping, and set aside for now.
 Place the butter and brown sugar in a small saucepan over medium-high heat. Stir while the butter melts, and bring the mixture to a rolling boil. Once boiling, carefully pour the sugar-butter mixture over the crackers on the baking sheet in an even layer, trying to cover most of the crackers. If you miss some spots, don’t worry as the toffee will spread in the oven.


Bake the toffee crackers at 350 degrees for five minutes, until the toffee is bubbling all over. Carefully remove the pan from the oven and allow to cool for one minute.
Sprinkle the chocolate chips on top of the hot toffee, and allow them to sit for one minute to soften and melt. Once softened, use an offset spatula or knife to spread the melted chocolate over the entire surface of the toffee in an even layer. 

While the chocolate is still sticky, sprinkle the top with the reserved crushed crackers, chopped nuts, sprinkles or any combination of the three.
Top the bars with nuts, crushed crackers, even sprinkles!


Topped with yellow and orange sprinkles, they're perfect for Fall/Halloween parties!


Refrigerate the pan to set the toffee and chocolate for about 30 minutes. Once set, break into small uneven pieces by hand, and enjoy! Store uneaten saltine toffee in an airtight container for up to a week.

Just don't blame me if you find yourself addicted!


Friday, June 3, 2011

Chocolate Banana Bread


Move over plain ole banana bread, you've been replaced! Traditional banana bread is good enough but if you're a chocolate lover like me I'm sure you'll agree, chocolate makes everything better! In this case, I think chocolate makes it much better.

Most of the time when I bake with bananas it's to use up ones that have gotten overly ripe and started turning black. Not so, this time. When I came across this recipe from Savory Sweet Life, I intentionally bought overripe bananas just so I could make this banana bread. I was not disappointed. It reminded me of Ben and Jerry's Chunky Monkey ice cream, but in bread form.  Moist, chocolaty, not too sweet, this bread will have you hoping you've let your bananas get overripe!


Although it's completely unnecessary, I highly suggest serving this bread topped with a large dollop of Nutella.

Chocolate Banana Bread
source: Alice, Savory Sweet Life June 18, 2009 (adapted)
(printable recipe)
Ingredients:
1 stick of salted butter, softened to room temp.
1/2 cup sugar
1 egg
2 large ripened bananas, mashed
1 tsp. vanilla
1 tsp. espresso powder
1 cup flour
1 tsp. baking soda
2 Tbl. cocoa powder
1/2 cup of sour cream
1 cup chocolate chips
1/2 cup of chopped walnuts (optional)

Method:
Preheat over to 350 degrees. Lightly grease a 9x5 loaf pan, or 2 mini pans with non-stick baking spray. In a large bowl, cream butter and sugar together until fluffy. Stir in egg, mashed bananas, sour cream, espresso powder, and vanilla until well blended. Add baking soda, cocoa, and flour. Mix just until incorporated. Stir in chocolate chips and nuts (if using). 
Pour batter into loaf pan and bake for 50 minutes – 1 hr for the 9x5 loaf pan or 35 to 40 minutes for the mini loaf pans. Insert a tooth pick into the center of the loaf and check to see if it comes out clean.
Remove from heat and allow bread to cool for 10 minutes. Invert the loaf pans onto a cooling rack. Great served warm, topped with Nutella.
On second thought, I feel the Nutella is a totally necessary part of this bread!

Saturday, February 5, 2011

Celebrate World Nutella day with Nutella Truffles


We all have our favorite days of the year, be it Christmas, Thanksgiving, your birthday, whatever. Well February 5th would have to be would have to high on my list. Want to know why? It just so happens to be World Nutella Day! Yes that's right an entire day set aside to celebrate Nutella and all the wonderful ways you can use it. I usually just stick a spoon in the jar and eat it straight from the spoon, but in honor of World Nutella day, I thought I'd put in a little more effort. Although these are a little more effort that just licking Nutella from a spoon, these truffles are super easy and sooo delicious.


Two of my favorite bloggers Sara of Ms. Adventures in Italy and Michelle of Bleeding Espresso came up with the idea for World Nutella Day 5 years ago. Check out their blogs for more mouthwatering Nutella recipes. Happy World Nutella Day!!


Nutella Truffles
Printable recipe


1 (12-oz.) package semisweet chocolate morsels
1/2 cup whipping cream
1/4 cup Nutella
3/4 cup finely chopped, toasted hazelnuts
Wax paper or parchment paper
Method: 
Microwave first 3 ingredients in a medium-size microwave-safe bowl at HIGH 1 to 1 1/2 minutes or until melted and smooth, stirring at 30-second intervals. Let cool 10 minutes.
Beat chocolate mixture at medium speed with an electric mixer 1 to 2 minutes or until whipped and smooth. Cover and chill 2 hours or until firm.
Preheat oven to 350 degrees. Spread chopped hazelnuts on a baking sheet and toast in oven for about 5 minutes or until the nuts start to turn a golden brown. Keep a close eye on the nuts because they will burn quickly. Remove from oven and allow them to cool completely.
Shape chocolate mixture into 1-inch balls, using a small ice-cream scoop. Roll in chopped toasted hazelnuts. If chocolate mixture becomes too soft to shape, refrigerate until firm. Place on wax/parchment paper-lined baking sheets. Chill 1 hour before serving. Truffles can be stored up to 5 days in an airtight container.