Wednesday, April 24, 2013

Blueberry Upside Down Cake


Several years ago while searching for a blueberry dessert, I found this recipe for blueberry upside down cake. It comes from Thibeault's Table, a wonderful blog from Canada with lots of great recipes. Ann, the blogs author, and her husband also make and sell gorgeous hardwood cutting boards. They are truly one of a kind works of art and I really want one!
Anyway, the first time I made this cake I fell in love with it. Since then it's become one of my favorite go-to recipes for a quick, but really delicious fruit dessert. I've made it so many times over the years that I was positive that I had already shared it here. After looking through my archive it appears that I some how overlooked posting about this wonderful little cake. Well let me just fix that right now!

This cake is so amazing served warm, right out of the oven, especially with a little vanilla ice cream. However, as great as that is, I love it equally as much the next day with a cup of hot coffee. For me adding the cinnamon to the cake, gives it more of a coffee cake flavor. If you leave the cinnamon out it's more a vanilla cake. Either way you can't go wrong, but with the cinnamon, this cake and cup of coffee are a match made in heaven!

Blueberry Upside Down Cake
Source: Thibeault's Table (slightly adapted)
PRINTABLE RECIPE

INGREDIENTS:
1/4 cup melted butter
1/2 cup brown sugar
2 cups blueberries
1 tablespoon lemon juice
1/2 cup butter
3/4 cup granulated sugar
1 egg
1/2 teaspoon vanilla
1/4 teaspoon almond extract
1 1/3 cups all-purpose flour
2 teaspoons baking powder
1/4 teaspoon salt
1 teaspoon cinnamon (optional)
3/4 cup buttermilk
METHOD:
Preheat oven to 350 degrees  Combine melted butter and brown sugar. Spread evenly on bottom of a 9 inch round cake pan with at least 2 inch sides. Spread blueberries evenly over the brown sugar mixture and drizzle the lemon juice over the berries.
With an electric mixer, cream the butter and sugar together, beating until light and fluffy, about 3 minutes. Scrape down the bowl and beat in egg, almond extract, and vanilla. Sift together the flour, baking powder, salt and cinnamon (if using). Mix in one third of the dry ingredients. Add in half the milk. Mix in another third of the dry ingredients, when just mixed, add in the rest of the milk. Add the remaining dry ingredients, mix until just incorporated. Spread batter evenly over blueberry layer. Bake for 45 minutes or until toothpick inserted in center comes out clean. Let the cake cool 10 minutes in pan, then invert on to large flat plate or cake plate.

Follow my blog with Bloglovin

Wednesday, April 17, 2013

Rosemary and Olive Focaccia

Hubs and I are enjoying some much needed R and R at the beach this week, so this will be a quick post. This focaccia is easy to make, most of the time involved in making it is rising times.  Even if you find working with yeast a little daunting, give this bread a try.  It's a very forgiving and pretty much fool-proof recipe. I found it to be about like making homemade pizza dough. It smells so good baking and tastes delicious, definitely worth the effort!


Rosemary and Olive Focaccia
PRINTABLE RECIPE
source: Bon Appetit-May 1995 (slightly adapted)
INGREDIENTS:
2 cups warm water (105°F; to 115°F)
2 teaspoons dry yeast
4 1/2 cups (about) bread flour, or all purpose flour
2 teaspoons salt
2 tablespoons (plus enough to coat baking pan) olive oil
1/3 cup black olives (such as Kalamata),pitted, roughly chopped
1 tablespoon chopped fresh rosemary
1 teaspoon sea salt

METHOD:

Put the warm water in large bowl or in a electric mixer bowl, such as a Kitchen-Aid, stir in the dry yeast. Let this stand until yeast dissolves and begins to "bloom", about 10 minutes.

Mix 4 1/4 cups flour and the salt to yeast mixture and stir to blend well (dough will be sticky). Using the dough hook attachment, turning the mixer on low speed, knead for about 5 minutes, adding in flour a few tablespoons at a time, if needed. Alternately, knead the dough by hand on floured surface until smooth and elastic,about 10 minutes, adding more flour by tablespoonfuls if dough is sticky. 
Lightly oil a large bowl. Forming the dough into ball, place the dough into the oiled bowl.Turn the dough once or twice to to coat with the oil. Cover with plastic wrap and let rise in warm area until doubled, about 1 1/2 hours. Punch down dough. Form dough into ball again and return to same bowl. Cover with plastic wrap and let rise in warm area until doubled, approximately 40 minutes, it may take less time than that.

Coat 15x10-inch baking sheet with olive oil. Punch down dough, and place onto the prepared baking pan. Press out dough to 13x10-inch rectangle. Let dough rest 10 minutes. Drizzle 2 tablespoons oil over dough. Sprinkle olives and chopped rosemary evenly over. Let dough rise uncovered in warm area until it puffs slightly, about 25 minutes.

Preheat oven to 475°F. Press fingertips all over dough, making indentations.Sprinkle the top of the bread with the sea salt and bake. It's done when it is until brown and crusty, 18-20 minutes. Let bread cool at least 10 minutes before cutting.

This focaccia is fantastic right out of the oven with a drizzle of olive oil. It makes for killer sandwiches too!
Greeting from Florida's Forgotten Coast. Last night's sunset ( that little black dot in the center of the sunset is a dolphin!) ....we've got a few more to go till it's back to reality!

Monday, April 8, 2013

Strawberry Cake

Strawberry cakes are a Southern cake staple. However, almost every recipe I've found are made with a cake mix and strawberry flavored jello. I have been looking for strawberry cake recipe that's made from scratch,for quite sometime. I was thrilled when I found this recipe by I Made That using pureed strawberries in the batter. No cake mix or jello required! 


A couple of weeks ago, I was drooling over the keyboard browsing King Arthur's website, and came across a product they sell called cake enhancer. It's supposed to make cakes, and other baked goods, lighter, fluffier, and last longer. It can be used in almost any type of baked good from cakes to bread. I was intrigued and ordered a box to try. I decided to use it in this cake and see what happened. My cake did have a really nice light fluffy (almost box mix like) texture. I can't wait to use the cake enhancer in some of my other recipes. 
Cake enhancer was not in the original recipe so don't feel that you need to have it to make this cake. 

Strawberry Cake
Source: I Made That, ( slightly adapted)
PRINTABLE RECIPE

2 1/2 cups cake flour
2 Tablespoons King Arthur cake enhancer (optional)
1 tsp baking soda
1/2 teaspoon kosher salt
1/3 cup buttermilk
1/4 cup canola oil
1/4 teaspoon almond extract
1 teaspoon vanilla paste or extract
1/2 cup butter (one stick), room temperature
1 1/2 cups sugar
2 large eggs, room temperature, lightly beaten
1 cup pureed strawberries (put berries in the food processor or blender to puree)
1 teaspoon lemon zest

Preheat oven to 350 degrees. Line two 9" (or three 8") cake pans with rounds of parchment and butter well or spray with a non stick baking spray.
In a medium bowl, sift together the flour, baking soda, salt, and cake enhancer, if using. In another bowl, combine the buttermilk, oil, and vanilla and almond extract. Set aside.
In an electric mixer fitted with the paddle attachment, beat the butter and sugar for 3-5 minutes until it forms a paste like texture.  Scrape the bowl down well, and gradually add the eggs in a slow stream, beating  for about 1 minute at medium speed. Gradually add the buttermilk mixture. Mix for 1 minute at medium speed. Reduce the speed of the mixer to low and add the flour mixture. Mix until just combined. Stir in the pureed strawberries and the lemon zest.
Divide the batter equally into the prepared cake pans and bake 20-25 minutes or until the cakes spring back when touched lightly in the center. Allow the cakes to cool before removing from the pan.

Strawberry Cream Cheese Frosting
source: Recipe.com
8-ounces cream cheese
1 cup unsalted butter, softened
6 Tablespoons strawberry preserves
1  teaspoon vanilla extract 
4  cups confectioners' sugar
1  pinch salt

In a large mixing bowl, beat cream cheese and butter at medium-high speed  until smooth. Add strawberry preserves and vanilla, beat until combined. Add confectioners' sugar and salt. Beat at medium/low speed until the sugar is combined and the icing is smooth. If necessary, add in a little milk to get a smooth consistency. 


Wednesday, March 27, 2013

Hot Cross Buns

I have had this recipe for hot cross buns stuck in a notebook that I use to save recipes I want to make sometime. It's been in there for several years now, a relic from the days when I'd print off recipes I wanted to make and keep them in a notebook. Thank goodness for Pinterest, now I can save recipes that I may never make and not be haunted by a notebook full of wasted paper! Anyway, I did finally get around to making the hot cross buns. Now only several hundred more recipes to go...plus all my new pins...

This was my first attempt at making hot cross buns. They are lightly sweet, spicy bun, containing dried fruits  such as raisins, and marked on top with a cross. Traditionally these buns where made to be served on Good Friday, The cross was made on them to represent the Crucifiction.

I was pretty satisfied with the results. I did make a few minor changes to the original recipe, mainly replacing the candied lemon and orange peel, with zest of each instead. I'm not a fan of candied peels and also they can be difficult to find in the grocery stores in my area. Which means I would have to make them if I wanted to add them to this recipe and since I don't care for them much, zest was a good sub. If you want to use the candied peels, then by all means go ahead and use them in your buns.

I also used golden raisins that I "plumped". Way back when I first started blogging, I made Sherry Yard's oatmeal cookies, which still the absolute best oatmeal cookie I've ever had. She says the secret to her cookies are "fat raisins". She has you boil the raisins with orange juice, rum, sugar and white wine. The liquid causes them to plump up, hence the name fat raisins. I've been using this idea in lots of recipes ever since I made those cookies. For this recipe I just squeezed the juice of one orange over the raisins and popped them into the microwave for just long enough for the liquid to come up to a boil. I just allow the raisins to cool in the liquid, drain and and use in the recipe. You could use just water if you don't have juice but I wanted to add a little more orange flavor to my buns so I used orange juice. Try these raisins in any of your baked goods calling for raisins, you won't believe how good they are!

For those of you that are wondering, yes, I did sing the Hot Cross Buns song while I made these buns. This recipe makes some big buns, definitely worth two a penny, I would think!
Truly traditional hot cross buns have candied fruit peels and the crosses are made from pastry, not sugar. I guess you can call mine hot cross-ish buns...but that's harder to sing!

Hot Cross Buns
SOURCE: Country Living Magazine (adapted)
PRINTABLE RECIPE

INGREDIENTS:
1 cup milk, warmed to 110°F
1 package dry active yeast
3/4 cup sugar plus 1 teaspoon sugar
2 1/4 cup all-purpose flour
2 cup bread flour
1/2 cup raisins, regular or golden, plumped*(optional)
1 heaping teaspoon lemon zest
1 heaping teaspoon orange zest
1 teaspoon salt
1/2 teaspoon cinnamon
1/4 teaspoon ground nutmeg
1/8 teaspoon ground cloves
4 tablespoon unsalted butter, melted
2 large eggs

Egg Wash
1 large egg yolk
1 tablespoon water

Glaze
2/3 cup confectioners sugar
1/4 teaspoon vanilla
1 tablespoon milk

*Plumping raisins, place raisins in a microwave safe bowl, add about a half of cup of liquid, water or orange juice or a mixture. You could also use a couple of tablespoons of rum or brandy, in place of some of the water or juice. Heat in the microwave for 30 seconds, or until the liquid boils. Allow the raisins to soak in the liquid for about 10 minutes, drain any excess liquid, and use in the recipe.

METHOD:

Coat a large bowl with oil and set aside. Mix together the 1 cup warmed milk, yeast, and the 1 teaspoon sugar in a small bowl and let stand while you do the next step. Combine the flours, 3/4 cup of sugar, raisins, lemon and orange zest, salt, and spices in the bowl of a standing mixer fitted with a dough hook. Stir the dry ingredients together. Add in the butter, eggs, and the milk/yeast mixture. Mix using the dough hook until all the flour is mixed in and a sticky dough is formed, about 3 minutes. **Transfer the dough to a lightly floured surface and knead by hand until smooth, about 5 minutes. Dusting your hands with flour or rubbing a little vegetable shortening on them will help keep the dough from sticking to your hands as much. The dough will be sticky, just keep lightly sprinkling it with flour. I used about a tablespoon or less worked it in until the dough stuck to my hands then sprinkled lightly with flour again, just until you get a nice smooth dough. The dough is sticky but don't go crazy with the flour or you'll end up with heavy buns. 
 Form the dough into a ball, put it into the oiled bowl, turning to coat all sides with the oil. Cover with a damp kitchen towel and let rise in a warm, draft-free place until it doubles in volume, about 1 hour.

Line a baking pan with parchment paper and set aside. Punch the dough down, transfer to a lightly floured surface, and knead for 3 minutes. Divide the dough into 12 equal-sized pieces, about 3 1/2 ounces each. If you want small buns, divide the dough into 24 equal pieces. (You will probably need two baking pans for 24 buns) Shape each piece into a ball and place the balls about 1 inch apart in four rows of three (for 12 buns, use two pans for 24) on the prepared pan. Cover and let rise until the buns double in volume and touch one another, about an hour or so.
Preheat your oven to 400 degrees about 30 minutes before you plan to bake the buns.

When the buns are done rising,make the egg wash. In a small bowl, combine the egg yolk with 1 tablespoon water. Using a pastry brush, lightly brush the mixture on the top of each bun. Place buns in the lower third of the oven. Bake until golden brown, about 20  minutes (check at 12-15 minutes, if you made smaller buns). Transfer to a wire rack to cool.
In a small bowl, combine the confectioners' sugar, milk, and vanilla. Stir until smooth. Allow buns to cool slightly, about 10 minutes, drizzle a horizontal line across each row of buns followed by a vertical line to form a cross on the top of each bun.

**I followed the original recipe's instructions for kneading the dough, but next time I think I'll leave them in the mixer to knead because the dough was a bit too sticky for hand kneading, in my opinion.

In English folklore, they believe sharing a hot cross bun with another is supposed to ensure friendship throughout the coming year, particularly if  you say,"Half for you and half for me, Between us two shall goodwill be" before you eat them...Maybe I'll make up tune to go with that one and mix it up a bit!

Tuesday, March 26, 2013

A small rant...


I rarely use my blog as a platform to post any kind of rant. Baking is supposed to make people happy. I want my readers to come here to find recipes, exchange ideas, try something new, etc...  not for rants,  nasty comments, and mean-spirited debates. Which is why I was a little hesitant to even say anything about a growing problem for bloggers like myself. Theft of our content has always been and probably will always be a problem. It pretty much goes with the territory if you post anything on the internet. We want to share our photos, ideas, and recipes and we LOVE it when you pass them on to others! Please feel free to click the share buttons on my site or my blogs facebook page and share away. Pin it to Pinterest, stumble it, like on facebook...you get my drift! The community built between reader and other bloggers is what I love most about blogging and what makes it fun!.

That being said, however, over the past month or so I've noticed a dramatic drop in traffic to my blog and had no idea what the causing this drop. Then I read this post from I Am Baker about Facebook sharing of blog content. She does a great job explaining what is copyrighted and what is not. (Yes I know a list of ingredients is not copyrighted, but the rest of the recipe is because it's my own words and the photos on my site are all mine!) I had been alerted by fellow bloggers in the past of Facebook pages that had posted my photos and the entire recipe on their site with no credit or link back to my blog. Until I read I Am Bakers post, I had no idea how wide spread the problem had become. These Facebook, I call them copy and paste pages, copy popular images and content they think a lot of people will share, and paste them onto their Facebook pages. They pass them off as their own, with nothing stating that this is not their photo or recipe. I found one of my recipes posted on one of these pages that had been shared 95 times last time I looked. The owner of the page it was posted on had shared the recipe saying something like "this is one of favorite things to make" then had my photo and the entire recipe copied in it's entirety posted with the picture. I left a comment telling her the photo and recipe were from my blog and to please remove the recipe and create a link to the original blog post if she wanted to share my post. She did nothing and the photo with the entire recipe are still on her site for other unknowing facebookers to share.
 The vast majority of the people that see these recipes on Facebook have no idea that the info they just "shared" with their friends was ripped off from a blogger that spent hours of work creating the original post. Yes most of us do receive compensation from various advertisers for the traffic that we bring into our blogs. So these people are also literally stealing money out of our pockets as well. As a small time blogger I don't have anyway to fight back against these thieves, except to ask you not to support these pages on facebook. Before you hit "share" see if the page either owns the content or has a link back to the owner of the content they have posted. You can easily identify these cut and paste thieves on Facebook as they post generally post several times a day, a picture with the entire recipe for the dish. Many times they ask you to "click share to save the recipe" They typically have thousands of followers and there are almost never any links to original sources.
If you want to know the names of the pages some of the biggest Facebook offenders, read I Am Bakers post and the follow-up comments. She calls out several and many commenters name quite a few other pages. I'm shocked  at how vicious some of the perpetrators have been toward Amanda since she pointed out their theft.
Visit her blog(s) even if you don't want to read more about this issue. She's an amazingly talented person and her blog(s) is truly a feast for the senses!

We all learned about plagiarism in about the 6th grade.That's what this boils down to. Think of it this way, you wouldn't be able to scan a cookbook and post it on Facebook as your own, well this is no different. Food bloggers are not the only ones that this is happening to. Those same pages constantly take content from craft bloggers and others as well, using the same M.O.
FYI Facebook can hold anyone that repost stolen content liable as well in the case of a lawsuit. Something to think about before hitting "share"!
That's it rant over. On to happy baking and yummy food!

Monday, March 18, 2013

Lemon Curd Filled Bunny Ear Cakes


The recipe for the cake part of this recipe on Nigella Lawson's How to be a Domestic Goddess. She calls them  fairy cakes, which are sometimes also called butterfly cakes when the cakes have a filling and a buttercream frosting. Butterfly cakes are sort of an English version of a cupcake. I realize probably just offend all of my English readers by comparing the two! Before making this recipe and reading many heated comments from English bakers on the differences of fairy/butterfly cakes and cupcakes, I was unaware how deep the feelings ran in this debate! Yes there is a difference between an American cupcake and an English fairy cake, but you have to admit, they are kind of similar...cake baked in a muffin tin, topped with a frosting...please don't send me nasty emails! :)
Anyhoo as I was putting the "wings" on my lovely lemon curd filled cupcakes butterfly cakes, ensconced in their adorable Spring-y baking cups, it occurred to me that if I placed the pieces upright rather than on their sides, they would look like rabbit ears instead of wings. How perfect with Easter just around the corner. Ta da! Lemon curd filled bunny ear cakes! Which are nothing like cupcakes and kind of like  English butterfly cakes...either my bases are covered or I've just offended both sides of the fairy cake/cupcake debate!

Nigella's fairy cake recipe couldn't be easier to make. It only takes a few minutes to whip up the cakes and they bake in under 20 minutes. Then they're ready to be made into bunnies or butterflies, which ever suits your fancy!

Bunny Ear Cakes (Butterfly Cake)
Source: Nigella Lawson, How to be a Domestic Goddess
Yield 10-12 regular size cupcakes
Printable recipe

INGERDIENTS:
1/2 cup, (1 stick) unsalted butter, softened
1/2 cup sugar
2 eggs
3/4 cup self-rising flour
1/2 teaspoon vanilla extract
3 tablespoons milk

lemon curd, store bought or homemade

METHOD:
Preheat oven to 375 degrees.
Line a 12 cup muffin pan with paper liners.
I baked mine in these paper baking cups I had, but a muffin tin lined with cupcake liners works just as well.

Put all the ingredients except for the milk into a food processor filled with the blade and process until smooth, about a minute. Pulsing quickly, while adding the milk down the funnel till just blended. Spoon batter into muffin pan, filling about 2/3 full.
Bake for 15-18 minutes or until they are golden on top. Cool completely

With a sharp knife and cut a circle out of the top of each cake at an angle (kind of a cone shape) about 1/2 inch from the edge of the cakes.
Cut each circle in half and set aside.

Fill the cakes with about 2 teaspoons of lemon curd. Fill a piping bag fitted with a tip with the frosting. (Alternately  you can put the frosting into a zip lock bag with a hole cut into one corner, to pipe out the icing.) Pipe the frosting onto the tops of the lemon curd filled cakes. Top with the cut out pieces of the cakes. I stood them upright to look like a bunnies ears. Dust with powdered sugar. Serve immediately or keep refrigerated until served. The cakes can be stored in an airtight container in the fridge for 3 or 4 days but are best the day they are made.

Frosting

1 stick butter, room temp
2 1/2 cups confectioner's sugar
Enough heavy cream to get a cream consistency
1 teaspoon of either lemon or vanilla extract

Mix butter and sugar together in a medium bowl with an electric mixer. Gradually add in enough cream to produce the desired consistency for spreading or piping. Mix in flavoring of your choice.

Happy Easter!


Thursday, March 14, 2013

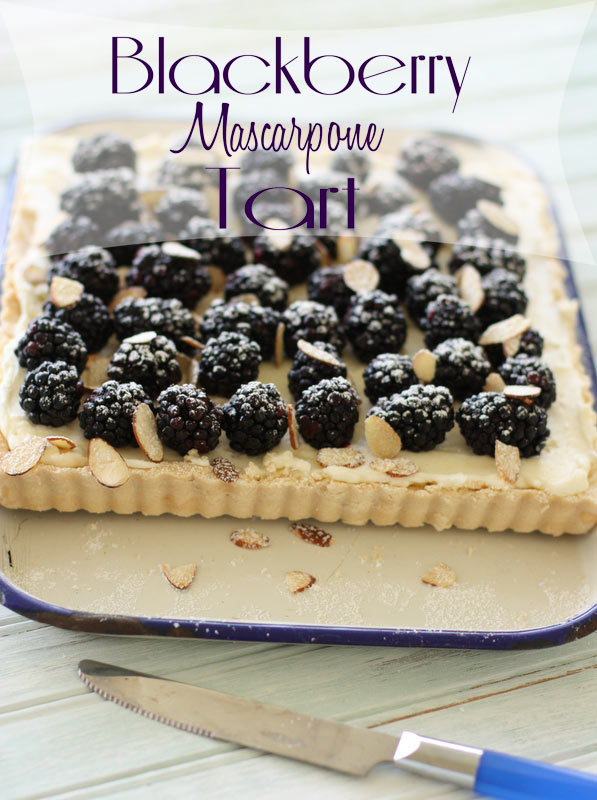
Blackberry Mascarpone Tart


Spring fever has struck me this week! Here in the South, Spring starts playing peek-a-boo with us right about now. The trees are starting to bud, the azaleas and dogwoods are beginning to break out. In the morning I'm reaching for a sweater, but by late afternoon, I'm contemplating breaking out the flip flops. I'm sooo ready for the flip flops but unfortunately I'll probably have to wait awhile to actually be able to wear them without my toes turning the color of these blackberries. Oh well I guess I have to settle for Spring desserts for now.

It may be a bit early to break out the flip flops but this blackberry tart is like Spring on a plate. This tart is not only absolutely delicious but so pretty it could be the center piece on your Easter table. Oh and did I mention, it couldn't be easier to make. Perfect!

Hello Spring!

Blackberry Mascarpone Tart
Printable Recipe

INGREDIENTS:
1 stick unsalted butter at room temperature
1 cup sugar
1/2 teaspoon salt
1/2 cup almond flour*
1 cup unbleached all-purpose flour
1 8 ounce package of mascarpone
1 cup confectioner’s sugar
1/2 cup heavy cream
3 cups blackberries
1/4 cup toasted almonds (optional)
powdered sugar, for dusting top

METHOD:
Preheat oven to 350 degrees. In the bowl of an electric mixer fitted with the paddle attachment, cream the butter and the granulated sugar. Add in salt and flours and mix until just combined. Press dough into a 9 inch tart pan. Bake for 20 minutes, or until edges begin to brown. Allow to cool completely.

In an electric mixer bowl, fitted with the paddle attachment, combine cheese and confectioner’s sugar. Add the cream. When it is all incorporated, switch to the whisk attachment, and increase the speed to high. Whisk until stiff peaks form.

Remove tart shell from the pan. Spread the cheese filling into the shell. Place the blackberries on top of the mascarpone mixture. Refrigerate until ready to serve. Before serving sprinkle with toasted almonds, if desired, and dust top of tart with powdered sugar.


*This recipe is not only easy but very adaptable as well. The almond flour can be replaced with any finely ground nut or with regular flour but I recommend a nut flour. It makes this tart just a little extra special. The mascarpone can be replaced with cream cheese, but the tart won't be quite as luscious. Almost any berry can be substituted for the blackberries, strawberries would be fantastic.

The wild azaleas are in bloom in the woods behind my house....flip flops are sure to follow!