Showing posts with label cake. Show all posts

Saturday, August 23, 2014

My fav Swiss Meringue Buttercream


So it's been a while since I've been here. Hey I've been at this blogging thing for 7 years so I guess I was due a sabbatical. I hadn't planned to be gone so long from blogging but my cake business has been keeping me so busy that something had to give. After a long day of baking and decorating,the last things my tired fingers have felt like doing is typing!
Anyway enough excuses, I'm back to share a great recipe for Swiss meringue buttercream (aka SMB) I found recently. I've tired numerous SMB recipes and this one is by far the best tasting and easiest to work SMB that I've ever made. It's so light and airy it almost has the texture of a whipped cream frosting. This recipe is also great for those of us that live in high humidity areas because it's more stable than many SMB recipes I've tried in the past.
I also love how smooth I could get this icing without much effort!

This recipe comes from Gretchen Price at Woodland Bakery. She calls this recipe The Worlds Best Swiss Meringue Buttercream, and I think I agree! She has a step-by step video here to guide you through the process of making the SMB. Gretchen is very entertaining to watch and makes the whole process of making SMB a lot less intimidating. If you've never tried making SMB before I highly recommend watching the video and giving it a try. Click one of the links above for the complete recipe and video for the World's Best Swiss Meringue Buttercream!


Wednesday, January 15, 2014

Pink Champagne Cake


Happy New Year!! Ok I know I'm really just a tiny bit late to the party, but I brought a pink Champagne cake. Hopefully this will make up for my tardiness in posting!!
I recently came across a recipe for this cake and have been dying to make it ever since. I was putting together a cake tasting for a bride this week and thought this cake would be a perfect for a wedding. Everything about this cake just screams celebration!

This would be a great cake for any celebration...perfect for Valentine's day!!

Here are just a couple of my thoughts on this cake. If you don't like the taste of Champagne/sparkling wine, you probably won't like the cake. It has two cups of champagne in it and it has a distinct champagne flavor. I thought it tasted a bit like a Zabaglione, which is one of my favorite desserts. Also, you need to use a sweet, not a dry (brut) Champagne or sparkling wine. It doesn't necessarily have to be a pink champagne but it should be more sweet than dry. I used a sparkling Rose for this cake.
Once again, you really can taste the flavor of the Champagne, so buy one that would be good enough to drink.

Tuesday, June 18, 2013

Chunky Monkey Cake

I you like banana bread, then this is your cake. This cake is a dense, very banana-y cake. I cut  this cake into half to make layers and filled it with some caramel frosting that I had left from another cake. Then I topped it with a cream cheese frosting. The caramel frosting was a last minute idea. You can just ice it with the cream cheese frosting but I really love caramel and the banana. In fact the cake would be delicious with just the caramel frosting, but why stop at just one flavor of frosting??
This cake is kind of a slightly sweeter version of a banana bread with the added bonus of frosting...or in this case two kinds of frosting!

The flavors of the cake reminded me of one of my favorite flavors of Ben and Jerry's ice cream, hence the name Chunky Monkey cake.

Monday, April 8, 2013

Strawberry Cake

Strawberry cakes are a Southern cake staple. However, almost every recipe I've found are made with a cake mix and strawberry flavored jello. I have been looking for strawberry cake recipe that's made from scratch,for quite sometime. I was thrilled when I found this recipe by I Made That using pureed strawberries in the batter. No cake mix or jello required! 


A couple of weeks ago, I was drooling over the keyboard browsing King Arthur's website, and came across a product they sell called cake enhancer. It's supposed to make cakes, and other baked goods, lighter, fluffier, and last longer. It can be used in almost any type of baked good from cakes to bread. I was intrigued and ordered a box to try. I decided to use it in this cake and see what happened. My cake did have a really nice light fluffy (almost box mix like) texture. I can't wait to use the cake enhancer in some of my other recipes. 
Cake enhancer was not in the original recipe so don't feel that you need to have it to make this cake. 

Strawberry Cake
Source: I Made That, ( slightly adapted)
PRINTABLE RECIPE

2 1/2 cups cake flour
2 Tablespoons King Arthur cake enhancer (optional)
1 tsp baking soda
1/2 teaspoon kosher salt
1/3 cup buttermilk
1/4 cup canola oil
1/4 teaspoon almond extract
1 teaspoon vanilla paste or extract
1/2 cup butter (one stick), room temperature
1 1/2 cups sugar
2 large eggs, room temperature, lightly beaten
1 cup pureed strawberries (put berries in the food processor or blender to puree)
1 teaspoon lemon zest

Preheat oven to 350 degrees. Line two 9" (or three 8") cake pans with rounds of parchment and butter well or spray with a non stick baking spray.
In a medium bowl, sift together the flour, baking soda, salt, and cake enhancer, if using. In another bowl, combine the buttermilk, oil, and vanilla and almond extract. Set aside.
In an electric mixer fitted with the paddle attachment, beat the butter and sugar for 3-5 minutes until it forms a paste like texture.  Scrape the bowl down well, and gradually add the eggs in a slow stream, beating  for about 1 minute at medium speed. Gradually add the buttermilk mixture. Mix for 1 minute at medium speed. Reduce the speed of the mixer to low and add the flour mixture. Mix until just combined. Stir in the pureed strawberries and the lemon zest.
Divide the batter equally into the prepared cake pans and bake 20-25 minutes or until the cakes spring back when touched lightly in the center. Allow the cakes to cool before removing from the pan.

Strawberry Cream Cheese Frosting
source: Recipe.com
8-ounces cream cheese
1 cup unsalted butter, softened
6 Tablespoons strawberry preserves
1  teaspoon vanilla extract 
4  cups confectioners' sugar
1  pinch salt

In a large mixing bowl, beat cream cheese and butter at medium-high speed  until smooth. Add strawberry preserves and vanilla, beat until combined. Add confectioners' sugar and salt. Beat at medium/low speed until the sugar is combined and the icing is smooth. If necessary, add in a little milk to get a smooth consistency. 


Tuesday, July 3, 2012

Happy 4th of July!

Here's just a quick, fun idea for a dessert for your 4th celebration. I made this one bowl vanilla cake. It's from Culinate, a great food centered website. You can use any white cake you want, but this recipe is easy and tastes great. I let the cake cool completely. I wanted to make individual cakes so I cut the cake into stars with my 3" star cookie cutter. You can also leave the cake whole, if you'd rather not bother with cutting out the stars, but how cute are they??!

I split the stars horizontally and spread on a layer of strawberry preserves, and put the stars back together. If you want you could use fresh strawberries, sliced and sprinkled with a little sugar instead of the preserves. Then I made some sweetened whipped cream, pipped it on top and decorated with a few fresh blueberries.  Easy, festive, and delicious! I hope you have a safe and happy 4th of July!


Friday, May 25, 2012

Pineapple Sheet Cake


If you've ever been to a church pot luck in the South then odds are, you've had this cake. It's always a crowd pleaser. It's moist, rich, and so tasty, but that's not the best part about this cake. What makes this cake a go to for serving a crowd is that it's so quick and easy to make. Seriously a boxed cake mix is more labor intensive than this baby. It's a no mixer needed kind of easy. If you've got a bowl, a spoon, and about 5 minutes, you can have this cake mixed up and in the oven. The pineapple keeps the cake really moist so it can easily be made a day ahead of time. If you are looking for great dessert with minimal effort for your Memorial Day party, I've got your cake!

Pineapple Sheet Cake

Originally published as Pineapple Sheet Cake in Country Extra January 1992, p51 (Slightly adapted)
Serves: about 24


Ingredients:
2 cups all-purpose flour
2 cups sugar
2 eggs
1 cup chopped pecans
2 teaspoons baking soda
1/2 teaspoon salt
1 teaspoon vanilla extract
1 can (20 ounces) crushed pineapple, undrained

Cream Cheese Icing:
1 package (8 ounces) cream cheese, softened
1/4 cup butter, softened
4 cups confectioners' sugar
1 teaspoon vanilla extract
1/2 cup chopped pecans (optional)


Method:
For Cake
Preheat oven to 350 degrees.
In a large bowl, add all the dry ingredients, whisk together. Add pineapple, vanilla and eggs. Mix until combined. Pour into a greased 9 x 13 inch baking pan. Bake at 350°for 35 minutes. Allow cake to cool before icing.
For icing
In a bowl, combine the cream cheese, butter, confectioners' sugar and vanilla until smooth. Spread over cake and sprinkle with nuts, if desired.

Sunday, April 29, 2012

Lemon Thyme Cake


I made these cakes for a ladies group I spoke at about using herbs in cooking. Most of the women in the group were fairly familiar with cooking with herbs like thyme, but very few had ever used any herb, other than mint, in baking. Thyme is from the mint family and has a slightly minty, lightly lemony flavor which makes it perfect to use in baking. Thyme pairs perfectly with this lemony cake. I added thyme to the cake batter. After the cakes were baked I poked holes into them with a skewer and topped them with a lemon thyme syrup. The syrup adds even more lemon thyme flavor. Poking holes into the cake allows the syrup to get all the way into the cake and keeps it extremely moist. In fact, these cakes seem to taste better the longer they sits. If you've never tried baking with herbs, this cake is a great place to start!

Lemon Thyme Cake
Source: Martha Stewart (adapted)
Yields: 2 loaf cakes or one bundt cake
Printable Recipe
Ingredient:
1 cup (2 sticks) unsalted butter
3 cups all-purpose flour
3/4 cup low-fat buttermilk
Zest of 2 lemons, finely grated
1 tablespoon fresh thyme,chopped, (if the center stem of the thyme is tough, pick the leaves off and discard the stem).
1/3 cup fresh lemon juice (about 2 lemons)
1 1/2 teaspoons salt
1/2 teaspoon baking powder
1/2 teaspoon baking soda
2 cups sugar
5 large eggs

Lemon Thyme Syrup 
1/4 cup water
1/4 cup lemon juice
3/4 cup sugar
Zest of one lemon, finely grated
5-6 sprigs of fresh thyme

Method:
Preheat oven to 350 degrees, with rack in lowest position. Butter and flour or spray with cooking spray, two 4 1/2-by-8-inch (6-cup) loaf pans.
Make the syrup:
In a small pot, stir together the lemon juice, zest, sugar, and thyme. Heat the mixture on medium for about 10 minutes, until the sugar is dissolves and the liquid is clear. Take off the heat, cover and set aside while you prepare the cake.
For the cake:
In a a 2 cup liquid measuring cup,combine buttermilk with lemon juice and fresh thyme. In a medium bowl, whisk together flour, salt, baking powder, and baking soda.
In a separate bowl mix lemon zest and sugar together. Rub the sugar together with the zest until the sugar is slightly damp. 
With an electric mixer, cream butter and sugar/zest until light and fluffy about 3 minutes. Add eggs, one at a time, beating well after each addition.
With mixer on low, add flour mixture in three parts alternately with the buttermilk mixture in two, beginning and ending with flour; beat just until smooth (do not overmix).
Divide batter evenly between pans; smooth tops. Bake until a toothpick inserted in centers comes out clean, 50 to 60 minutes (tent with foil if browning too quickly). Cool 15 minutes in pan. Turn out cakes onto a rack; cool for about 20 minutes before glazing with the syrup.
Set rack with cakes over a baking sheet lined with waxed paper. Poke holes in the cakes over the top with a skewer or a thin knife. Pour the syrup over cakes, letting it run down the sides; let dry, about 30 minutes.

I also want to congratulate Kerry S. on winning our Woodland Fairy giveaway!! Our fairy party was also featured on two wonderful blogs last week. Woohoo! 
Check out our feature on Happy Hour Project and Kate from A Creative Cookie picked our party to be featured on Sugar Bee Crafts! Thanks ladies, I am honored!


Tuesday, April 10, 2012

Strawberry Roulade

Like most families, our holiday traditions revolve are food. That's especially true for Easter in our family. We have pretty much the same menu from year to year. The same was true this year. We had our annual Easter lunch at the farm on Sunday afternoon. It was a gorgeous day. My contribution to the meal was this Strawberry Roulade. It was delicious, very light, a perfect Spring dessert. The cake is a light sponge cake filled with a mascarpone whipped cream and fresh strawberries. It's kind of like a rolled up strawberry shortcake.


If you've never made a roulade before don't be intimidated by the process. It can be a little nerve racking to roll up a cake in a towel, but it's easier than it looks.  


Strawberry Roulade
Source: TheBakingPan.com (adapted) 


Printable recipe
For the Cake:
2/3 cup all-purpose flour
1 teaspoon baking powder
1/2 teaspoon salt
4 large eggs, separated
3/4 cup granulated sugar, divided
2 tablespoons water
1 teaspoon pure vanilla extract

Method:
Preheat oven to 375 degrees F. Prepare one 10½ x15½ x1 inch Jelly Roll pan; lightly grease the pan or spray with baking spray, line with parchment paper, and then lightly spray with baking spray.

Sprinkle a clean towel with 1/4 cup confectioners’ (powdered) sugar. Set aside to use after the cake is baked. A small kitchen towel that is a little larger than the 15x10 inch pan works well.

In a medium mixing bowl, combine flour, baking powder, and salt; sift or whisk together to mix. Set aside.
In a large bowl of an electric mixer, add the egg yolks and beat 3 to 5 minutes on medium-high speed until the egg yolk foam becomes thick and lemon colored. With the mixer on medium speed, VERY slowly add 1/2 cup of the sugar to the eggs, either one tablespoon at a time, or in a very slow steady stream, taking from 2 to 3 minutes to add all of the sugar, and beating until the eggs and sugar are fully incorporated. Scrape down the sides and bottom of the bowl with a rubber spatula. The mixture will be thick and a pale yellow color. Add the water and vanilla and continue mixing for another 1 minute until well blended.
With the mixer on low speed, gradually add about 1/2 of the flour mixture, mix just until blended, and then add the remaining half, mix just until blended, scraping down the side of the bowl as needed.
In another large mixing bowl and using clean beaters, beat the egg whites with an electric mixer until soft peaks form. Gradually add the remaining 1/4 cup sugar; continue beating until stiff peaks form. Using a balloon type whisk or large rubber spatula, gently fold about 1/4 of the beaten egg whites into the batter to lighten the batter, and then fold the remaining egg whites in.

Bake:
Spoon the batter into the prepared pan and smooth the surface with the back of a large spoon or large offset spatula. Bake for 12 to 15 minutes or until the top of the cake springs back when lightly touched. Remove from oven, immediately loosen edges of cake from pan and turn the cake over onto the prepared towel. Carefully peel off the parchment paper, and then roll the cake and towel together tightly, starting with the narrow end. Place seam side down on a wire cooling rack to cool completely.

For the Filling:
1 1/2 cups heavy whipping cream, cold
1/2 cup mascarpone
1 teaspoon vanilla
2/3 cup of powdered sugar
Sliced strawberries (about 1 1/2 cup)
*(1/2 cup Strawberry Jam, optional)

To make the filling, whip together the mascarpone, heavy cream, sugar and vanilla until stiff peaks form.

Assembly:

Carefully unroll cooled cake but don’t try to make the cake lie completely flat, the edge should remain curled so that the cake doesn’t split.


Spread whipped cream over the cake and under the curled edge and leaving a 1 1/2 inch border on the far side. Sprinkle strawberries over the whipped cream. Gently re-roll the cake without the towel, starting with the curled end. Place seam side down on a serving plate. Cover and refrigerate at least 2 hours before serving. Dust with additional powdered sugar if desired.


*Note: The original recipe called for 1/2 cup of strawberry jam spread over the cake before spreading on the whipped cream. I didn't have strawberry jam so I left it out but the jam would add a bit more strawberry flavor to the cake so I think I'll add it next time I make this.


A great dessert to impress your friends with!


Wednesday, March 28, 2012

Lemon Lime Baby Cakes

 Sing Sing it's Spring!!
Beautiful Spring days like today bring back to mind a song from my childhood. As a young child, I loved playing my records on the family record player. I realize I'm probably dating myself by admitting we had a record player, as I'm sure some of you never had/used a record player. We had a record player even after CD's were readily available. New-fangled technology was not at all important to my parents and the record player worked just fine, so why change? My sisters and I had quite a few records that were recorded books with songs. The books to follow along with, accompanied the records. Each one of these records started with instructions on what sound to listen for to know when to turn the pages of the book. We had all the classics, Peter Pan, Alice in Wonderland, etc. But my favorite was the Black Beauty record/book and I could probably still sing the songs from that record. Anyway, one of the story records had a song called "Sing Sing it's Spring" on it. That's all I remember from that particular record but this morning when I woke up to the sounds of happy chirping, that old song popped into my head. 
That recollection has absolutely nothing at all to do with these baby cakes, except that the light fresh lemon lime flavor of these cakes will have you singing for Spring too!
Tint the glaze with some food coloring in pastel colors and these little babies are perfect for Easter! 
Lemon Lime Baby Cakes
Printable Recipe

Source: April 10th, 2009 - by Stephanie Younger
Yields: 18-24 mini cakes using a mini muffin tin or 12 cakes using a regular muffin tin
Ingredients:
1 1/2 cups all purpose flour
1 teaspoon baking powder
1/4 teaspoon salt
1/2 cup butter, at room temperature
1 cup granulated sugar
2 eggs
1 tablespoon fresh lemon juice
2 teaspoons fresh lime juice
1 tablespoon fresh lemon zest
1 teaspoon fresh lime zest
1/2 teaspoon vanilla extract
1/8 teaspoon almond extract
1/2 cup plain yogurt

For the drizzle:
1 1/2 cups confectioners’ sugar
lemon and lime juice or use several tablespoons of frozen lemonade or limeade concentrate, thawed
Tint with food coloring, if desired
I added some sprinkles too!
Whisk together the flour, baking powder and salt. Set aside. In a mixer, beat the butter and sugar until fluffy. Add eggs one at a time, mixing well between additions. Add lemon and lime juice and zests, vanilla and almond extract and yogurt. Add the flour mixture, mix just until combined. Grease the pan of your choice and fill the cups half way. Bake at 350 degrees for 15-17 minutes or baked through and when cooled, transfer to a wire rack. In a small bowl combine the confectioners’ sugar and enough lemon and lime juice or lemon-aid concentrate to make a nice consistency for the drizzle. Drizzle over the cakes.

Are you singing yet??

Tuesday, March 13, 2012

Strawberry Swirl Cream Cheese Pound Cake

Spring has sprung here in the Southeast. I don't know what that means to you but for me it means strawberry season!  For many years, my parents grew strawberries on a commercial level. So as you can imagine, I've eaten a lot of strawberries, in almost anyway imaginable.  One of my favorite ways to use strawberries is to macerate them. Are you impressed by that term?? It's not nearly as impressive as it sounds. It's just sliced berries with sugar that sit until the juices release. We like to mash the berries slightly (I use a potato masher). We called mashed strawberries....fancy, I know, but that's just how we are around here.  At this point you can do anything with the mashed strawberries. They're delicious on top of ice cream, yogurt, pancakes, the list goes on, but pile them on top of a hunk of buttery pound cake maybe a bit of freshly whipped cream...simply wonderful!   
Last month's Southern Living featured a pound cake with strawberries swirled through it, on the cover.  When I read through the recipe it sounded delicious but called for a strawberry glaze for the swirl. I'm not a fan of strawberry glaze. It has a kind of artificially taste that I don't like. I decided to cook down some berries and make my own glaze to swirl in the cake. I was going to strain the berries and make a syrup more like the original recipe called for but I decided I liked the idea of having strawberry pieces baked into the cake. I could have my mashed berries baked right into the cake...perfect!

Strawberry Swirl Pound Cake


Source: Nancy H. Test, West Chester, Ohio,  

MARCH 2011 (adapted)
Printable Recipe
Ingredients:
1 1/2 cups butter, softened
3 cups sugar
1 (8-oz.) package cream cheese, softened
6 large eggs
3 cups all-purpose flour
1/2 teaspoon almond extract
1 teaspoon vanilla extract
1 teaspoon lemon zest

2/3 cup strawberry glaze
1 (6-inch) wooden skewer

Method:
Preheat oven to 350°. Beat butter at medium speed with a heavy-duty electric stand mixer until creamy. Gradually add sugar, beating at medium speed until light and fluffy. Add cream cheese, beating until creamy. Add eggs, 1 at a time, beating just until blended after each addition. Scrape down the sides of the bowl.
Gradually add flour to butter mixture. Beat at low speed just until blended after each addition, stopping to scrape bowl as needed. Stir in the lemon zest, almond, and vanilla extracts. Pour one-third of batter into a greased and floured *10-inch 14 cup tube pan (about 2 2/3 cups batter). Dollop 8 rounded teaspoonfuls strawberry glaze over batter, and swirl with wooden skewer. Repeat procedure once, and top with remaining third of batter.

Bake at 350° for 1 hour to 1 hour and 10 minutes or until a long wooden pick inserted in center comes out clean. Cool in pan on a wire rack 10 to 15 minutes; remove from pan to wire rack, and cool completely (about 1 hour).

Notes:*the original recipe said to use a 10-inch 14 cup tube pan but I used my 10-inch 12 cup bundt pan.

Strawberry Swirl
Strawberry Swirl
Ingredients:
2 cups strawberries(about 1 lb), quartered
1/3 cup sugar
1/2 cup water
2 teaspoons lemon juice
1 tablespoon corn starch

Method:
Combine the water, strawberries, sugar, and lemon juice in a large saucepan on high heat. Stir and bring up to a boil.
After the mixture begins to boil, reduce the heat to medium low. Cook for 5-8 minutes, until the strawberries have completely broken down.  As the strawberries soften, use a wooden spoon or potato masher to break up the berries. (At this point you could strain the strawberries through a sieve for a smooth glaze, but I decided to leave the bits of strawberry in mine.)
Meanwhile, whisk the cornstarch with 3 tablespoons of water in a small bowl. Then, pour into the strawberries.
Increase heat to high, and continue to whisk the mixture until it thickens and the cornstarch becomes clear and loses it's cloudy appearance, approximately 3-5 minutes.
Remove  from heat, and pour into separate bowl to cool down. Use 3/4 a cup to swirl in the cake. Any leftovers are great served along with the cake.
This is a BIG cake when it's done. With that lovely swirl of berries running through it, this cake would be perfect for our family Easter gathering. Can't wait for an excuse to make this again!
Strawberry swirl!

Saturday, July 30, 2011

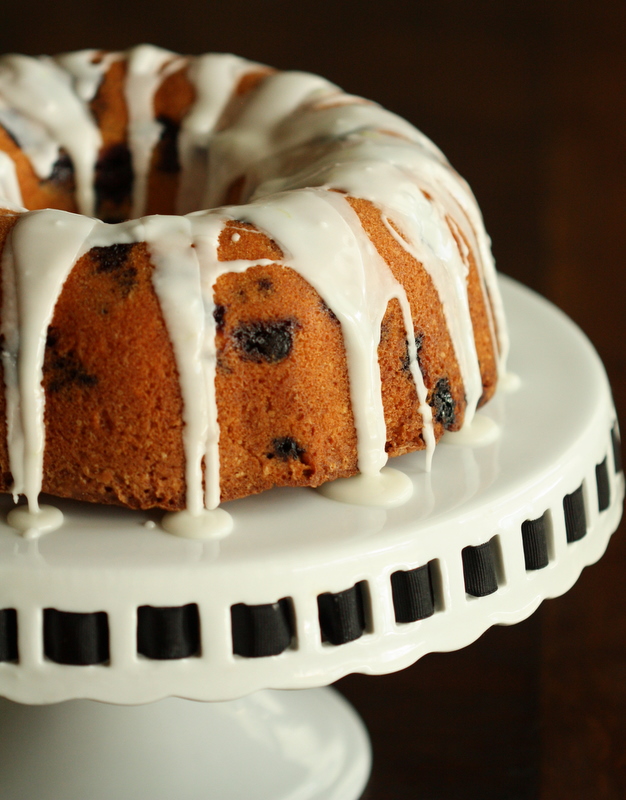
Blueberry Lime Pound Cake

 I have a confession to make. I have a slight problem with hoarding. Well that's a bit of an exaggeration, I only hoard one thing, old cooking magazines. I keep a few Bon Appetit's and a Martha Stewart Living, here and there, but mostly it's limited to Fine Cooking magazines. For some reason, I can't stand to throw them away. I love every issue. They only publish a new magazine every other month, which is probably a good thing because with only six issues a year, it would take a long time for me to make it on to "Hoarders: Buried Alive!"
Actually, recently in a fit of spring cleaning, I did part with quite a few issues. I kept only the ones that with lots of recipes I want to make, or had really pretty pictures... Yes I know I can look up old recipes online, but it's way more fun to grab a cold drink and flip through a stack of magazines. Thank goodness I still had my Jun/July 2008 issue, because it was chock full of great blueberry recipes.  I remembered there were several recipes in that issue that I wanted to make. I had dogeared the page to this recipe a long time ago and I decided now was the time to put that hoarded issue to good use! 


Blueberry Lime Pound Cake
Source: Fine Cooking: (adapted)
Printable Recipe
Ingredients:
For the cake:
1 cup unsalted butter, at room temperature
2-1/3 cups all-purpose flour
1-1/2 tsp. baking power
scant 1/2 teaspoon salt
1-3/4 cups granulated sugar
2 tsp. finely grated lime zest
*6 oz. mascarpone or cream cheese, softened
4 large eggs plus 1 large egg yolk, at room temperature
1 pint blueberries, room temperature, not cold from the refrigerator 
For the glaze:
4 oz. (1 cup) confectioners’ sugar
2 Tbs. fresh lime juice; more as needed
1/2 tsp. lime zest

*Note: I used mascarpone because I had it and didn't have any cream cheese on hand. It was delicious in this cake!

Method:
Position a rack in the center of the oven and heat the oven to 350°F. Butter and flour a 12-cup Bundt pan.
Make the cake: Sift the flour, baking powder, and salt into a medium bowl. Stir the lime zest into the sifted flour mixture.
With a stand mixer fitted with the paddle attachment or a hand mixer, beat the butter and mascarpone or cream cheese in a large bowl on medium speed until smooth, about 1 minute. Add the sugar mixture and beat on medium until light and fluffy, 1 to 2 minutes. With the mixer still running, add the whole eggs one at a time, mixing well after each addition and stopping the mixer to scrape the bowl twice. Beat in the egg yolk. Reduce the mixer speed to low and slowly add the flour mixture. Stop the mixer one last time to scrape the bowl and then beat at medium speed until the batter is smooth and light, about 20 seconds. With a rubber spatula, gently fold the blueberries into the batter.
Pour the batter into the bundt pan, spreading it evenly with the spatula. Lightly tap the pan against the counter to eliminate any air pockets. Bake until a wooden skewer inserted in the center comes out clean, 50 to 55 minutes. Set the pan on a wire rack to cool for 10 minutes and then invert onto the rack, remove the pan, and let cool completely.

Glaze the cake: In a small bowl, whisk the confectioners’ sugar, lime zest, and lime juice together until smooth. The glaze should be thin enough to pour. If not, add more lime juice, 1 tsp. at a time. Put a baking sheet under the rack to catch drips and drizzle the glaze over the top and sides of the cake. Let the glaze set before transferring to a cake plate.
Or you can add the glaze right on the cake plate, like I did!

Other blueberry recipes you might like:
Low Fat Blueberry Oat Loaf Cake
Fresh Blueberry Pie
Orange Blueberry Muffins
Blueberry Ice Cream
Blueberry Barbecue Sauce

Wednesday, May 4, 2011

Pineapple Upside Down Bundtlets

Pineapple upside-down cake is one of my childhood favorite desserts, as I mentioned when I made this apricot upside-down cake. Today when I had some leftover pineapple I needed to use up, pineapple upside-down cake came to mind immediately. Instead of making the cake in my cast iron skillet like I usually would, I thought I try making it in these cute little bundt pans I bought a while back. I bought these mini bundt pans a couple of years ago, mostly because I had never seen small bundt pans before and I thought, "How cute, baby bundts!" Yes, I buy bake ware based on looks sometimes, shallow, I know. Anyway because the pans are cute, and I love making individual sized desserts (also for the cute factor), I decided try using them for this cake. The mini bundt pans, made the perfect, individual, pineapple upside-down bundtlets.
 Little baby bundtlets, adorable!


Pineapple Upside Down Bundtlets  
(printable recipe)

Yields 6 one cup mini bundts
Ingredients:

For the topping
4 tablespoons butter, melted
3/4 cup brown sugar, firmly packed
1 8 ounce can of pineapple slices, drained. Reserve juice.
1/4 cup pecan pieces

For the cake
1/2 cup butter, melted
1/2 cup granulated sugar
1 large egg
1 1/2 cups all-purpose flour
1/2 tablespoon baking powder
1/2 teaspoon salt
reserved pineapple juice and milk to equal 1/2 cup
1/2 teaspoon vanilla
6 maraschino cherries (Optional, for garnish)

Method:

Preheat oven to 350 degrees. Spray 6 one cup capacity mini bundt cake pan(s) with non stick cooking spray. You can also use the the super mini bundt mold pans or a muffin tin but will have to your adjust cooking time.
For the topping:
Melt the butter in a small glass bowl. Stir in the brown sugar and place bowl in the microwave. Heat for about 30 seconds on high heat just until the sugar melts. Spoon brown sugar evenly into the mini bundt pan molds.
Sprinkle the nuts over the brown sugar mixture, dividing them evenly between each bundt mold
Place one pineapple ring in each mini bundt pan. Depending on the size of your bundt molds, you may have to cut the pineapple rings to fit. 

For the cake batter:
Cream the butter and sugar together. Add the egg and beat well.
In a medium bowl, sift the flour, baking powder, and salt together. Add about one-third of the flour
mixture to the sugar and egg mixture, then one-half of the juice and milk mixture and mix
together. Repeat until the flour and juice mixtures are mixed into the batter. Add the vanilla. Blend until smooth. Pour the batter over the pineapple dividing it evenly into each bundt cake mold. Place bundt pan(s) on a baking sheet to catch any overflow while baking. Bake 25 to 28 minutes, less (about 15 minutes) if you have the really mini sized bundt mold pans, or until a toothpick comes out clean.
Cool for 5 minutes. To remove the cakes from the pan, place a sheet of wax paper or
foil over the top of the pan. Place a wire rack face down on top of foil, flip over, and let sit
a few seconds. Lift off the pan. The cakes should remain on the foil or waxed paper.
You may have to spoon some of the nuts and sugar back onto the cakes.
Slice the cherries in half. Place half of a cherry in the middle of each mini bundt cake.

I've noticed recently that mini bundts are suddenly everywhere. I bought these individual 1 cup capacity pans a few years ago. At that time these were the only mini bundts I had seen, but now there are lots of different pans to chose from. You can use any mini bundt pan you have for this recipe, but your cooking times can vary widely.
You can find these pans here
I love my individual bundtlet pans, but I've got my eye on this pan