Showing posts with label healthy eating. Show all posts

Thursday, February 21, 2013

The Oscar for the best hummus goes to...


I read somewhere that February is National Snack Foods month. Apperently it was started as a marketing ploy to bump up sales of snack foods during a typically low month for sales. I assume the drop in snack food sales is caused by all those New Years resolution diets that begin in January. Maybe the marketers figure they can lure us into throwing in the resolution towel by naming February snack food month...pretty ingenious I must say! With the Super Bowl, Mardi Gras, Valentine's Day, and the Oscars, all in February there's no lack of snack food worthy events to celebrate. So Happy National Snack Food month. Good thing it's a short month!
My ultimate snack food is probably chips and dip. Salty, crunchy, creamy...diet? what diet? Hand me the chips and pass that dip! This hummus is healthier alternative to traditional chips and dips. If eaten with carrots and broccoli it falls into the downright good for you category! The best part is it's delicious and doesn't make you feel like your giving up something or missing out. Feel free to dig into this snack food and enjoy National Snack Foods month without the guilt!


Artichoke Hummus

INGREDIENTS:

1 can (14 oz) chickpeas, drained with liquid set aside
1 can (14oz) artichoke hearts,  drained
1 tablespoon tahini
3 tablespoons olive oil
1 clove of garlic, crushed
2 tablespoon lemon juice
1 teaspoon soy sauce

METHOD:

In a food processor, combine chickpeas, artichokes, garlic, and tahini. Blend. Slowly add olive oil, soy sauce, and lemon juice. Blend to a smooth consistency. If artichoke hummus is too thick, add some of  chickpea liquid, a little at a time, until you get the consistency you want. Place in serveing bowl. I like to drizzle the top with a little good quality olive oil and a dash of smoky paprika.

This makes a great party dip. If your having an Oscar party (or like me just like to munch while you watch) this hummus is perfect. I plan to snarf on it while watching uber skinny actresses strut their stuff on the red carpet. Less guilt than with regular chips and dip, which allows me to believe that I'd look just as good strutting my stuff down the red carpet!

Tuesday, January 3, 2012

Apple Pie Oatmeal

It's a new year, the holiday's and all the non-stop eating that goes along with them have past. Fresh starts and resolutions abound. Eat more veggies, get more exercise, lose a few pounds ...Sound familiar? While all of those sound like perfectly wonderful things to strive for, I can't help craving comfort food when it's cold outside. On these wintry days, I crave hearty, stick to your ribs, kinds of foods. Rich hearty comfort foods and eating healthy don't usually have much in common. This apple pie oatmeal has the best of both worlds. It's a hearty, warm, comforting meal that's packed with all the goodness of oatmeal and apples. Isn't it great when you can have your cake (or apple pie) and eat it too!

Apple Pie Oatmeal

Ingredients:
2 large tart apples
1 1/2 tablespoons butter
1 tablespoon brown sugar (or substitute Stevia or Stevia in the Raw)
2 tablespoons maple syrup (or use honey, or just more brown sugar)
1/2 teaspoon ground cinnamon
Pinch ground nutmeg
Pinch of ground ginger
a large squeeze of fresh lemon juice, about a teaspoon or so
1/8 cup water

Cooked oatmeal. (I use steel cut oatmeal because I like the flavor and texture but  use whatever oatmeal you prefer.)

Method:
Core the apples and chop into small 1/2 inch pieces. In a skillet over medium heat, add the butter. When the butter is melted, add the brown sugar, cinnamon, nutmeg, lemon, apples and water. Let cook for about 5-10 minutes or until all the apples are soft and tender. 
The apples can be made in advance and stored in an air-tight container in the refrigerator for a couple of weeks.
 
To serve: I like to stir a spoonful or two (depending on how many servings of oatmeal I'm making) of the apples into the oatmeal when it's finished cooking then I divide oatmeal into bowls and serve with a dopple of apples on top. 

I suggest making a double recipe of the apples and keeping them in the fridge. This way on those busy mornings, you'll still have time for a bowl of apple pie oatmeal.
The apples are also delicious mixed into yogurt, on top of pancakes, baked into puff pastry for a quick dessert, or even served along with pork.

Tuesday, April 5, 2011

Eating her curds and whey...


Back in Miss Muffet's day there were many family owned and operated dairies in the U.S. My grandfather was one of those dairy farmer's so I feel a personal connection to the dairy farmer. There has been a rapid decline in the past 20 years in family owned and operated dairies. In Alabama, my home state, 10 years ago there were approximately 200 small family run dairies. Today there are only about 60 and they are struggling hold on to their farms. There are numerous reason for the decline, but one of the major reasons for the decline is the takeover by corporate farming. These farms are strictly for money making. There is little regard for the animals or the quality of the product. The cows are fed high corn diets, attached to mechanical milkers, and pumped full of hormones, all in an effort to get the most milk for the least expense. The small farmer can't simply compete on volume and are not paid enough for their milk to keep their farms running. It's a sad situation that only we as consumers can change by supporting our local farmers. Not only will you be helping keep them in business but you will be getting a much higher quality (and healthier!) milk.
Brand new baby calf!
Sorry for getting out my soapbox, but the plight of the small farmer, is an issue near and dear to me!
I'm lucky enough to live very near Working Cow Dairy,  a certified organic milk dairy. Hubs and I visited their farm this past weekend. If I were a cow, this is where I'd want to live! The day we visited, they were offering milk buy one get one gallon free! I came home with 2 gallons of organic milk and a half gallon of organic chocolate milk.


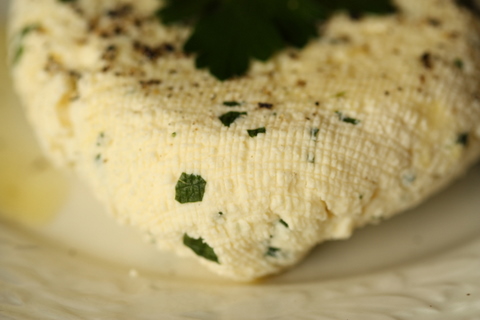
I needed to use up some of my milk so I decided to try give cheese making a try. This was a first for me so I decided to make a simple farmer's cheese. Farmer's cheese is a simple unripened cheese, similar to cottage cheese, but drier and firmer in texture. It has a mild, slightly tangy flavor and is firm enough to slice or crumble. It's an all-purpose cheese that can be eaten as is or used in cooking. I think it's great spread on fresh bread. I added flat leaf parsley and chives to mine, but it's very good just plain.

Farmer's Cheese

1/2 gallon whole milk (NOT ultra-pasteurized)
1/4 cup white vinegar
1 teaspoon salt
2 tablespoons of any fresh herb, chopped (optional)

**Note: You do not want to use ultra-pasteurized milk for cheese making because a curd will not set. Ultra-pasteurized milk is not always labeled as such, but you can tell because the expiration date is extremely long, usually 30-90 days from the day you buy it. Regular pasteurized milk, however, will work fine for cheese making. Milk from a dairy in your area will give you the best results.

Bring milk to a slow boil. Keep the heat at medium or medium low, otherwise you risk burning the milk to the bottom of the pot.
When small, foamy bubbles begin to form on the surface of the milk, but it is not yet at a rolling boil, turn off the heat. If you have a thermometer, which is helpful, the temperature will read about 190 degrees.

Add the vinegar and stir the milk. You will notice curds immediately beginning to form.

Let the milk sit for 15 minutes. After this time, add any additional flavors (like fresh herbs).
Place a colander over a large bowl or pot. Drape either cheesecloth or a thin dish towel over the colander. Pour the curds into the cheese cloth. The whey (liquid) will drain and be collected in the bowl below and the solids curds will be caught in the cheese cloth.


Parsley and chives for my cheese.

Look at those lovely curds!


Mmmmm

Lift the cheese cloth up and wrap it around the curds, twisting and squeezing to expel moisture. After squeezing out the moisture, the curds for farmer's cheese will be dry and crumbly. If you want a creamier texture, mix a little of the reserved whey back in with the curds. To shape the cheese, keep it wrapped in cheese cloth and form it into a mound on a plate. Set another plate on top and press the curds into a flat disc that is 1-2 inches tall. Cover and refrigerate for an hour or so before removing cheese cloth.


I love the pattern from the cheese cloth!

Buy local, support your local farmers!!