Tuesday, March 26, 2013

A small rant...


I rarely use my blog as a platform to post any kind of rant. Baking is supposed to make people happy. I want my readers to come here to find recipes, exchange ideas, try something new, etc...  not for rants,  nasty comments, and mean-spirited debates. Which is why I was a little hesitant to even say anything about a growing problem for bloggers like myself. Theft of our content has always been and probably will always be a problem. It pretty much goes with the territory if you post anything on the internet. We want to share our photos, ideas, and recipes and we LOVE it when you pass them on to others! Please feel free to click the share buttons on my site or my blogs facebook page and share away. Pin it to Pinterest, stumble it, like on facebook...you get my drift! The community built between reader and other bloggers is what I love most about blogging and what makes it fun!.

That being said, however, over the past month or so I've noticed a dramatic drop in traffic to my blog and had no idea what the causing this drop. Then I read this post from I Am Baker about Facebook sharing of blog content. She does a great job explaining what is copyrighted and what is not. (Yes I know a list of ingredients is not copyrighted, but the rest of the recipe is because it's my own words and the photos on my site are all mine!) I had been alerted by fellow bloggers in the past of Facebook pages that had posted my photos and the entire recipe on their site with no credit or link back to my blog. Until I read I Am Bakers post, I had no idea how wide spread the problem had become. These Facebook, I call them copy and paste pages, copy popular images and content they think a lot of people will share, and paste them onto their Facebook pages. They pass them off as their own, with nothing stating that this is not their photo or recipe. I found one of my recipes posted on one of these pages that had been shared 95 times last time I looked. The owner of the page it was posted on had shared the recipe saying something like "this is one of favorite things to make" then had my photo and the entire recipe copied in it's entirety posted with the picture. I left a comment telling her the photo and recipe were from my blog and to please remove the recipe and create a link to the original blog post if she wanted to share my post. She did nothing and the photo with the entire recipe are still on her site for other unknowing facebookers to share.
 The vast majority of the people that see these recipes on Facebook have no idea that the info they just "shared" with their friends was ripped off from a blogger that spent hours of work creating the original post. Yes most of us do receive compensation from various advertisers for the traffic that we bring into our blogs. So these people are also literally stealing money out of our pockets as well. As a small time blogger I don't have anyway to fight back against these thieves, except to ask you not to support these pages on facebook. Before you hit "share" see if the page either owns the content or has a link back to the owner of the content they have posted. You can easily identify these cut and paste thieves on Facebook as they post generally post several times a day, a picture with the entire recipe for the dish. Many times they ask you to "click share to save the recipe" They typically have thousands of followers and there are almost never any links to original sources.
If you want to know the names of the pages some of the biggest Facebook offenders, read I Am Bakers post and the follow-up comments. She calls out several and many commenters name quite a few other pages. I'm shocked  at how vicious some of the perpetrators have been toward Amanda since she pointed out their theft.
Visit her blog(s) even if you don't want to read more about this issue. She's an amazingly talented person and her blog(s) is truly a feast for the senses!

We all learned about plagiarism in about the 6th grade.That's what this boils down to. Think of it this way, you wouldn't be able to scan a cookbook and post it on Facebook as your own, well this is no different. Food bloggers are not the only ones that this is happening to. Those same pages constantly take content from craft bloggers and others as well, using the same M.O.
FYI Facebook can hold anyone that repost stolen content liable as well in the case of a lawsuit. Something to think about before hitting "share"!
That's it rant over. On to happy baking and yummy food!

Monday, March 18, 2013

Lemon Curd Filled Bunny Ear Cakes


The recipe for the cake part of this recipe on Nigella Lawson's How to be a Domestic Goddess. She calls them  fairy cakes, which are sometimes also called butterfly cakes when the cakes have a filling and a buttercream frosting. Butterfly cakes are sort of an English version of a cupcake. I realize probably just offend all of my English readers by comparing the two! Before making this recipe and reading many heated comments from English bakers on the differences of fairy/butterfly cakes and cupcakes, I was unaware how deep the feelings ran in this debate! Yes there is a difference between an American cupcake and an English fairy cake, but you have to admit, they are kind of similar...cake baked in a muffin tin, topped with a frosting...please don't send me nasty emails! :)
Anyhoo as I was putting the "wings" on my lovely lemon curd filled cupcakes butterfly cakes, ensconced in their adorable Spring-y baking cups, it occurred to me that if I placed the pieces upright rather than on their sides, they would look like rabbit ears instead of wings. How perfect with Easter just around the corner. Ta da! Lemon curd filled bunny ear cakes! Which are nothing like cupcakes and kind of like  English butterfly cakes...either my bases are covered or I've just offended both sides of the fairy cake/cupcake debate!

Nigella's fairy cake recipe couldn't be easier to make. It only takes a few minutes to whip up the cakes and they bake in under 20 minutes. Then they're ready to be made into bunnies or butterflies, which ever suits your fancy!

Bunny Ear Cakes (Butterfly Cake)
Source: Nigella Lawson, How to be a Domestic Goddess
Yield 10-12 regular size cupcakes
Printable recipe

INGERDIENTS:
1/2 cup, (1 stick) unsalted butter, softened
1/2 cup sugar
2 eggs
3/4 cup self-rising flour
1/2 teaspoon vanilla extract
3 tablespoons milk

lemon curd, store bought or homemade

METHOD:
Preheat oven to 375 degrees.
Line a 12 cup muffin pan with paper liners.
I baked mine in these paper baking cups I had, but a muffin tin lined with cupcake liners works just as well.

Put all the ingredients except for the milk into a food processor filled with the blade and process until smooth, about a minute. Pulsing quickly, while adding the milk down the funnel till just blended. Spoon batter into muffin pan, filling about 2/3 full.
Bake for 15-18 minutes or until they are golden on top. Cool completely

With a sharp knife and cut a circle out of the top of each cake at an angle (kind of a cone shape) about 1/2 inch from the edge of the cakes.
Cut each circle in half and set aside.

Fill the cakes with about 2 teaspoons of lemon curd. Fill a piping bag fitted with a tip with the frosting. (Alternately  you can put the frosting into a zip lock bag with a hole cut into one corner, to pipe out the icing.) Pipe the frosting onto the tops of the lemon curd filled cakes. Top with the cut out pieces of the cakes. I stood them upright to look like a bunnies ears. Dust with powdered sugar. Serve immediately or keep refrigerated until served. The cakes can be stored in an airtight container in the fridge for 3 or 4 days but are best the day they are made.

Frosting

1 stick butter, room temp
2 1/2 cups confectioner's sugar
Enough heavy cream to get a cream consistency
1 teaspoon of either lemon or vanilla extract

Mix butter and sugar together in a medium bowl with an electric mixer. Gradually add in enough cream to produce the desired consistency for spreading or piping. Mix in flavoring of your choice.

Happy Easter!


Thursday, March 14, 2013

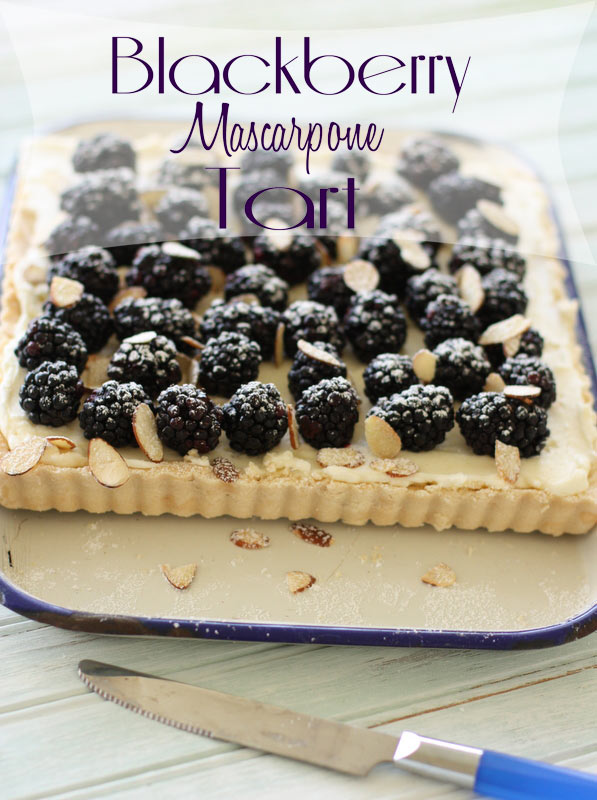
Blackberry Mascarpone Tart


Spring fever has struck me this week! Here in the South, Spring starts playing peek-a-boo with us right about now. The trees are starting to bud, the azaleas and dogwoods are beginning to break out. In the morning I'm reaching for a sweater, but by late afternoon, I'm contemplating breaking out the flip flops. I'm sooo ready for the flip flops but unfortunately I'll probably have to wait awhile to actually be able to wear them without my toes turning the color of these blackberries. Oh well I guess I have to settle for Spring desserts for now.

It may be a bit early to break out the flip flops but this blackberry tart is like Spring on a plate. This tart is not only absolutely delicious but so pretty it could be the center piece on your Easter table. Oh and did I mention, it couldn't be easier to make. Perfect!

Hello Spring!

Blackberry Mascarpone Tart
Printable Recipe

INGREDIENTS:
1 stick unsalted butter at room temperature
1 cup sugar
1/2 teaspoon salt
1/2 cup almond flour*
1 cup unbleached all-purpose flour
1 8 ounce package of mascarpone
1 cup confectioner’s sugar
1/2 cup heavy cream
3 cups blackberries
1/4 cup toasted almonds (optional)
powdered sugar, for dusting top

METHOD:
Preheat oven to 350 degrees. In the bowl of an electric mixer fitted with the paddle attachment, cream the butter and the granulated sugar. Add in salt and flours and mix until just combined. Press dough into a 9 inch tart pan. Bake for 20 minutes, or until edges begin to brown. Allow to cool completely.

In an electric mixer bowl, fitted with the paddle attachment, combine cheese and confectioner’s sugar. Add the cream. When it is all incorporated, switch to the whisk attachment, and increase the speed to high. Whisk until stiff peaks form.

Remove tart shell from the pan. Spread the cheese filling into the shell. Place the blackberries on top of the mascarpone mixture. Refrigerate until ready to serve. Before serving sprinkle with toasted almonds, if desired, and dust top of tart with powdered sugar.


*This recipe is not only easy but very adaptable as well. The almond flour can be replaced with any finely ground nut or with regular flour but I recommend a nut flour. It makes this tart just a little extra special. The mascarpone can be replaced with cream cheese, but the tart won't be quite as luscious. Almost any berry can be substituted for the blackberries, strawberries would be fantastic.

The wild azaleas are in bloom in the woods behind my house....flip flops are sure to follow!

Monday, March 11, 2013

No Time to Slow Down


I have a specialty baking business and work for myself. I make mostly custom cakes for birthdays, weddings, showers and so on. Many people think that working for yourself, from home, translates into lots of free time, bon bon eating, soap opera watching... I don't want to shatter anyone's illusions, but working for yourself is not idyllic as it may sound. If you work in an office or for someone else, chances are you are not responsible for every detail of the business you work for. Yes working for myself does afford me some flexibility but it's up to me to get all of my orders completed. I'm the one that makes the cakes, designs and decorates them, answers the phone calls and texts, does the billing, the list goes on. It's all on me to complete the orders I take. If I don't get a cake done on time then little Suzy may not get her birthday cake. Trust me no one wants that to happen! It seems as though many of my days are spent running around from place to place. Whether is a cake delivery, meeting with a bride or client about a cake, buying more supplies, etc. On days like these I usually grab my go cup of coffee and anything I can find to eat and head out the door. I don't have the time to worry about things like fiber and whether or not I've had any fruit today. I know it's important to eat right but when a cake has to be at a venue by a certain time and I'm hungry, I want something that I can just grab and eat on the go.

That's what I love about the new Grab and Go! packs of Fig Newtons. They are made with whole grains and each pack has five grams of fiber - pretty great for a snack food. Plus they are packed with that wonderful fig filling that has made Fig Newtons one of my all-time favorite cookies. I can keep a couple of the packets of Newtons in my purse and have a delicious whole grain and fruit snack on hand anytime, anywhere!

Newtons have gone way beyond just the fig cookies. They have introduced a new line of fruit thins cookies. They come in a variety of flavors. I have had the Cherry Vanilla Fruit Thins and Oh.My. these cookies rock! They are a crisp wafer cookie studded with pieces of dried cherry. The fact that they contain no high fructose corn syrup and 8 grams of whole grains per serving is just the cherry on top for me. *hee hee* I may have to throw some these into a zip baggie and toss them into my purse too!

Visit NewtonsCookies.com for a chance to win a grand prize weekend getaway or one of many other great weekly prizes!
And be sure to visit the Newtons brand page on BlogHer.com to read other bloggers' posts!

Thursday, February 21, 2013

The Oscar for the best hummus goes to...


I read somewhere that February is National Snack Foods month. Apperently it was started as a marketing ploy to bump up sales of snack foods during a typically low month for sales. I assume the drop in snack food sales is caused by all those New Years resolution diets that begin in January. Maybe the marketers figure they can lure us into throwing in the resolution towel by naming February snack food month...pretty ingenious I must say! With the Super Bowl, Mardi Gras, Valentine's Day, and the Oscars, all in February there's no lack of snack food worthy events to celebrate. So Happy National Snack Food month. Good thing it's a short month!
My ultimate snack food is probably chips and dip. Salty, crunchy, creamy...diet? what diet? Hand me the chips and pass that dip! This hummus is healthier alternative to traditional chips and dips. If eaten with carrots and broccoli it falls into the downright good for you category! The best part is it's delicious and doesn't make you feel like your giving up something or missing out. Feel free to dig into this snack food and enjoy National Snack Foods month without the guilt!


Artichoke Hummus

INGREDIENTS:

1 can (14 oz) chickpeas, drained with liquid set aside
1 can (14oz) artichoke hearts,  drained
1 tablespoon tahini
3 tablespoons olive oil
1 clove of garlic, crushed
2 tablespoon lemon juice
1 teaspoon soy sauce

METHOD:

In a food processor, combine chickpeas, artichokes, garlic, and tahini. Blend. Slowly add olive oil, soy sauce, and lemon juice. Blend to a smooth consistency. If artichoke hummus is too thick, add some of  chickpea liquid, a little at a time, until you get the consistency you want. Place in serveing bowl. I like to drizzle the top with a little good quality olive oil and a dash of smoky paprika.

This makes a great party dip. If your having an Oscar party (or like me just like to munch while you watch) this hummus is perfect. I plan to snarf on it while watching uber skinny actresses strut their stuff on the red carpet. Less guilt than with regular chips and dip, which allows me to believe that I'd look just as good strutting my stuff down the red carpet!

Thursday, February 14, 2013

Royal Icing or Glaze Icing?

Happy Valentine's Day!

I've been swamped making dozens of these conversation heart cookies. One of my friends asked for a glaze type icing instead of royal icing. The rest of the cookies I made were done with royal icing. This was the first time I had done an actual side-by-side comparison of the two. So I thought I'd break down a few of my pros and cons for each. I've had my issues with royal icing in the past but we have learned to play nice with each other. (lots of practice helps!) Glaze icing is super simple to make and for the novice decorator, can be a little less frustrating than royal icing. Both are great options for making cute delicious cookies.

Pros for glaze icing:
1. you can make a huge batch of icing in about 2 minutes with just a bowl and a spoon
2. it's easy to get the right flooding consistency.
3. it stays really shiny when dry
4. doesn't dry hard, like royal icing, but hard enough to stack and bag
Cons:
1. the flooded cookies are more likely to overflow the outline
2. it's sticky, like really sticky, to work with
3. it doesn't work well for more intricate designs because it doesn't hold its shape well
4. lots of air bubbles unless it sits for a long time after mixing, even then lots of air bubbles.

Here is the glaze icing recipe I used for these cookies.

Glaze iced cookies: Shiny, but less perfect looking (writing is royal icing)

Pros for royal icing:
1. holds it's shape when piped
2. if you have the right consistency in the icing, it's easier than glaze to achieve a "perfect" looking cookie
3.It's very versatile, can be used to decorate cookies, on cakes, as glue for fondant pieces, thinned out to cover cake boards...
4. dries hard
Cons:
1.I call it finicky, because you have to be very precise when you make it. Too little or too much of anything really changes the icing and how it looks when it's dry.
2. dries matte (which isn't always a con, I liked the less shiny look better for these heart cookies)
3. getting the right flood consistency can be tricky (again lots of practice)

Royal icing cookies
A couple of tips for royal icing that have helped me:

Finding the right recipe. This one from Antonia74 is amazing, if you follow her recipe exactly. This is the only way I make my royal icing now but if you have a recipe you like then stick with it.
Weigh your sugar, unless you can be certain that you can measure it exactly the same every time. This simple step has made all the difference for me when making royal icing.
Don't over-mix the icing. Don't mix at too high of a speed. This prevents cracking and really cuts down on air bubbles.

Mostly relax and have fun, it's just a cookie!

So there you have it, my take on royal icing verses glaze. Both are a great option for decorating cookies. What is your favorite icing for decorating cookies?? I'd love hear any tips you want to share as well!
Happy decorating!


Monday, February 11, 2013

DIY chocolate heart decorations


These decorations are super simple and don't require any special skills or equipment to make. If you can draw a heart shape then you've pretty much got the skill set needed to make these chocolate hearts. Use them as cupcake toppers or to decorate a cake. They're so cute they'll make you look like a decorating superstar!

What you'll need:

Candy melts, (any colors you want) can be found in the cake decorating section of Wal-Mart or any major craft store.

Wax paper or parchment paper

zip top baggies, or if you want you can use pipping bags and tips but they aren't necessary to make the hearts.

How To:


Place a piece of the wax paper or parchment paper onto a cookie sheet..

Put approximately 1/2 cup of candy melts into the zip top baggie. Melt them in the microwave for 30 seconds.

Knead the bag and heat them for 15-20 seconds until melted.

Push the melted chocolate toward one corner of the baggie. Cut a very small tip from one corner of the baggie.

Fold the top of the bag over and squeeze as you draw some heart shapes onto the wax paper.

If you think you need a pattern, or want them to all to be exactly the same size, you can print out some hearts on paper and place the paper under your wax paper to use as a guide. Alternately, you could trace around some small cookie cutters onto parchment paper, flip the paper over and follow the pattern.

I like to do them freehand. I like making different sizes and shapes.


Get as fancy as you like. Fill in the hearts completely, make curlicues, whatever! Any mistakes are easily to get rid of, just pop it in your mouth and mistake...gone!
Let the chocolate candy heart set up for 30 minutes to an hour. They should be dry enough to pick up easily. If they stick a bit, carefully slide a spatula or off-set decorating spatula under the hearts to lift them up. Try not to handle the hearts too much. The warmth from your hand softens the chocolate and can make them break.