Tuesday, May 17, 2011

Hydrangea Cupcake Bouquet Tutorial


I made this Hydrangea cupcake bouquet a couple of years ago to give as a gift to a friend for her birthday. I've been asked about how it's made many times and have finally gotten around to posting this tutorial. It's fairly simple to do but very impressive when finished. 
To make one small cupcake bouquet, you will need:

1 recipe (2-3 cups) buttercream frosting (you can use any type buttercream frosting you prefer. I used this recipe)
Violet or purple food coloring. The gel type icing coloring works best.
Pastry bag fitted with a large star tip. 
Container for your bouquet
Floral oasis or foam cut to fit the into your container
toothpicks
5-10 pieces of tissue paper cut into 4-5 inch squares


Add the violet food coloring to the buttercream but don't blend it in completely. Let some of the icing be darker and even leave some white bits. This will make your hydrangeas look variegated and more realistic. 

I used the Wilton 1M star tip. This is my go to decorating tip. I use it all the time!


Fill your pastry bag with the violet frosting and pipe stars all over the top of the cupcake. Pipe the stars very close together so that you cover the entire top of the cupcake.

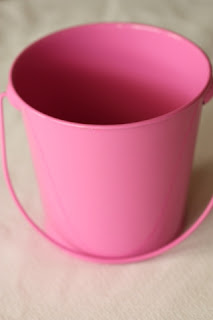
I found these cute metal buckets for $1.00 at Target ! Small terracotta pots or any small flower pots work well too. Cut your floral foam to fit into your container. If you have a wide topped pot/container you may have to extra pieces to fit down into the sides. It doesn't have to fit perfectly, just make sure you have enough oasis to support your cupcakes.


Poke 2-3 toothpicks into the bottoms of you cupcakes. Two toothpicks usually does the job, but occasionally I need three to keep the cupcake in place.

Stick the tooth-picked cupcakes into the oasis in your container. Place the cupcakes as close together as possible. Fitting as many as possible around the top of the container. this will vary on the size of your cupcakes and the container you choose. I could fit 4 cupcakes on this bouquet. Don't worry that there are gaps where you can see the oasis. You will be hiding these with the tissue paper.

Grasp the tissue paper in the center of each square and twist. This will form your tissue paper "leaves". Going around the bouquet add the pieces of tissue paper anywhere you have a gap. I stick the pieces all around the edges and usually one on top. If you have a piece that won't stay in place you can secure it with a toothpick.

Voila, an edible bouquet, a great gift for almost anyone!

Wednesday, May 11, 2011

Strawberry Rhubarb Hand Pies...

or should I call them pop tarts?
I made these little cuties yesterday. After dinner last night, hubs grabbed one, asking mid-bite what it was he was eating. While I was saying, those are strawberry rhubarb hand pies, he says, "Oh my God those are the best pop tarts EVER."
No matter how much we begged, my mother refused to buy us pop tarts when we were kids. She said they were "all sugar, junk food". Whenever we asked for things like, sugary cereals, pop tarts, pretty much any prepackaged sweet, Mom would say no. She usually followed the "No" with, "You'd be better off eating the cardboard it came in." Don't feel too sorry for me. Mom did not withhold sweets from us. I didn't realize till I was much older that we were quite spoiled, in fact. She baked something from scratch nearly every day. The sweets in my lunch bag were the envy of all those around me at school lunch table! But as a kid, I always assumed my parents were withholding something wonderful, just to torture me.  I think I was in middle school or possibly high school when I ate my first pop tart at a friends home. I remember opening the foil package, thinking, "this is going to be awesome!" Wow, was I disappointed. I didn't even eat the whole thing. Mom was right, I'd have been better off eating the cardboard box it came in.
It didn't occur to me while I was making these hand pies, but they are very similar to a pop tart, sweet pastry with a fruit filling. Cut them out in rectangles and you've got the best pop tart ever!
Strawberry Rhubarb Hand Pies/Pop Tart
(Printable recipe) 
source: Southern Living May 2011
Yields about 2 dozen

Ingredients:   
For the filling
3/4 cup finely diced fresh strawberries
3/4 cup finely diced rhubarb
1 tablespoon cornstarch
2 tablespoons sugar
1 1/2 teaspoons orange zest

For the crust:
2 1/4 cups all-purpose flour
1/4 teaspoon salt
1/4 cup sugar
1 teaspoon orange zest
1/2 cup butter, cold
1/4 cup shortening, chilled
3 tablespoons ice-cold water
3 tablespoons orange juice
Parchment paper
1 egg yolk, beaten

Method:
Combine strawberries, rhubarb, cornstarch, 2 Tbsp. sugar, and 1 1/2 tsp. orange zest in a small bowl.
Preheat oven to 375°. Combine flour, salt, and 1/4 cup sugar in a large bowl. Cut in butter and shortening with a pastry blender until mixture resembles small peas. Stir in orange zest. Drizzle with ice-cold water and orange juice. Stir with a fork until combined. (Mixture will be crumbly and dry.) Knead mixture lightly, and shape dough into a disk. Divide dough in half. Wrap in plastic wrap and refrigerate for 10 minutes. Roll half of dough to 1/8-inch thickness on a heavily floured surface.

Cut with a 2 1/4-inch round cutter, rerolling scraps as needed. Place half of dough rounds 2 inches apart on a parchment paper-lined baking sheets. Top with 1 rounded teaspoonful strawberry mixture (Don't overfill or your pies will not stay together). Dampen edges of dough with water, and top with remaining dough rounds, pressing edges to seal. Crimp edges with a fork, and cut a slit in top of each round for steam to escape. Repeat procedure with remaining dough and strawberry mixture.
Stir together egg yolk and cream; brush pies with egg wash. Sprinkle with sugar. Freeze pies 10 minutes.

Bake for 20 to 25 minutes or until lightly browned. Cool 10 minutes. Serve warm or at room temperature. Store in an airtight container up to 2 days. 

I know another strawberry/rhubarb recipe. In my defense, they are both in season in Spring and I look forward to strawberries and rhubarb all year! When I saw this recipe in Southern Living I knew I'd be making it as soon as possible. I loved the idea of little pies. Pie filling encased in flaky buttery pie crust. The best part, you can pick it up and take it with you! So much more portable than a regular pie. Perfect for lunch boxes or picnics.

Wednesday, May 4, 2011

Pineapple Upside Down Bundtlets

Pineapple upside-down cake is one of my childhood favorite desserts, as I mentioned when I made this apricot upside-down cake. Today when I had some leftover pineapple I needed to use up, pineapple upside-down cake came to mind immediately. Instead of making the cake in my cast iron skillet like I usually would, I thought I try making it in these cute little bundt pans I bought a while back. I bought these mini bundt pans a couple of years ago, mostly because I had never seen small bundt pans before and I thought, "How cute, baby bundts!" Yes, I buy bake ware based on looks sometimes, shallow, I know. Anyway because the pans are cute, and I love making individual sized desserts (also for the cute factor), I decided try using them for this cake. The mini bundt pans, made the perfect, individual, pineapple upside-down bundtlets.
 Little baby bundtlets, adorable!


Pineapple Upside Down Bundtlets  
(printable recipe)

Yields 6 one cup mini bundts
Ingredients:

For the topping
4 tablespoons butter, melted
3/4 cup brown sugar, firmly packed
1 8 ounce can of pineapple slices, drained. Reserve juice.
1/4 cup pecan pieces

For the cake
1/2 cup butter, melted
1/2 cup granulated sugar
1 large egg
1 1/2 cups all-purpose flour
1/2 tablespoon baking powder
1/2 teaspoon salt
reserved pineapple juice and milk to equal 1/2 cup
1/2 teaspoon vanilla
6 maraschino cherries (Optional, for garnish)

Method:

Preheat oven to 350 degrees. Spray 6 one cup capacity mini bundt cake pan(s) with non stick cooking spray. You can also use the the super mini bundt mold pans or a muffin tin but will have to your adjust cooking time.
For the topping:
Melt the butter in a small glass bowl. Stir in the brown sugar and place bowl in the microwave. Heat for about 30 seconds on high heat just until the sugar melts. Spoon brown sugar evenly into the mini bundt pan molds.
Sprinkle the nuts over the brown sugar mixture, dividing them evenly between each bundt mold
Place one pineapple ring in each mini bundt pan. Depending on the size of your bundt molds, you may have to cut the pineapple rings to fit. 

For the cake batter:
Cream the butter and sugar together. Add the egg and beat well.
In a medium bowl, sift the flour, baking powder, and salt together. Add about one-third of the flour
mixture to the sugar and egg mixture, then one-half of the juice and milk mixture and mix
together. Repeat until the flour and juice mixtures are mixed into the batter. Add the vanilla. Blend until smooth. Pour the batter over the pineapple dividing it evenly into each bundt cake mold. Place bundt pan(s) on a baking sheet to catch any overflow while baking. Bake 25 to 28 minutes, less (about 15 minutes) if you have the really mini sized bundt mold pans, or until a toothpick comes out clean.
Cool for 5 minutes. To remove the cakes from the pan, place a sheet of wax paper or
foil over the top of the pan. Place a wire rack face down on top of foil, flip over, and let sit
a few seconds. Lift off the pan. The cakes should remain on the foil or waxed paper.
You may have to spoon some of the nuts and sugar back onto the cakes.
Slice the cherries in half. Place half of a cherry in the middle of each mini bundt cake.

I've noticed recently that mini bundts are suddenly everywhere. I bought these individual 1 cup capacity pans a few years ago. At that time these were the only mini bundts I had seen, but now there are lots of different pans to chose from. You can use any mini bundt pan you have for this recipe, but your cooking times can vary widely.
You can find these pans here
I love my individual bundtlet pans, but I've got my eye on this pan

Thursday, April 28, 2011

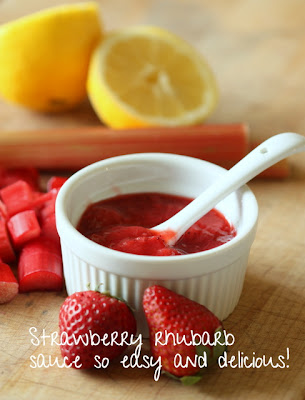
Strawberry Rhubarb Sauce

I know I've mentioned before that my father side of the family is Pennsylvania Dutch Mennonite.  Although I'm not a practicing Mennonite and wasn't raised as one, most of the rest of my father's side of the family are still Mennonite. Because of this the Mennonite culture has had a huge impact on who I am. Much of the culture in just ingrained in my soul. Especially when it come to food and feeding people. It's nearly impossible for me to cook for less than six people, no matter how hard I try. I also inherited my inability to dance or play sports from the Mennonite side of my family, but that's another story. Back to the food stuff, Mennonites (at least the one I know) have a love affair with gravies, sauces, relishes, etc. Gravy is so sacred in my family, it's practically its own food group. I don't remember not knowing how to make gravy. Then there's applesauce. Also nearly a food group. Applesauce is more or less a condiment in my family.  It was almost always on my grandmother's table. As a child, I thought everyone dipped their potato chips in applesauce or poured it on top of their coffee cake. So not surprisingly, I too love a good sauce.
Anyway, both my grandmother and my mother, who is not Mennonite but cooks like one, instilled the love of rhubarb in me at a very young age. I look forward with great anticipation to the arrival of rhubarb every spring. Even if you think you don't care for rhubarb, I'm telling you this sauce will change your mind! It's amazing on ice cream, mixed into plain yogurt, poured over a slice of pound cake, smeared on hot buttered pancakes... Hungry yet? 


Strawberry Rhubarb Sauce
(Printable Recipe)
Ingredients:
1/3 to 1/2 cup sugar, depending on desired sweetness
1/3 cup water
1 pound rhubarb stalks, diced
1 quart strawberries, cleaned, hulled and sliced
1/2 tablespoon lemon juice


Method:
In a heavy saucepan over medium heat combine sugar and water. Stir to dissolve sugar. Add rhubarb and allow to simmer for 15 minutes or until very tender. Add strawberries and lemon juice and simmer for 10 minutes more. Allow mixture to cool slightly before serving. It's great served warm or cold.
The perfect balance of sweet and tart!

Wednesday, April 20, 2011

Carrot Cake Cookies


I love carrot cake. For some reason I always really want it around Easter. Maybe it's a subconscious thing with seeing all the Easter bunnies that gets me craving carrots. Who knows! This year was no different. I been craving a piece  hunk of carrot cake. Although as much as I really do adore carrot cake, the recipe I usually use makes an enormous cake. Not necessarily a bad thing if you've got a big family, or are entertaining a crowd, or don't mind eating only carrot cake for a week. Actually I could probably do the last one, my pants, not so much though! Anyway since it is just hubs and me, and he'll only eat a couple slices, and I do want to zip my pants, I thought I try these carrot cake cookies. They had everything I love in carrot cake; nuts, raisins, carrots, and cream cheese frosting. The original frosting recipe mixes cream cheese and honey together for the frosting, but I decided to use the cream cheese frosting I use on my cake for the cookies. I mean really, it's the cream cheese frosting that has you licking the plate with carrot cake, right?
I was really happy with  these cookies, they really did taste a lot like a traditional carrot cake. I got my carrot cake fix and didn't have to eat 75 percent of a cake to do it!

Carrot Cake Cookies
(printable recipe)
Source: Gourmet,  April 2004 (adapted)
Ingredients:
1 1/8 cups all-purpose flour
1 teaspoon cinnamon
Pinch of freshly grated nutmeg
1/2 teaspoon baking soda
1/2 teaspoon salt 
1/2 cup (1 stick) unsalted butter, softened
1/3 cup plus 2 tablespoons packed light brown sugar
1/3 cup plus 2 tablespoons granulated sugar
1 large egg
1/2 teaspoon vanilla
1 cup coarsely grated carrots (2 medium)
1 scant cup walnuts (3 ounces), chopped
1/2 cup raisins 
Method:
Put oven racks in upper and lower thirds of oven and preheat oven to 375°F. Lightly grease a baking sheet or line with parchment paper.
Whisk together flour, cinnamon, baking soda, and salt in a bowl.
Beat together butter, sugars, egg, and vanilla in a bowl with an electric mixer at medium speed until pale and fluffy, about 2 minutes. Mix in carrots, nuts, and raisins at low speed, then add flour mixture and beat until just combined. 


Drop 1 1/2 tablespoons batter per cookie 2 inches apart on baking sheets and bake, switching position of sheets halfway through baking, until cookies are lightly browned and springy to the touch, 12 to 16 minutes total. Cool cookies on sheets on racks 1 minute, then transfer cookies to racks to cool completely.
While cookies are baking, make the cream cheese frosting.
Ice the tops of the cookies with cream cheese frosting and sprinkle with chopped nuts or sandwich flat sides of cookies together with a generous tablespoon of cream cheese frosting in between.
On some of the cookies I just iced the tops. Either way is yummy!
Cream Cheese Frosting
1/2 cup butter (1 stick)
8 oz. cream cheese
3 cups powdered sugar
1 tsp. vanilla extract
Method:
With an electric mixer, mix together the butter and cream cheese , until very smooth. Scrape down the sides and bottom of the bowl.  Add the vanilla extract and the powdered sugar, mix until smooth.

Sunday, April 10, 2011

Trail Mix Cookies


We are heading to the beach for a week...yea! So just a short post for now. Anyway, I wanted to bring along some hearty and hopefully somewhat healthier, cookies for us to snack on during the week. I came across quite a few recipes for trail mix cookies that seemed to fit the bill. I took some elements from a several recipes and came up with these cookies. This recipe is open to endless interpretation, so use whatever combo of dried fruits and nuts that you want.

Trail Mix Cookies
(printable recipe)
Ingredients:
1 cup butter, softened
1 cups brown sugar
1/2 cup sugar
1 large egg
2 teaspoons pure vanilla extract
1 2/3 cup all-purpose flour or a mix of white and wheat flour
3/4 teaspoon baking soda
1/4 teaspoon baking powder
1 teaspoon cinnamon
1 1/2 cups rolled oats
1/2 cup semi-sweet or dark chocolate chips or chunks
1 1/2 cups total of any mixture of dried fruits and nuts. (I used cranberries, almond slivers, and raisins)

Method:
Preheat oven to 350° F.
Cream butter and sugar until light and fluffy. Add egg and beat until smooth. Beat in vanilla.Combine flours, baking soda, baking powder, and cinnamon. Mix into butter mixture. Add rolled oats, chocolate chunks, and dried fruits and nuts. Roll into balls ( I made mine 2" because I wanted a big cookie), place on an ungreased or parchment lined baking sheet, and flatten slightly. Bake 10 to 15 ( depending on how big you made your cookies) minutes or until bottoms are golden, not browned. Cool on pan for
5 minutes. Remove to a wire rack to cool completely.
Makes about two dozen cookies
Other great recipes for trail mix cookies:
Trail Mix Energy Cookies/Breakfast Cookies


Tuesday, April 5, 2011

Eating her curds and whey...


Back in Miss Muffet's day there were many family owned and operated dairies in the U.S. My grandfather was one of those dairy farmer's so I feel a personal connection to the dairy farmer. There has been a rapid decline in the past 20 years in family owned and operated dairies. In Alabama, my home state, 10 years ago there were approximately 200 small family run dairies. Today there are only about 60 and they are struggling hold on to their farms. There are numerous reason for the decline, but one of the major reasons for the decline is the takeover by corporate farming. These farms are strictly for money making. There is little regard for the animals or the quality of the product. The cows are fed high corn diets, attached to mechanical milkers, and pumped full of hormones, all in an effort to get the most milk for the least expense. The small farmer can't simply compete on volume and are not paid enough for their milk to keep their farms running. It's a sad situation that only we as consumers can change by supporting our local farmers. Not only will you be helping keep them in business but you will be getting a much higher quality (and healthier!) milk.
Brand new baby calf!
Sorry for getting out my soapbox, but the plight of the small farmer, is an issue near and dear to me!
I'm lucky enough to live very near Working Cow Dairy,  a certified organic milk dairy. Hubs and I visited their farm this past weekend. If I were a cow, this is where I'd want to live! The day we visited, they were offering milk buy one get one gallon free! I came home with 2 gallons of organic milk and a half gallon of organic chocolate milk.


I needed to use up some of my milk so I decided to try give cheese making a try. This was a first for me so I decided to make a simple farmer's cheese. Farmer's cheese is a simple unripened cheese, similar to cottage cheese, but drier and firmer in texture. It has a mild, slightly tangy flavor and is firm enough to slice or crumble. It's an all-purpose cheese that can be eaten as is or used in cooking. I think it's great spread on fresh bread. I added flat leaf parsley and chives to mine, but it's very good just plain.

Farmer's Cheese

1/2 gallon whole milk (NOT ultra-pasteurized)
1/4 cup white vinegar
1 teaspoon salt
2 tablespoons of any fresh herb, chopped (optional)

**Note: You do not want to use ultra-pasteurized milk for cheese making because a curd will not set. Ultra-pasteurized milk is not always labeled as such, but you can tell because the expiration date is extremely long, usually 30-90 days from the day you buy it. Regular pasteurized milk, however, will work fine for cheese making. Milk from a dairy in your area will give you the best results.

Bring milk to a slow boil. Keep the heat at medium or medium low, otherwise you risk burning the milk to the bottom of the pot.
When small, foamy bubbles begin to form on the surface of the milk, but it is not yet at a rolling boil, turn off the heat. If you have a thermometer, which is helpful, the temperature will read about 190 degrees.

Add the vinegar and stir the milk. You will notice curds immediately beginning to form.

Let the milk sit for 15 minutes. After this time, add any additional flavors (like fresh herbs).
Place a colander over a large bowl or pot. Drape either cheesecloth or a thin dish towel over the colander. Pour the curds into the cheese cloth. The whey (liquid) will drain and be collected in the bowl below and the solids curds will be caught in the cheese cloth.


Parsley and chives for my cheese.

Look at those lovely curds!


Mmmmm

Lift the cheese cloth up and wrap it around the curds, twisting and squeezing to expel moisture. After squeezing out the moisture, the curds for farmer's cheese will be dry and crumbly. If you want a creamier texture, mix a little of the reserved whey back in with the curds. To shape the cheese, keep it wrapped in cheese cloth and form it into a mound on a plate. Set another plate on top and press the curds into a flat disc that is 1-2 inches tall. Cover and refrigerate for an hour or so before removing cheese cloth.


I love the pattern from the cheese cloth!

Buy local, support your local farmers!!